There are a few tools that can be used to communicate with M3 outside of smart office including report writers like DB2 or MySQL for reading, M3 Enterprise Collaborator (MEC) for running transactions and of course my favorite the M3 API toolkit. Out of all these options there are drawbacks to each. The report writing is limited to reading data unless you are living life dangerously. The MEC tool can be complicated and time-consuming to set up and pretty much can’t be done without training or a consultant. The M3 API is not all that user-friendly and can be time-consuming especially with long transactions (like adding new items) and deployment can be a bit of a nightmare.
As mentioned above the M3 API toolkit is by far my favorite way of interacting with M3 outside of smart office typically with some added functionality of table lookups which is a much better way to get info out rather than an API call. The reason for choosing the API is simple. The documentation is excellent and the possibilities are endless! That being said there are still some drawbacks.
- While the API toolkit supports many different languages if you want to use more than one platform transactions will have to be completely rewritten.
- Deployment can be difficult. The toolkit needs to be installed on every computer or device that wants to communicate with M3.
- If database access is desired drivers are required and permissions will need to be granted for every client.
- Some transactions are long and time-consuming to set up.
There is good news though. Hosting your own custom web service using WCF that uses the M3 API toolkit eliminates all of these drawbacks. If your web service is well thought out expanding your functionality and streamlining day-to-day business activities becomes easy.
So let’s get started. Out of all of the transactions in M3 one of the simplest transactions is confirming a pick list because it only requires two inputs. For the sake of getting your feet wet with this new setup without overwhelming you we will start with this transaction. As we run through this example realize that while this transaction is simple the true power of the web service becomes more obvious with more complicated transactions.
Step 1 Start a new project
In Microsoft Visual Studio start a new project using the template WCF Service Application. I’ve named my project M3Ideas. (creative right?)

Once the project opens you will see two important files in the solution explorer on the right. One will be called Service1 and the other will be called IService1. Service1 is a class where all of the code for actually running transactions using the API will take place and IService1 is an example of what our client applications will see and be able to use. Notice that there is both Service Contracts with Operation Contracts which are the functions that our tablets or computer programs will call and there are Data Contracts with Data Members which is how data will be presented to our software. This is what makes the Web Service powerful, we get the ability to create our own objects and essentially make a wrapper class for the M3 API Toolkit that can be used by any program we want that needs to interact with M3.

So lets start renaming the items to suit our needs. Since our goal is to report Pick Lists I’ll chose to rename the IService1 interface to MWS420 after the M3 program for reporting pick lists. Do this in the solution explorer on the right and Visual Studio will rename it everywhere. I’ll also make just one Operation Contract for now called ConfirmPickList which takes two integers, the delivery number and the suffix. Right now I’ll go ahead and delete the CompositeType class below but don’t forget how to make Data Contracts this interface won’t be using them but with longer transactions they are pretty much the greatest thing on earth. At this point my interface looks something like this.

Remember this is just a prototype for what the client applications will get to use. You might be wondering why I named the interface after only one program. What if you want to use more than one program in you web service? The reason I did this is simply for organization and clarity when making the client applications. When I go to run transactions in other programs I will make new interfaces which will look just like this one only with their own name. This will make it so that the client has to not only specify which transaction to run but which interface the transaction comes from. This enables me to use similar function names for more than one program and still know exactly which program the transaction goes with. A good example of this is if I wanted to confirm manufacturing operations in PMS070 I can use similar function names and the client application will easily know which program each transaction belongs to even if the name isn’t as descriptive as it probably should be. It will become more clear what this will look like in future posts where we connect to the web service from our various clients.
Step 2 Set up the transactions
Ok lets look at the Service1.svc file now which is where the code for this transaction will be placed. Go ahead and rename this file to M3.svc and rename the class M3 as well. This is where all the code for the transactions will go. The single most important thing in this file is the interface implementation right after the class name. In an effort to be organized we will use several partial classes rather than one class. Each partial class will implement one of the interfaces we set up for our program. The code will look like this.

Notice that each partial class has a colon before the interface name that it implements. Since I’ve used partial classes each one implements just one of my interfaces. If you really wanted you could use just one regular class that implements all of the interfaces. All you would have to do is list them off and separate them by a comma. I think doing it this way will be a bit more straight forward though.
So now lets get to the fun part and set up the M3 APIs and show the program how to connect to M3 and make the transactions come to life. The first thing we need to do is add a reference to the M3 API. In this example we will use the 64 bit library although you can use whichever one you want. It is interesting to know that the target platform that this service will run on is completely unrelated to the programs that will connect to it. This is another huge advantage to using the web service instead of each client using the API toolkit directly.
To add the reference go ahead and right click on references in the solution explorer and select add reference. On the left select browse and again browse at the bottom and locate the file MVXSockNx64.dll. The file should be located in C:\MvxAPI. Once the file is added you should see the file in the list of references.

Once the reference has been added you can start using the library to communicate with M3. All you need to do is add the using statement at the top of the file and you can start using the library to run transactions. Don’t forget there is a help file that is well documented that will show you how to set up the transactions. Although running these transactions isn’t that elegant the documentation will tell you how to get it done.
To run transactions you will need the port number that the API uses to connect to M3 (there is one of these for each environment), a username and password that is set up in M3 and has permissions to use the APIs that you want to use, as well as the host name. When we are done our transaction will look like this. Note my port numbers might be the same as yours but they don’t have to be. Yours could be different.
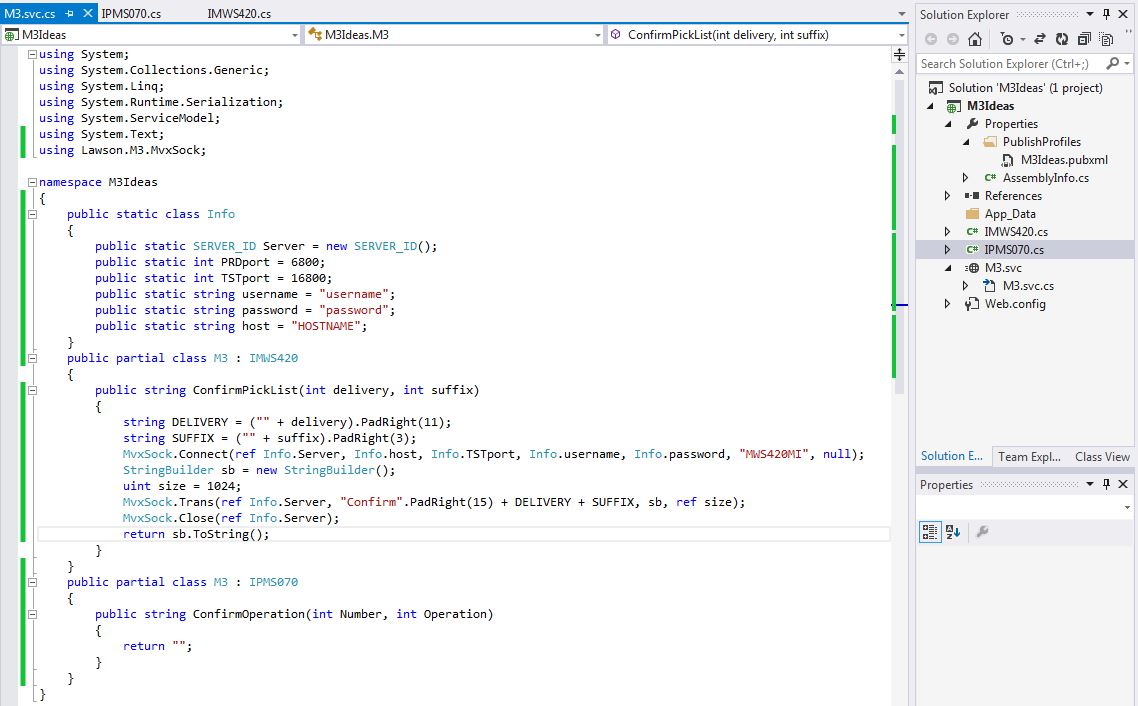
I went ahead and put some of the constant Information in a static class called Info. This will make it so I don’t have to type in the data each time and I can use it in all of my partial classes. I’ve also set up the transaction which is exactly how the documentation says to do it. This includes padding the spaces so that each input is in the correct position of the string.
Step 3 Publish
Now that we have our first transaction set up lets publish it and test it. Once it’s been tested we can change to the port to production. To host the web service you will need a computer or virtual machine that is running IIS. You might need to enable the feature in windows. If you are unsure how to enable the feature a simple google search will walk you through it.
Ok to publish the web service right click on project in the solutions explorer and select publish. Set up a publish configuration to publish to the file system in a folder of your choosing. We’ll copy these files to the computer that will host the service. You will also need to locate the file MvxSockx64.dll file and copy that to folder as well. Go ahead and put it in the bin subfolder with the other libraries that got published. Next copy that folder to the C drive of the computer that will host the service and open IIS. On the left side of the screen expand the tree and right click Default Web Site and select add application. Then show IIS what folder your files will be and name your service.

To verify that your service is up and running expand the tree on the left more and select the application you just added. Then on the far right select browse and it should open a browser. Select the SVC file and it should bring you to a screen with directions how to use it. In the next post I’ll run through some samples on how to use the service to streamline reporting pick lists.
Here is the screen that you should be able to get to. If something happened to go wrong it will be displayed on this screen.

If you have any questions on what the web service can be used for please feel free to ask in the comments. Also if you run into any problems please let me know.
Happy coding.
-The Engineer

Interesting approach. What do you see as the advantages of this vs. the native REST web services exposed in the Grid-enabled versions of M3, or using Infor’s LWS/MWS to expose an API as a SOAP web service?
LikeLike
I’m honestly not all that sure. After I write a few more posts using this setup you will probably be able to answer that question better than me. I’ve never used the built in web services so I don’t really know what their limitations are. The thing I like about this setup is that it is very user friendly for people developing Windows programs. At the end of the day the communication system is pretty much the same both ways though. The big difference will be in programming clients and making your own Data Contracts.
LikeLike
Hi Thibaud, just stumbled into this useful article as I am going to implement REST for the first time; thanks for this. But I want to comment 2 of your statements regarding API’s:
“Deployment can be difficult. The toolkit needs to be installed on every computer or device that wants to communicate with M3.”
Depends on the language and the environment. If you are using a Net language and have Smart Office installed, you can use the Lawson.M3.MI namespace- all objects are there. If you don’t use Smart office but a Net language, you can simply copy the binaries to your program directory; on Windows 64 bit it is MvxSockx64.dll and MvxSockNx64.dll. When these file are added to the Smart Office folder, it is even possible to use API’s in old versions of Smart office, i.e. 9.1.2, which has not support for API communication. No path variable, no registration is required.
“If database access is desired drivers are required and permissions will need to be granted for every client.”
Wrapping an SQL Query in a M3 Web Service is a powerful method to avoid local components. If Smart Office is present on the PC, the DynamicWS dll can be used in a Net application to communicate over Web Services. But you can also create a proxy class in Visual Studio from the WSDL file, or create a fully generic solution by talking via SOAP/HTTP to the M3 Web Service server as SmartData does. In all these cases, the database connection is set up on the MWS Server as an additional Web Service context of type “Database”, with a central JDBC-Driver, and central User Credentials. Carefully developed SQL queries are often faster than API’s and consume less system resources.
/Heiko
LikeLike
Heiko,
I suppose you are right when it comes to copying those files. I guess I sort of had this figured out when I deployed the WCF service and if one of those two files are missing it will throw an exception. You can see that I mention that in the publish section. At one point I had some difficulty deploying a client application and probably didn’t realize at the time the second file was all I needed and that no registration was required. I suppose that in the midst of my difficulty I just installed the toolkit and obviously it started working.
As far as the Database access goes I never had any intention of pulling data from the system using an API call. I agree, that is way too slow and limited in capability compared to a query. Not to mention you have to rip apart super long strings depending on what program you are using. In the above project a direct reference to a database can be made to run a query. The resulting data can then be sent to the clients as objects defined by the data contracts that you’ve set up.
In this setup the idea is that you don’t have to rely on external DLL files in order for your program to run. A good example of this is if you were using a windows tablet and you were using enterprise sideloading to deploy apps. In this case you might avoid external dependencies as a matter of convenience.
One of the other benefits is that the more you run code you remove from the client applications the faster it is to update. Suppose you have a bug in one of your transactions or you want to start adding additional information. Since most of your code resides in the Web service you can update the transaction and the clients will immediately get the fix without having to redeploy the client software. This is of course provided that the contracts haven’t changed.
For me the reason for using a setup like this is to eventually be able to integrate with other software packages including scheduling software. I can also record some additional data in a custom database to get a better analysis of how long manufacturing operations are taking all without having to rely on clients doing it themselves.
On another note if you are looking for customization because you need to run transactions in large quantities on a frequent basis this option is also very attractive because clients can choose to run things asynchronously if they don’t require feedback. This forces the server to do all the work and leaves the client free to move on to the next task.
I think I have a few Ideas of things I can put in my next post to show off what a data lookup looks like as well as what a Client App would look like. I think I can find some time in the next week or so to do some writing. . . Hopefully.
LikeLike