
June 11, 2017 11:03 pm
Further building my Infor ION Grid laboratory for learning purposes, today, I will install the Grid on Ubuntu Linux, a Debian-based Linux distribution.
I will use what I learned in part 5 for the PostgreSQL database, in part 4bis for the console installation mode, in part 2 for the manual installation, and in part 3 for the cryptographic key material. And I will install the latest Grid version 11.1.13.0.77, on the latest Ubuntu Desktop 16.04.2 with Long Term Support (LTS).
Install PostgreSQL on Linux, verify the connection, and set the password for user postgres:
sudo apt-get update
sudo apt-get install postgresql postgresql-contrib
sudo -i -u postgres
psql
\conninfo
\password
\q
exit

The Grid bundled installer (as in part 4bis) throws the following error:
You are installing on an unsupported platform (001)
Console installation FAILED!

Apparently, it is hard-coded to only support Red Hat and Suse, not Ubuntu.

Nonetheless, the Grid is just Java and SQL, so it should work on Ubuntu as well. Let’s try installing it manually instead.
Create the Grid database in PostgreSQL as in part 5, and create the Grid tables as in part 2 with a few changes for the binary data type:
sudo -i -u postgres
createdb InforIONGrid
psql -d InforIONGrid
CREATE TABLE GRIDCONF (
 GRID varchar(64) NOT NULL,
 TYPE varchar(32) NOT NULL,
 NAME varchar(128) NOT NULL,
 TS numeric(20, 0) NOT NULL,
 DATA bytea NULL,
 SEQID numeric(5, 0) NOT NULL
);
INSERT INTO GRIDCONF (GRID, TYPE, NAME, TS, DATA, SEQID) VALUES ('InforIONGrid', 'runtime' , 'null', 0, '<?xml version="1.0" ?>
<runtime xmlns="http://schemas.lawson.com/grid/configuration_v3">
 <bindings />
 <sessionProviders />
 <routers />
 <contextRoots />
 <propertySettings />
</runtime>', 0);
INSERT INTO GRIDCONF (GRID, TYPE, NAME, TS, DATA, SEQID) VALUES ('InforIONGrid', 'topology' , 'null', 0, '<?xml version="1.0" ?>
<topology xmlns="http://schemas.lawson.com/grid/configuration_v3">
 <hosts>
 <host name="localhost" address="127.0.0.1" gridAgentPort="50003" />
 </hosts>
 <registry host="localhost" port="50004" />
</topology>', 0);

Verify with a JDBC client:

Install the Grid manually as in part 2:
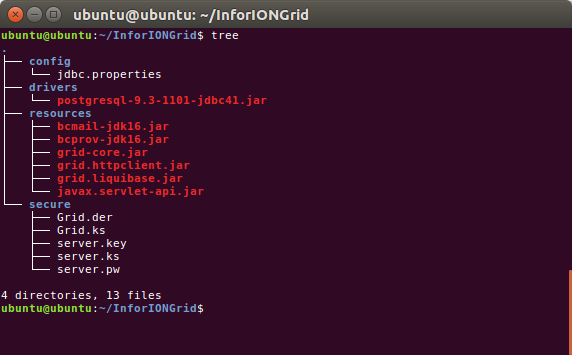
Create the file and folder structure, with the JAR files, and JDBC driver:
jdbc.properties:
driverDir=/home/ubuntu/InforIONGrid/drivers/
url=jdbc:postgresql://localhost:5432/InforIONGrid
dbType=postgresql
user=postgres
encryptedPwd=cGFzc3dvcmQxMjM=
schema=public
Create the cryptographic key material as in part 3:
java -cp resources/grid-core.jar:resources/bcprov-jdk16.jar:resources/bcmail-jdk16.jar com.lawson.grid.security.Certificates -create=gridcert -gridname InforIONGrid -gridpassword password123 -gridkeystore secure
java -cp resources/grid-core.jar:resources/bcprov-jdk16.jar:resources/bcmail-jdk16.jar com.lawson.grid.security.Certificates -create=hostcert -gridname InforIONGrid -gridpassword password123 -hostname localhost -gridkeystore secure -hostkeystore secure -role grid-admin -address localhost -address ::1 -address 127.0.0.1 -address example.com -unresolved
java -cp resources/grid-core.jar:resources/bcprov-jdk16.jar:resources/bcmail-jdk16.jar com.lawson.grid.security.Certificates -create=symkey -gridname InforIONGrid -gridkeystore secure -gridpassword password123 -symkeypath secure -hostkeystore secure -hostname localhost
Start the Grid:
java -cp resources/grid-core.jar:resources/bcprov-jdk16.jar:resources/bcmail-jdk16.jar:resources/grid.liquibase.jar:drivers/sqljdbc42.jar:resources/javax.servlet-api.jar:resources/grid.httpclient.jar com.lawson.grid.Startup -registry -configDir . -host localhost -logLevel ALL

The result is a Grid as usual, in Ubuntu:

I put the install.sh script on my GitHub. I tested it with a stock Ubuntu Live DVD, and it works like a charm, installing and launching a Grid in less than a minute.
I made a demo here: I boot the stock Ubuntu Live DVD, I download the Grid and the install.sh script, I execute the script, it installs the Grid (the minimal version of part 2), and it launches the Grid:
From here, you can finish the rest of part 2 for the Configuration Import & Edit and Topology View, and continue to part 2bis for the Default Router, Developer Session Provider, Administrative Router, Configuration Manager, web user interface, and Grid Agent.
That was an illustrated guide on how to install the Infor ION Grid manually on Ubuntu Linux and PostgreSQL, for learning purposes. I had to use everything I learned in this series so far.
That’s it! Thanks for reading until here.
Posted by thibaudatwork
Categories: Infor ION Grid
Tags: Grid
Mobile Site | Full Site
Get a free blog at WordPress.com Theme: WordPress Mobile Edition by Alex King.
[…] Building an Infor Grid Lab – Part 6 June 11, 2017 […]
LikeLike
By Building an Infor Grid Lab – Part 5 – M3 ideas on June 12, 2017 at 2:01 am
[…] Building an Infor Grid Lab – Part 6 June 11, 2017 […]
LikeLike
By Building an Infor Grid Lab – Part 4bis – M3 ideas on June 12, 2017 at 2:02 am
[…] Building an Infor Grid Lab – Part 6 June 11, 2017 […]
LikeLike
By Building an Infor Grid Lab – Part 2bis – M3 ideas on June 12, 2017 at 2:03 am
[…] Building an Infor Grid Lab – Part 6 June 11, 2017 […]
LikeLike
By Building an Infor Grid Lab – Part 4 – M3 ideas on June 12, 2017 at 2:04 am
[…] Building an Infor Grid Lab – Part 6 June 11, 2017 […]
LikeLike
By Building an Infor Grid Lab – Part 3 – M3 ideas on June 12, 2017 at 2:06 am
[…] Building an Infor Grid Lab – Part 6 June 11, 2017 […]
LikeLike
By Building an Infor Grid Lab – Part 2 – M3 ideas on June 12, 2017 at 2:07 am
[…] Building an Infor Grid Lab – Part 6 June 11, 2017 […]
LikeLike
By Building an Infor Grid Lab – Part 1 – M3 ideas on June 12, 2017 at 2:08 am
Catchy, crafty
Alain
LikeLike
By Anonymous on June 12, 2017 at 4:18 pm
[…] Building an Infor Grid Lab – Part 6 June 11, 2017 […]
LikeLike
By Building an Infor Grid Lab – Part 6bis – M3 ideas on June 13, 2017 at 4:05 am
UPDATE: We don’t need to install postgresql-contrib, just postgresql.
LikeLike
By thibaudatwork on June 15, 2017 at 10:44 pm
[…] Building an Infor Grid Lab – Part 6 June 11, 2017 […]
LikeLike
By Building an Infor Grid Lab – Part 7 – M3 ideas on June 16, 2017 at 5:03 am
[…] Building an Infor Grid Lab – Part 6 June 11, 2017 […]
LikeLike
By Building an Infor Grid Lab – Part 8 – M3 ideas on July 7, 2017 at 5:55 pm