I am building an Infor ION Grid laboratory manually without LifeCycle Manager (LCM) for my learning purposes. In part 2, I had made the installation using cryptographic keys taken from an existing Grid installation. Today, I will create new keys.
About
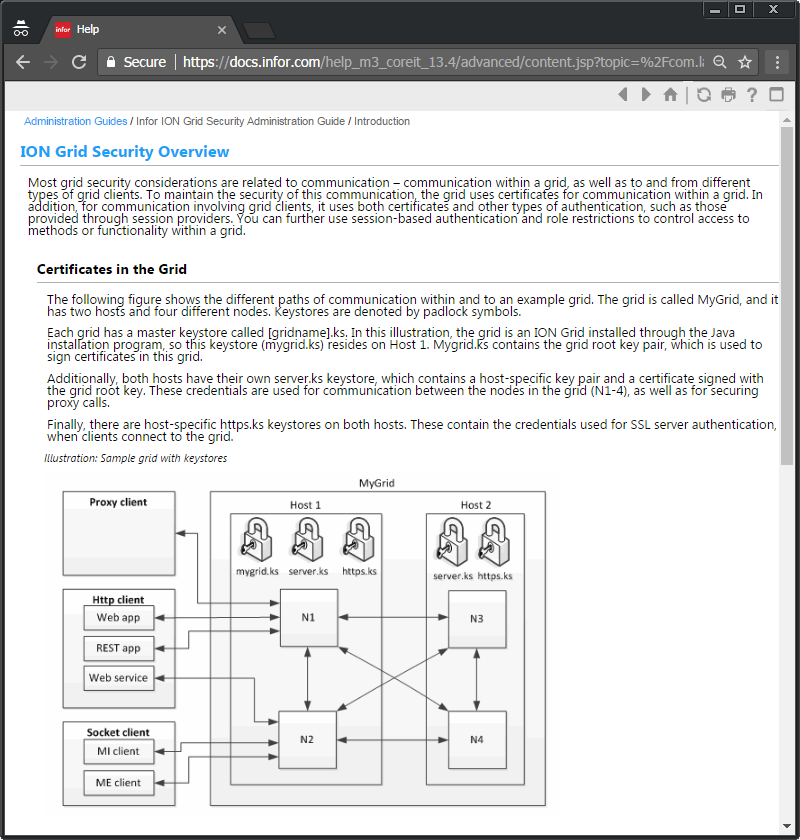
The Grid uses TLS to ensure privacy, authentication, and integrity of communication within the Grid. That involves asymmetric cryptography, public/private key pairs, key exchange, digital certificates, digital signatures, symmetric keys, ciphers, etc.
Thankfully the Grid automates most of it. It uses the Java Cryptography Extension (JCE), the Bouncy Castle Crypto APIs, and 2048 bit RSA key pairs. The key material is unique to each installation.
Documentation
The Infor Documentation Infocenter has an Infor ION Grid Security Administration Guide:
Disclaimer
The Infor documentation that is publicly available covers the default cryptographic properties of the Grid such as algorithms, providers, cipher suites, block cipher modes of operation, hashing functions, padding, key length, paths, file names, etc.; the Internet covers cryptography in general; and I am not revealing any secrets; therefore, I am revealing no more information than what is already available publicly. Besides, revealing cryptographic properties does not reveal any secrets, therefore Infor is not revealing any secrets either. Besides, the default properties can be changed to suit our needs. The security of a cryptosystem depends not on the knowledge of its cryptographic properties, but on its implementation and on the security of the secret key material. Thus, it is important you keep your systems up-to-date, and keep your secret key material secure. In doubt, read Auguste Kerckhoffs’s principle, “il faut qu’il puisse sans inconvénient tomber entre les mains de l’ennemi” or Claude Shannon’s maxim, “we shall assume that the enemy knows the system being used.”
Key material
For a minimalist Grid installation, we need the following four files, they are unique to each installation:

For the Grid, we need these files, where the file names must match the Grid name, e.g. Grid:
- Grid.ks: this is the Java keystore for the Grid. It contains the Grid’s public/private key pair, and the Grid self-signed certificate which will be the root certificate authority (CA) to sign other keys.
- Grid.pw (optional): this is the clear text password for both keystore and private key.
For each host, we need these files, where the file names are server:
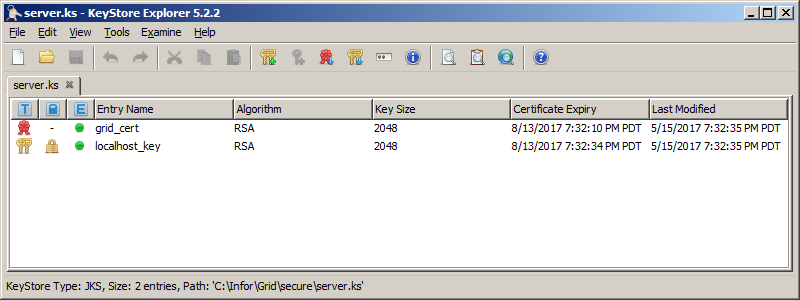
- server.ks: this is the Java keystore for the host. It contains the host’s public/private key pair, and the host certificate signed by the Grid.
- server.pw: this is the clear text password for both keystore and private key.
- server.key: this is a symmetric key, signed and encrypted, used to encrypt/decrypt protected Grid properties.
In a production environment, keep all these files secure.
Console tool
The Grid has a console tool that automatically creates the key material:
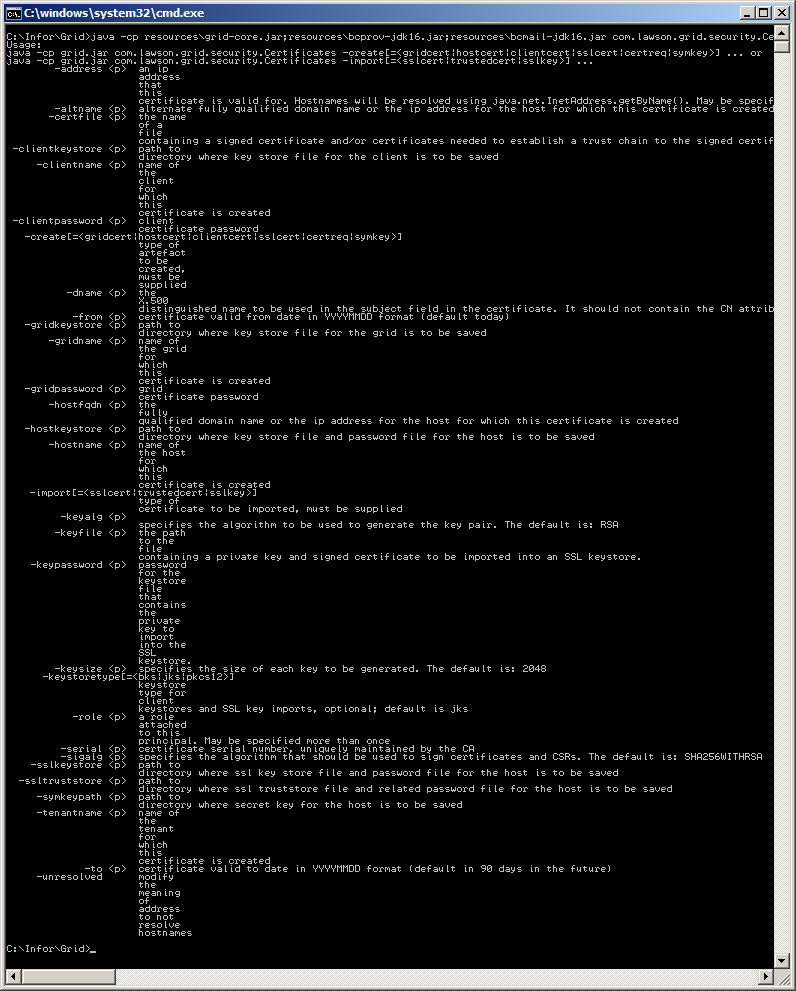
In addition to the console tool, I will show the equivalent command using the Java keytool, and I will inspect the result with KeyStore Explorer.
1. Create Grid material
Use this command to create new key material for the Grid (replace the parameter values with your values, and use a strong password):
java ^
 -cp resources\grid-core.jar;resources\bcprov-jdk16.jar;resources\bcmail-jdk16.jar ^
 com.lawson.grid.security.Certificates ^
 -create=gridcert ^
 -gridname Grid ^
 -gridpassword password123 ^
 -gridkeystore secure

It produces these two files:
- Grid.der
- Grid.ks
Note: Grid.der is the root CA that typically system administrators will push to the users computers, and then those computers will automatically trust the certificates of M3, Smart Office, etc.
Note: Unfortunately, the command does not automatically generate a strong password for this keystore, which leaves it vulnerable to user choice.


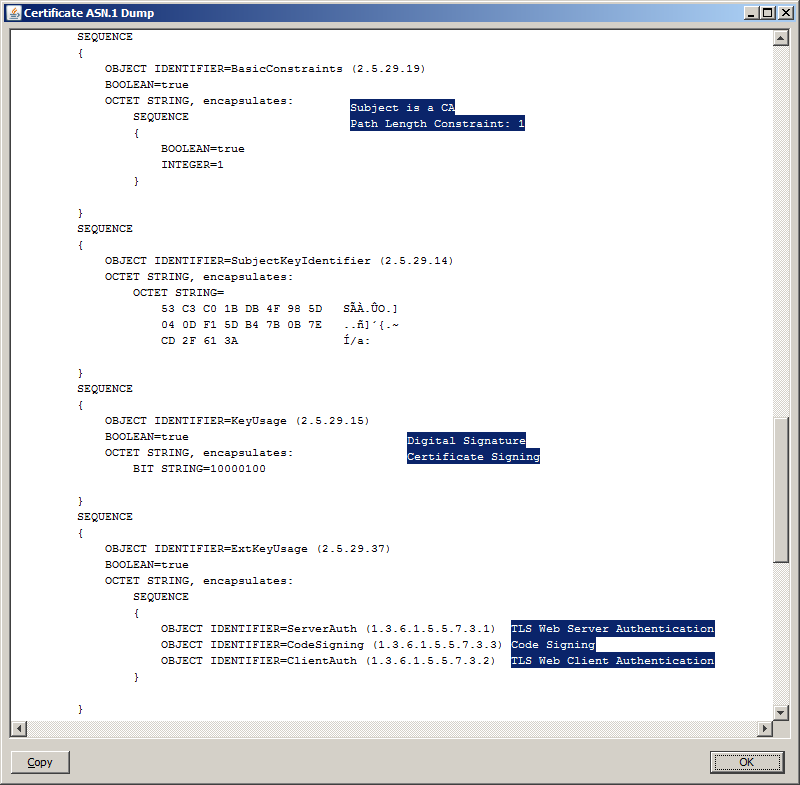
The Grid certificate has the following extensions:
- Basic Constraints: Subject is a CA, Path Length Constraint: 1
- Subject Key Identifier
- Key Usage: Digital Signature, Certificate Signing
- Extended Key Usage: TLS Web Server Authentication, Code Signing, TLS Web Client Authentication
Alternatively, instead of the console tool, we can use the Java keytool:
keytool ^
 -genkeypair ^
 -keyalg RSA ^
 -keysize 2048 ^
 -sigalg SHA256WITHRSA ^
 -dname cn=Grid ^
 -ext BasicConstraints=ca:true,pathlen:1 ^
 -ext KeyUsage=digitalSignature,keyCertSign ^
 -ext ExtendedkeyUsage=serverAuth,codeSigning,clientAuth ^
 -validity 90 ^
 -keypass password123 ^
 -keystore secure\Grid.ks ^
 -storepass password123
Then, we need to do some export/import to add the certificate as a separate entry:
keytool ^
 -exportcert ^
 -file secure\Grid.der ^
 -keystore secure\Grid.ks ^
 -storepass password123
keytool ^
 -changealias ^
 -alias mykey ^
 -destalias grid_key ^
 -keypass password123 ^
 -keystore secure\Grid.ks ^
 -storepass password123
keytool ^
 -noprompt ^
 -importcert ^
 -alias mykey ^
 -file secure\Grid.der ^
 -keypass password123 ^
 -keystore secure\Grid.ks ^
 -storepass password123
keytool ^
 -changealias ^
 -alias mykey ^
 -destalias grid_cert ^
 -keypass password123 ^
 -keystore secure\Grid.ks ^
 -storepass password123

2. Create host material
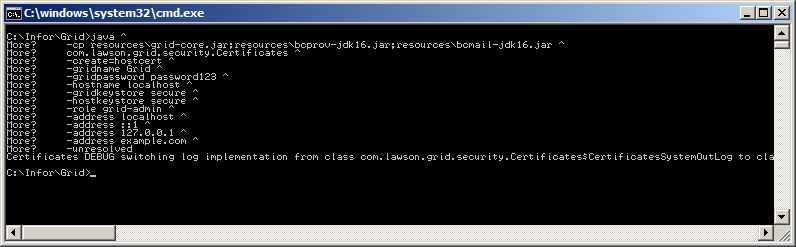
Use this command to create new key material for the host (replace the parameter values with your values, and add as many roles and addresses as needed for this host):
java ^
 -cp resources\grid-core.jar;resources\bcprov-jdk16.jar;resources\bcmail-jdk16.jar ^
 com.lawson.grid.security.Certificates ^
 -create=hostcert ^
 -gridname Grid ^
 -gridpassword password123 ^
 -hostname localhost ^
 -gridkeystore secure ^
 -hostkeystore secure ^
 -role grid-admin ^
 -address localhost ^
 -address ::1 ^
 -address 127.0.0.1 ^
 -address example.com ^
 -unresolved
It produces these two files:
- server.ks
- server.pw
Note: Fortunately, the command automatically generates a strong password for this keystore.

The host certificate has extensions for the role (e.g. grid-admin), for the host actor (SYSTEM), for the IP addresses and hostnames:

Alternatively, instead of the console tool, we can use the Java keytool. But it is tricky for we have to add the certificate extensions in hexadecimal. The IANA enterprise number for Lawson Software (Infor) is 10105. The OID names can be found in the OID repository. Note: Thomas Fanto registered child OID 238 for the Grid runtime information in 2009, but somehow the console tool uses child OID 237 instead, which is not reserved. Anyway, dump the OID values as hexadecimal (e.g. grid-admin is 677269642D61646D696E, and SYSTEM is 53595354454D). Prefix them with the ASN.1 UTF8String tag byte of 0x0C to encapsulate them as a UTF-8 String and with the byte length in HEX (e.g. grid-admin is 10 bytes long which is 0x0A, and SYSTEM is 6 bytes long which is 0x06). For the sequences, prefix them with the SEQUENCE tag byte of 0x30 and with the sequence byte length (e.g. 9+3+9+11+2*4 = 40 = 0x28).
keytool ^
 -genkey ^
 -alias localhost_key ^
 -keyalg RSA ^
 -keysize 2048 ^
 -sigalg SHA256WITHRSA ^
 -dname cn=localhost ^
 -ext 1.3.6.1.4.1.10105.237.0.2=300C0C0A677269642D61646D696E ^
 -ext 1.3.6.1.4.1.10105.237.0.3=0C0653595354454D ^
 -ext 1.3.6.1.4.1.10105.237.0.4=30280C096C6F63616C686F73740C033A3A310C093132372E302E302E310C0B6578616D706C652E636F6D ^
 -validity 90 ^
 -keypass password123 ^
 -keystore secure\server.ks ^
 -storepass password123

Then, we need to create a certificate signing request (CSR) for the host certificate, sign it with the Grid root CA, and import the resulting chain to the keystore:
keytool ^
 -certreq ^
 -alias localhost_key ^
 -keyalg SHA256WITHRSA ^
 -file secure\server.csr.txt ^
 -keystore secure\server.ks ^
 -storepass password123
keytool ^
 -gencert ^
 -infile secure\server.csr.txt ^
 -outfile secure\server.der ^
 -keystore secure\Grid.ks ^
 -storepass password123 ^
 -alias grid_key ^
 -ext BC=0
keytool ^
 -importcert ^
 -noprompt ^
 -trustcacerts ^
 -alias grid_key ^
 -file secure\Grid.der ^
 -keystore secure\server.ks ^
 -storepass password123
keytool ^
 -importcert ^
 -trustcacerts ^
 -alias localhost_key ^
 -file secure\server.der ^
 -keystore secure\server.ks ^
 -storepass password123
Then, save the keystore password with:
echo | set /p="password123" > secure\server.pw
3. Create symmetric material
Use this command to create new symmetric key material (replace the parameter values with your values):
java ^
 -cp resources\grid-core.jar;resources\bcprov-jdk16.jar;resources\bcmail-jdk16.jar ^
 com.lawson.grid.security.Certificates ^
 -create=symkey ^
 -gridname Grid ^
 -gridkeystore secure ^
 -gridpassword password123 ^
 -symkeypath secure ^
 -hostkeystore secure ^
 -hostname localhost

It produces this file:
- server.key
It is used to encrypt/decrypt protected Grid properties such as passwords:


Alternatively, we can generate the server.key in Java by taking the Grid certificate’s distinguished name in ASN.1 DER encoded form, signing it with the Grid’s private key, and encrypting it with the host’s public key, but I am not allowed to show the source code for that, and I am struggling with replicating it with the OpenSSL RSA utility and AES encryption. So use the Grid command tool above to generate server.key.
Result
We now have the new unique necessary and sufficient cryptographic key material for a minimalist Grid, and the Grid successfully validates it:
successfully initialized secret key
successfully initialized server keystore

GitHub
I collected all the commands in my GitHub at keys.cmd.
Future work
Next time, I would like to:
- Generate the symmetric key with OpenSSL
- Continue researching security vulnerabilities
- Use the new Grid installer
- Setup an administrative router
- Setup session providers
- Install applications
- Install the Grid on Linux and PostgreSQL
Conclusion
That was an illustration of how to manually create – for learning purposes – new cryptographic keys for a minimalist installation of the Infor ION Grid using the built-in tools, and alternatively using the Java keytool. I am learning so I probably missed a few things. Thankfully the Grid console tool automates most of it.
That’s it! Congratulations if you’ve made it so far.
Related posts
- Building an Infor Grid Lab – Part 1 – early Grid version 0.x
- Building an Infor Grid Lab – Part 2 – latest Grid version 11.x
- Building an Infor Grid Lab – Part 2bis – Configuration Manager
- Building an Infor Grid Lab – Part 3 – Cryptographic keys
- Building an Infor Grid Lab – Part 4 – Grid installer
- Building an Infor Grid Lab – Part 4bis – Console and silent install
- Building an Infor Grid Lab – Part 5 – PostgreSQL database
- Building an Infor Grid Lab – Part 6 – Ubuntu Linux
- Building an Infor Grid Lab – Part 6bis – CentOS Linux
- Building an Infor Grid Lab – Part 7 – Virtual Private Cloud

10 thoughts on “Building an Infor Grid Lab – Part 3”