M3 MI Data Import for Web Services (MDIWS)

I just learned the existence of the M3 MI Data Import for Web Services (MDIWS), which is the equivalent of the traditional M3 Data Import (MDI) but using the M3 API REST/JSON endpoint instead of the traditional proprietary binary endpoint.

The tool and documentation are straightforward, so I will just promote it here with some screenshots:

Here are the executable and documentation:

Here is a sample semicolon separated CSV file with data, no header:

Here is the tool in action:

As a reference, here is the traditional M3 Data Import tool:

Thanks Björn P. for the tool.

That’s it!

Easy export/import M3 with JavaScript 6

Last week I had to copy several M3 Supplier CRS620 records, from one company CONO into another company, and I found this elegant solution using JavaScript 6.

Classic approach

Traditionally, I would have used M3 API or SQL to export the records to a CSV file in my computer, change the company number, and use M3 Data Import (MDI) to import the CSV into the other company. But the API LstSuppliers does not output all the fields, so I would have had to use GetBasicData, record by record. It is trivial, but it is tedious because of the many steps and tools involved, and it is antiquated.

A new approach

Instead, I have been wanting to learn JavaScript 6 (ECMAScript 6th Edition), so I challenged myself to learn this new solution using the M3 API REST web service and ES6.

Using ES6 is elegant because the result is very concise (only two lines of relevant code), and it is very expressive using: arrow functions (the new anonymous functions), map/reduce and array comprehension, Promises (the new deferred; chaining, fluid programming), and the fetch API (the new XMLHttpRequest).

Here is the source code in ES6:

var baseUrl = "https://hostname:21108/m3api-rest/execute/CRS620MI/";
["1069112004", "1069112005", "1069112006", "1069112007", "1069112008", "1069112009", "1069112010"]
    .forEach(SUNO => GetBasicData(930, SUNO)
        .then(data => AddSupplier(702, "USA", data)));

function GetBasicData(CONO, SUNO) {
    var url = baseUrl + "GetBasicData;cono=" + encodeURIComponent(CONO) + "?SUNO=" + encodeURIComponent(SUNO);
    return fetch(url, {
        credentials: 'same-origin',
        headers: { 'Accept': 'application/json', }})
        .then(response => response.json());
}

function AddSupplier(CONO, DIVI, data) {
    var url = baseUrl + "AddSupplier;cono=" + encodeURIComponent(CONO) + ";divi=" + encodeURIComponent(DIVI) + "?";
    data.MIRecord[0].NameValue.map(o => url += "&" + o.Name + "=" + encodeURIComponent(o.Value));
    return fetch(url, {
        credentials: 'same-origin',
        headers: { 'Accept': 'application/json', }});
}

/*
optional:
console.log([data.MIRecord[0].NameValue.find(o => o.Name === "CONO").Value, data.MIRecord[0].NameValue.find(o => o.Name === "SUNO").Value]);
console.log([response.url.split("?")[1].split("&").find(pair => pair.split("=")[0] === "SUNO").split("=")[1], data.Message]);
*/

We have to run this in the JavaScript console of a browser that supports ES6 and the fetch API, such as Google Chrome, and we have to login to the Infor ION Grid Management Pages to have an authenticated session.

Here is the result:
result1

And we can inspect the request/responses in the network tab:result2

That’s it!

Thanks for reading. Leave us a comment in the section below. And if you liked this, please subscribe, like, share, and come write the next blog post with us.

How to call M3 API from Pentaho Spoon (PDI)

HI, I am Walter. This is my first post in this blog which was usefull just more than once for me in past … now I want to contribute something also from my side…

In past I have done a lot of data exports and imports via M3API over VBA in Excel. This works fine too, but this has 2 problems:

  1. you have to pay attention if you share the files (security)
  2. there are no good practicable solution for automation of the scripts

In past I have done a lot of work also with data integration tools, one of the most used is Pentaho Spoon (PDI). So I startet some investigation of how to integrate M3 API with PDI. This is a short how to call M3 API using the data integration tool Pentaho Spoon (ex. Kettle), also known as Pentaho PDI.

Data integration tools are usefull for extracting, manipulating and writing data from and to different in and outputs.

pdi-screen2

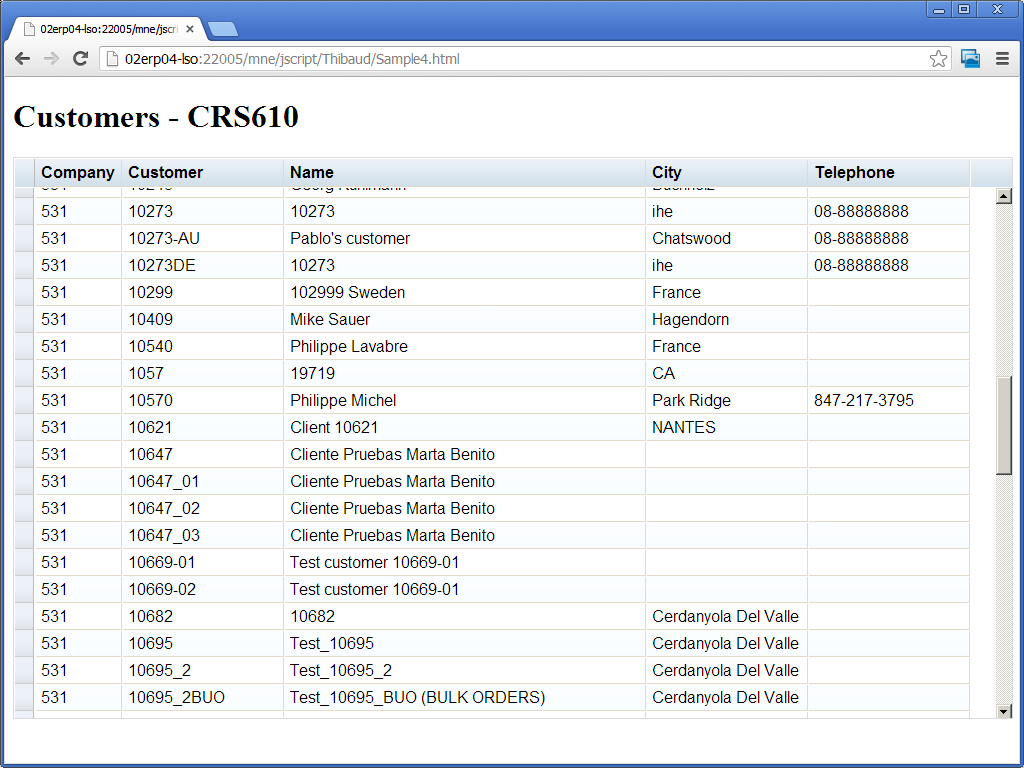
In this example I use Kettle to extract Customerdata, transform it and save it in a csv file.

Pentaho Spoon is a very powerful tool, is based on a opensource licence and the community edition can be downloaded here. The package is platform independent and the transformation files can be build in Windows, and used on a Linux environemnt or viceversa. Probably only some path variables must be changed.

Preparation

This example is based on windows environment, but the same can be done without any problems also on Linux environment.

  1. Download the Pentaho PDI package from the link above. Unzip the package and copy/paste the folder where every you want. For example directly under C:\
  2. You need a newer version of API Toolkit where also java library is available. All you need for this example is the library MvxAPI.jar which normally is located in the MvxAPI Folder.
  3. Copy the MvxAPI.jar lib to the lib Folder of Pentaho PDI, normally located in the data-integration folder.
  4. Start Pentaho PDI

Lets start

The target is to read data from M3 via the M3 API. For this purpose we use the Java library. Pentaho PDI uses graphical transformation steps which help you to create a data transformation. For some of this steps it needs also little bit of programming knowledge. But don’t worry, there are many examples in the MvxAPI package about calling M3 API via Java. And also for Pentaho PDI there are many examples for each transformation step.

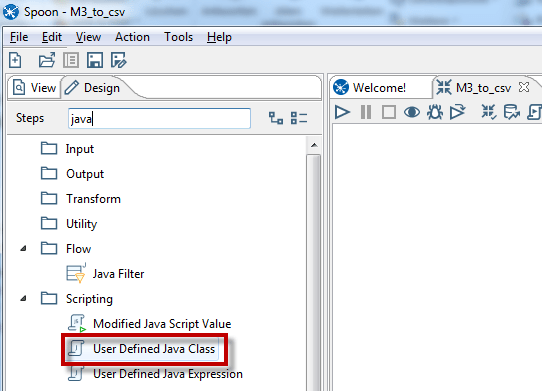
For calling M3 API via PDI we use the transformation step “User Defined Java Class” (UDJC)

pdi_java2

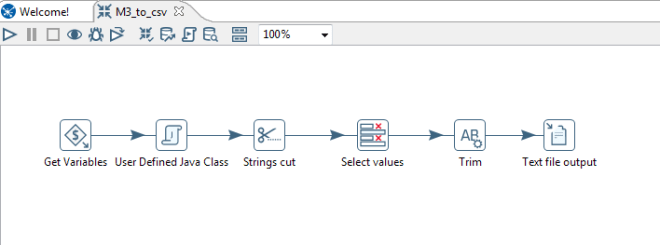
In total for this example I have used 6 different transformation steps:

  1. Get Variables – call variables from kettle.properties file located under your home/.kettle directory
    sysvar
  2. User defined Java Class – Call API and forward all retrieved records to next step.
  3. Strings cut – split the API stream in individual fields.
  4. Select values – filtering of columns which should be forwarded to next step.
  5. Trim – trim the blanks before and after the column values.
  6. Text file output – write the selected and cleaned values in a csv file.

It looks like this now:

trans

As just explained you need to make some java development in the UDJC (User defined java class) step. Here is my piece of cake:

import java.util.regex.Pattern;
import java.util.*;
import MvxAPI.*;

private Pattern p = null;
private FieldHelper fieldToTest = null;
private FieldHelper outputField = null;

private ArrayList keys = null;
private int idx = 0;

MvxSockJ obj2;
int i, j, x;
String str,str2;
String sendstr;
double ver;
String test, MvxERR;

public boolean processRow(StepMetaInterface smi, StepDataInterface sdi) throws KettleException
{
//Initialize rows
Object[] r = getRow();
if (r == null) {
setOutputDone();
return false;
}

//assign system variables from previous step (kettle.properties)
String M3_System = get(Fields.In, “M3_System”).getString(r);
int M3_Port = get(Fields.In, “M3_Port”).getInteger(r).intValue();
String M3_User = get(Fields.In, “M3_User”).getString(r);
String M3_Pass = get(Fields.In, “M3_Pass”).getString(r);

//Create new row output
r = createOutputRow(r, data.outputRowMeta.size());

/**
* Setup communication parameters for M3
*/
//open the connection with system variables forwarded from previous step
obj2=new MvxSockJ(M3_System, M3_Port, “”, 0, “”);

obj2.DEBUG = true; // Have MvxSockJ print out debug info

//Call the MI with user and pass forwarded from previous step
i = obj2.mvxInit(“”, M3_User, M3_Pass, “CRS610MI”);

if(i>0) {
get(Fields.Out, “error”).setValue(r, “Error: ” +obj2.mvxGetLastError());
putRow(data.outputRowMeta, r);
return true;
}

ver=obj2.mvxVersion();
get(Fields.Out, “version”).setValue(r, ver);

/**
* Build the transaction
*/
sendstr = “LstByNumber    1            “;

//Set max records
str=obj2.mvxTrans(“SetLstMaxRec   50          “);

//Run the transaction
str=obj2.mvxTrans(sendstr);

if(str.startsWith(“NOK”)) {
get(Fields.Out, “error”).setValue(r, “Error:” +str);
}

x=0;

if(str != null) {
while (str.startsWith(“REP”)) {
x=x+1;
/**
* This prints out the whole returned string without trying to
* extract particular fields from the layout.
*/

// Set key and value in a new output row
get(Fields.Out, “crs610_stream”).setValue(r, str);
get(Fields.Out, “idx”).setValue(r, x);

// Send the row to the next step.
putRow(data.outputRowMeta, r);
str=obj2.mvxRecv();
}
}
else
get(Fields.Out, “error”).setValue(r, “Error: ” +obj2.mvxGetLastError());
putRow(data.outputRowMeta, r);
i=obj2.mvxClose(); // close connection
return true;
}

The class is calling the CRS610MI and reads the first 50 records. This records are forwarded then to the next step.

At the end the of the transformation the output is saved in the file C:\TEMP\crs610.csv

The whole transformation with all contained steps will be saved in a file with .ktr extension. Here you can download the example file! You have to accept the self signed certificate. Don’t worry, there is no risk 😉

Conclusion

After a short time of investigation I was able to build a really performant transformation. For reading, transforming and writing up to 10.000 records the transformation it needs less the 30 seconds. In my eyes a good performance.

Clearly you can do all what do you want with the data, save in another database, combine the data with additional datasources, save in Excel or send to another server via REST, SOAP, JSON webservice, or whatever is your requirement.

If you are not familiar with Pentaho PDI (Spoon) there are many How to’s in the web, in the Examples folder are many examples which gives you an idea how to work with PDI.

And for me the most important function that the transformation can be scheduled in combination with “Kittchen”, which is also part of Pentaho PDI.

Next steps

My next target is to write data via API in M3 using PDI. I will keep you updated about it. Hope this is may usefull for somebody of you! Let me know.. if you have any questions let me know.

Thank you,
Walter

M3 API protocol dissector for Wireshark

Have you ever needed to troubleshoot M3 API calls in Wireshark? Unfortunately, the M3 API protocol is a proprietary protocol. Consequently, Wireshark does not understand it, and it just gives us raw TCP data as a stream of bytes.

Abstract

I implemented a simple protocol dissector for Wireshark that understands the M3 API protocol, i.e. it parses the TCP stream to show the M3 API bytes in a human-readable format, with company (CONO), division (DIVI), user id (USID), and MI program (e.g. CRS610MI). The dissector is currently not complete and only parses the MvxInit request phase of the protocol.

Reverse engineering

I reverse engineered the M3 API protocol thanks to MvxLib, a free and open source client implementation of the protocol in C# by Mattias Bengtsson (now deprecated), and thanks to MvxSockJ, the official and closed-source client implementation of the protocol in Java (up-to-date).

3 2

MvxInit

The MvxInit phase of the protocol is the first phase of the protocol for connection and authentication, and it has the following structure:

struct MvxInit
{
   struct request {
      int size;
      char Command[5]; // PWLOG
      char CONO_DIVI[32];
      char USID[16];
      char PasswordCiphertext[16]; // password ^ key
      char MIProgram[32]; // e.g. CRS610MI
      char ApplicationName[32]; // e.g. MI-TEST
      char LocalIPAddress[16];
   };
   struct response {
      int size_;
      char message[15];
   };
};

Wireshark Generic Dissector

I used the Wireshark Generic Dissector (wsgd) to create a simple dissector. It requires two files: a data format description, and a file description.

The data format description m3api.fdesc is very similar to the C struct above, where the header is required by wsgd:

struct header
{
   byte_order big_endian;
   uint16 id;
   uint16 size;
}
struct body
{
   struct
   {
      uint32 size;
      string(5) Command;
      string(32) CONO_DIVI;
      string(16) USID;
      string(16) PasswordCiphertext;
      string(32) MIProgram;
      string(32) ApplicationName;
      string(16) LocalIPAddress;
   } MvxInit;
}

Given the limitations of wsgd and its message identifier, I could not solve how to parse more than one type of message, so I chose the MvxInit request, and the rest will throw errors.

I made a test M3 API call to M3BE, I captured it in Wireshark, and I saved the TCP stream as a binary file (I anonymized it so I can publish it here):

Then, I used wsgd’s byte_interpret.exe (available on the wsgd downloads), using that test binary file, to fine tune my data format description until it was correct:
byte_interpret.exe m3api.fdesc -frame_bin Test.bin

Then, here is the wsgd file description m3api.wsgd; note how I listed the TCP port numbers of my M3 API servers (DEV, TST, PRD):

PROTONAME M3 API protocol
PROTOSHORTNAME M3API
PROTOABBREV m3api

PARENT_SUBFIELD tcp.port
PARENT_SUBFIELD_VALUES 16305 16405 16605 # DEV TST PRD

MSG_HEADER_TYPE header
MSG_ID_FIELD_NAME id
MSG_SUMMARY_SUBSIDIARY_FIELD_NAMES size
MSG_TOTAL_LENGTH size + 4
MSG_MAIN_TYPE body

PROTO_TYPE_DEFINITIONS
include m3api.fdesc;

To activate the new dissector in Wireshark, simply drop the wsgd generic.dll file into Wireshark’s plugins folder, and drop the two above files into Wireshark’s profiles folder:

Then, restart Wireshark, and start capturing M3 API calls. Wireshark will automatically parse the TCP stream as M3 API protocol for the port numbers you specified in the data format description.

Result

Here is a resulting capture between MI-Test and M3BE. Note how you can filter the displayed packets by m3api. Note how the protocol dissector understands the phase of the M3 API protocol (MvxInit), the company (CONO), division (DIVI), user id (USID), and MIProgram (CRS610MI). Also, I wrote C code to decrypt the password ciphertext, but I could not solve where to put that code in wsgd, so the dissector does not decrypt the password.

Limitations and future work

  • I am using M3BE 15.1.2. The M3 API protocol may be different for previous or future versions of M3.
  • I am doing user/password authentication. The M3 API protocol supports other methods of authentication.
  • Given the limitations of wsgd and its message identifier, I will most likely discontinue using wsgd.
  • Instead, I would write a protocol dissector in LUA.
  • Ideally, I should write a protocol dissector in C, but that is over-kill for my needs.

Conclusion

That was a simple M3 API protocol dissector for Wireshark that parses and displays M3 API bytes into a human readable format to help troubleshoot M3 API calls between client applications and M3 Business Engine.

About the M3 API protocol

The M3 API protocol is a proprietary client/server protocol based on TCP/IP for third-party applications to make API calls to Infor M3 Business Engine (M3BE). It was created a long time ago when Movex was on AS/400. It is a very simple protocol, lean, efficient, with good performance, it is available in major platforms (IBM System i, Microsoft Windows Intel/AMD, SUN Solaris, Linux, 32-bit, 64-bit, etc.), it is available in major programming languages (C/C++, Win32, Java, .NET, etc.), it supports Unicode, it supports multiple authentication methods, and it has withstood the test of time (since the nineties). It has been maintained primarily by Björn P.

The data transits in clear text. The protocol had an optional encryption available with the Blowfish cipher, but that feature was removed. Now, only the password is encoded with a XOR cipher during MvxInit. If you need to make secure calls, use the M3 API SOAP or REST secure endpoints of the Infor Grid.

For more information about M3 API, refer to the documentation in the M3 API Toolkit:
4

How to call M3 API from the Grid application proxy

Here is how to call M3 API using the MI-WS application proxy of the Infor Grid.

This is useful if we want to benefit from what is already setup in the Grid and not have to deal with creating our own connection to the M3 API server with Java library, hostname, port number, userid, password, connection pool, etc.

Note: For details on what Grid application proxies are, refer to the previous post.

MI-WS application proxy

The MI-WS application is part of the M3 Business Engine Foundation. We will need foundation-client.jar to compile our classes:
1b

Step 1. Logon to the Grid

First, login to the Grid from your application and get a SessionId and optionally a GridPrincipal.

From a Grid application:

import com.lawson.grid.proxy.access.GridPrincipal;
import com.lawson.grid.proxy.access.SessionController;
import com.lawson.grid.proxy.access.SessionId;

// get session id
SessionId sid = ??? // PENDING
GridPrincipal principal = ??? // PENDING;

From a client application outside the Grid:

import com.lawson.grid.proxy.access.GridPrincipal;
import com.lawson.grid.proxy.access.SessionId;
import com.lawson.grid.proxy.access.SessionProvider;
import com.lawson.grid.proxy.access.SessionUtils;
import com.lawson.grid.proxy.ProxyException;

// logon and get session id
SessionUtils su = SessionUtils.getInstance(registry);
SessionProvider sp = su.getProvider(SessionProvider.TYPE_USER_PASSWORD);
SessionId sid;
try {
    sid = sp.logon(userid, password.toCharArray());
} catch (ProxyException e) {
    ...
}
GridPrincipal principal = su.getPrincipal(sid);

Step 2. Call the M3 API

Second, call the M3 API, for example CRS610MI.LstByNumber, and get the result:

import java.util.ArrayList;
import java.util.List;
import com.lawson.grid.proxy.ProxyClient;
import com.lawson.grid.proxy.ProxyException;
import com.lawson.miws.api.data.MIParameters;
import com.lawson.miws.api.data.MIParameters.ColumnList;
import com.lawson.miws.api.data.MIRecord;
import com.lawson.miws.api.data.MIResult;
import com.lawson.miws.api.MITransactionException;
import com.lawson.miws.proxy.MIAccessProxy;

// get the proxy
MIAccessProxy proxy = (MIAccessProxy)registry.getProxy(MIAccessProxy.class);

// login to M3
ProxyClient.setSessionId(proxy, sid);

// prepare the parameters
MIParameters paramMIParameters = new MIParameters();
paramMIParameters.setProgram("CRS610MI");
paramMIParameters.setTransaction("LstByNumber");
paramMIParameters.setMaxReturnedRecords(10);

// set the return columns
ColumnList returnColumns = new ColumnList();
List<String> returnColumnNames = new ArrayList<String>();
returnColumnNames.add("CONO");
returnColumnNames.add("CUNO");
returnColumnNames.add("CUNM");
returnColumns.setReturnColumnNames(returnColumnNames);
paramMIParameters.setReturnColumns(returnColumns);

// execute
MIResult result;
try {
	result = proxy.execute(paramMIParameters);
} catch (MITransactionException e) {
	...
} catch (ProxyException e) {
	...
}

// show the result
List<MIRecord> records = result.getResult();
for (MIRecord record: records) {
	record.toString();
}

Note: When I use ColumnList it throws java.io.NotSerializableException: com.lawson.miws.api.data.MIParameters$ColumnList. It appears to be a bug in that the ColumnList class is missing implements Serializable. I reported it in Infor Xtreme incident 8629267.

That’s it. Please let me know what you think in the comments below.

Hosting a Custom Web Service with the M3 API Toolkit

There are a few tools that can be used to communicate with M3 outside of smart office including report writers like DB2 or MySQL for reading, M3 Enterprise Collaborator (MEC) for running transactions and of course my favorite the M3 API toolkit. Out of all these options there are drawbacks to each. The report writing is limited to reading data unless you are living life dangerously. The MEC tool can be complicated and time-consuming to set up and pretty much can’t be done without training or a consultant. The M3 API is not all that user-friendly and can be time-consuming especially with long transactions (like adding new items) and deployment can be a bit of a nightmare.

As mentioned above the M3 API toolkit is by far my favorite way of interacting with M3 outside of smart office typically with some added functionality of table lookups which is a much better way to get info out rather than an API call. The reason for choosing the API is simple. The documentation is excellent and the possibilities are endless! That being said there are still some drawbacks.

  1. While the API toolkit supports many different languages if you want to use more than one platform transactions will have to be completely rewritten.
  2. Deployment can be difficult. The toolkit needs to be installed on every computer or device that wants to communicate with M3.
  3. If database access is desired drivers are required and permissions will need to be granted for every client.
  4. Some transactions are long and time-consuming to set up.

There is good news though. Hosting your own custom web service using WCF that uses the M3 API toolkit eliminates all of these drawbacks. If your web service is well thought out expanding your functionality and streamlining day-to-day business activities becomes easy.

So let’s get started. Out of all of the transactions in M3 one of the simplest transactions is confirming a pick list because it only requires two inputs. For the sake of getting your feet wet with this new setup without overwhelming you we will start with this transaction. As we run through this example realize that while this transaction is simple the true power of the web service becomes more obvious with more complicated transactions.

Step 1 Start a new project

In Microsoft Visual Studio start a new project using the template WCF Service Application. I’ve named my project M3Ideas. (creative right?)

OpenProject

Once the project opens you will see two important files in the solution explorer on the right. One will be called Service1 and the other will be called IService1. Service1 is a class where all of the code for actually running transactions using the API will take place and IService1 is an example of what our client applications will see and be able to use. Notice that there is both Service Contracts with Operation Contracts which are the functions that our tablets or computer programs will call and there are Data Contracts with Data Members which is how data will be presented to our software. This is what makes the Web Service powerful, we get the ability to create our own objects and essentially make a wrapper class for the M3 API Toolkit that can be used by any program we want that needs to interact with M3.

NewWebService

So lets start renaming the items to suit our needs. Since our goal is to report Pick Lists I’ll chose to rename the IService1 interface to MWS420 after the M3 program for reporting pick lists. Do this in the solution explorer on the right and Visual Studio will rename it everywhere. I’ll also make just one Operation Contract for now called ConfirmPickList which takes two integers, the delivery number and the suffix. Right now I’ll go ahead and delete the CompositeType class below but don’t forget how to make Data Contracts this interface won’t be using them but with longer transactions they are pretty much the greatest thing on earth. At this point my interface looks something like this.

MWS420

Remember this is just a prototype for what the client applications will get to use. You might be wondering why I named the interface after only one program. What if you want to use more than one program in you web service? The reason I did this is simply for organization and clarity when making the client applications. When I go to run transactions in other programs I will make new interfaces which will look just like this one only with their own name. This will make it so that the client has to not only specify which transaction to run but which interface the transaction comes from. This enables me to use similar function names for more than one program and still know exactly which program the transaction goes with. A good example of this is if I wanted to confirm manufacturing operations in PMS070 I can use similar function names and the client application will easily know which program each transaction belongs to even if the name isn’t as descriptive as it probably should be. It will become more clear what this will look like in future posts where we connect to the web service from our various clients.

Step 2 Set up the transactions

Ok lets look at the Service1.svc file now which is where the code for this transaction will be placed. Go ahead and rename this file to M3.svc and rename the class M3 as well. This is where all the code for the transactions will go. The single most important thing in this file is the interface implementation right after the class name. In an effort to be organized we will use several partial classes rather than one class. Each partial class will implement one of the interfaces we set up for our program. The code will look like this.

PartialClasses

Notice that each partial class has a colon before the interface name that it implements. Since I’ve used partial classes each one implements just one of my interfaces. If you really wanted you could use just one regular class that implements all of the interfaces. All you would have to do is list them off and separate them by a comma. I think doing it this way will be a bit more straight forward though.

So now lets get to the fun part and set up the M3 APIs and show the program how to connect to M3 and make the transactions come to life. The first thing we need to do is add a reference to the M3 API. In this example we will use the 64 bit library although you can use whichever one you want. It is interesting to know that the target platform that this service will run on is completely unrelated to the programs that will connect to it. This is another huge advantage to using the web service instead of each client using the API toolkit directly.

To add the reference go ahead and right click on references in the solution explorer and select add reference. On the left select browse and again browse at the bottom and locate the file MVXSockNx64.dll. The file should be located in C:\MvxAPI. Once the file is added you should see the file in the list of references.

Reference

Once the reference has been added you can start using the library to communicate with M3. All you need to do is add the using statement at the top of the file and you can start using the library to run transactions. Don’t forget there is a help file that is well documented that will show you how to set up the transactions. Although running these transactions isn’t that elegant the documentation will tell you how to get it done.

To run transactions you will need the port number that the API uses to connect to M3 (there is one of these for each environment), a username and password that is set up in M3 and has permissions to use the APIs that you want to use, as well as the host name. When we are done our transaction will look like this. Note my port numbers might be the same as yours but they don’t have to be. Yours could be different.

ConfirmPickList

I went ahead and put some of the constant Information in a static class called Info. This will make it so I don’t have to type in the data each time and I can use it in all of my partial classes. I’ve also set up the transaction which is exactly how the documentation says to do it. This includes padding the spaces so that each input is in the correct position of the string.

Step 3 Publish

Now that we have our first transaction set up lets publish it and test it. Once it’s been tested we can change to the port to production. To host the web service you will need a computer or virtual machine that is running IIS. You might need to enable the feature in windows. If you are unsure how to enable the feature a simple google search will walk you through it.

Ok to publish the web service right click on project in the solutions explorer and select publish. Set up a publish configuration to publish to the file system in a folder of your choosing. We’ll copy these files to the computer that will host the service. You will also need to locate the file MvxSockx64.dll file and copy that to folder as well. Go ahead and put it in the bin subfolder with the other libraries that got published. Next copy that folder to the C drive of the computer that will host the service and open IIS. On the left side of the screen expand the tree and right click Default Web Site and select add application. Then show IIS what folder your files will be and name your service.

IISSetup

To verify that your service is up and running expand the tree on the left more and select the application you just added. Then on the far right select browse and it should open a browser. Select the SVC file and it should bring you to a screen with directions how to use it. In the next post I’ll run through some samples on how to use the service to streamline reporting pick lists.

Here is the screen that you should be able to get to. If something happened to go wrong it will be displayed on this screen.

BrowserM3Service

If you have any questions on what the web service can be used for please feel free to ask in the comments. Also if you run into any problems please let me know.

Happy coding.

-The Engineer

How to call an M3-API with Angular JS and from a web page

I’m new to JAvascript, and Angular JS has given me a challenge but a great tool for manipulating web page content. It’s a MVC framework that’s recommended by a few colleagues.

The details below outline how to create a webpage to:

a) Get a list of customers ordered by Customer Number from M3
b) display on a web page the customer number, customer name and customer phone number.

This will be a custom webpage that can be called within Infor’s H5 client. As there are no customisations available yet, Javascript + Angular JS is a good open source alternative.

Continue reading How to call an M3-API with Angular JS and from a web page

Data conversion techniques

Here below is an old slide I found in my archives where I list my known techniques for data conversion, i.e. how to push data into Infor M3, also known as data entry. This list intends to remind readers there are more solutions than the traditional techniques.

Data conversionTechniques

Traditional entry points

The two traditional entry points are:

  1. API – The traditional entry point is to call M3 API. Advantages: it’s the fastest and most reliable technique, and the most widespread in terms of platforms supported, libraries, tools, and documentation. Disadvantages: there aren’t M3 API available for every program/field/operation in M3, as given by the M3 API Repository – MRS001.
  2. MDP – When there’s no M3 API available, we use the other traditional entry point, Lawson Web Services (LWS) of type M3 Display Program (MDP) to simulate a user going through the screens at the middleware level in M3 Net Extension (MNE). Advantages: with the Lawson Web Services Designer we can create the equivalent of an M3 API, for most M3 Programs, in almost no time. Disadvantage: it’s less efficient to run than M3 API as there are more layers to traverse.

Those are the traditional techniques. And we massively call them with for example M3 Data Import (MDI), Smart Data Tool (SDT), M3 E-Collaborator (MeC), Visual Basic macros in Microsoft Excel, ProcessFlow Integrator (PFI), Infor Process Automation (IPA), Tibco, WebMethods, or custom Java/C#/VB programs, with the data coming from a source like for example a Microsoft Excel spreadsheet, a CSV or plain text file, or a staging database.

Alternate techniques

If the traditional entry points fail, there are two alternate techniques.

  1. Manual entry – We can always do manual data entry. Advantage: it requires almost no skills, no programming, and no tools. Disadvantage: it can become humanly impossible to manually enter large amounts of data.
  2. MAK – Alternatively, we can write an M3 modification with MAK, to create a new API or modify an existing one. Advantages: it’s the ultimate solution. Disadvantages: it requires an MAK developer, it can take time, and M3 mods create a maintenance problem.

Despair techniques

Then, there are the following techniques which are less know and which I use when I’m at a loss of ideas:

  1. MForms Automation – When there are no M3 API available, and when Lawson Web Services of type MDP fail for rare M3 programs, we can try to reproduce the steps with MForms Automation and write a Smart Office Script that loops thru a data source and executes the MForms Automation at each iteration. This is a proven technique and Seth will soon write a post illustrating this solution. Advantage: It’s the last card on the deck when you lost hope. Disadvantage: It’s less efficient because it’s at the user interface level.
  2. Bookmarks – Similarly, we can write a Smart Office Script to execute Bookmarks in a loop of the form mforms://bookmark?program=CRS620&tablename=CIDMAS&keys=IDCONO…
  3. MNEAI – Likewise, we can inject a piece of JavaScript in M3 Workplace to simulate a user’s data entry, and loop through a data source we get with JavaScript.
  4. H5 Client – We can do the same JavaScript injection for H5 Client.
  5. Macro – We can record the mouse movement and click events, and the keyboard keystrokes, and use a Windows program to replay them. Advantages: It’s the last solution available out of desperation. Disadvantage: it will break at the slightest change in window position or popup, and it will be slow.

Forbidden techniques

Finally, as a reminder, we never use SQL INSERT/UPDATE/DELETE to M3, as that would break the integrity of the ERP, it would bypass the cache of the data abstraction layer, and it would void warranty for support.

That’s it! Thanks for reading. Subscribe below.

How to render M3 API using Dojo DataGrid

Here is a solution to render the response of an Infor M3 API request into the Dojo DataGrid. This post is a continuation of my previous posts, How to call M3 API using the Dojo Toolkit, how to call M3 API with jQuery DataTables, and How to call an M3 Web Service using jQuery. Also, this is a solution for IBrix no longer supported.

<html>
<head>
<link rel="stylesheet" href="//ajax.googleapis.com/ajax/libs/dojo/1.9.1/dijit/themes/claro/claro.css">
<style type="text/css">
@import "//ajax.googleapis.com/ajax/libs/dojo/1.9.1/dojox/grid/resources/claroGrid.css";
#gridDiv {
 width: 1000px;
 height: 35em;
}
</style>
<script>dojoConfig = {parseOnLoad: true}</script>
<script src="//ajax.googleapis.com/ajax/libs/dojo/1.9.1/dojo/dojo.js"></script>
<script>
require(['dojo/_base/lang', 'dojox/grid/DataGrid', 'dojo/data/ItemFileWriteStore', 'dojo/dom', 'dojo/domReady!', 'dojo/request/xhr'],
function (lang, DataGrid, ItemFileWriteStore, Button, dom, xhr) {

    // make the M3 API request with dojo/request/xhr
    xhr('/m3api-rest/execute/CRS610MI/LstByNumber', {
       method: 'GET',
       withCredentials: true,
       user: 'Tschneider',
       password: '********',
       headers: {'Accept': 'application/json'},
       handleAs: 'json',
    }).then(render);

    // render the M3 API response with Dojo DataGrid
    function render(response) {
        // set up data store
        var data = {
            identifier: "id",
            items: []
        };
        var data_list = [];
        // loop thru the MIResponse
        for (var i in response.MIRecord) {
            // transform each MIRecord to an associative array accessible by key
            var record = {};
            response.MIRecord[i].NameValue.map(function (o) {
                record[o.Name] = o.Value;
            });
            // move each record to the data_list of the DataGrid
            data_list[i] = {
                col1: record['CONO'],
                col2: record['CUNO'],
                col3: record['CUNM'],
                col4: record['TOWN'],
                col5: record['PHNO'],
            };
        }
        for (var i = 0, l = data_list.length; i < data_list.length; i++) {
            data.items.push(lang.mixin({id: i + 1}, data_list[i % l]));
        }
        var store = new ItemFileWriteStore({data: data});

        // setup the DataGrid layout
        var layout = [[
            {'name': 'Company', 'field': 'col1', 'width': '75px'},
            {'name': 'Customer', 'field': 'col2', 'width': '150px'},
            {'name': 'Name', 'field': 'col3', 'width': '350px'},
            {'name': 'City', 'field': 'col4', 'width': '150px'},
            {'name': 'Telephone', 'field': 'col5', 'width': '150px'}
        ]];

        // create a new grid
        var grid = new DataGrid({
            id: 'grid',
            store: store,
            structure: layout,
            rowSelector: '20px'
        });

        // append the new grid to the div
        grid.placeAt("gridDiv");

        // call startup() to render the grid
        grid.startup();
    }
});
</script>
</head>
<body class="claro">
     <h1>Customers - CRS610</h1>
    <div id="gridDiv"></div>
</body>
</html>

Here is a screenshot of the result:

2

Note 1: The DataGrid will automatically provide client-side sorting and pagination, which in the case of M3 API is not suitable because we receive 100 records by default. So we have to implement our own server-side sorting and pagination, as well as handle positioning.

Note 2: I don’t like the solution too much as the data is copied seemingly four times in memory: in the response, in the data_grid, in the data, and in the store. There is most probably a solution to improve this memory footprint. I haven’t investigated yet.

Related articles

How to call M3 API using the Dojo Toolkit

Here is a solution to call Infor M3 API on the client-side using the Dojo Toolkit. This is a continuation of the previous posts, how to call M3 API with jQuery DataTables, and How to call an M3 Web Service using jQuery.

First, create an HTML file somewhere on the same domain as the M3 API REST endpoint as I explained in a previous post, for example:
1

Second, use the new dojo/request/xhr to make the HTTP Request to M3 API with REST/JSON:

<html>
<head>
<script src="//ajax.googleapis.com/ajax/libs/dojo/1.9.1/dojo/dojo.js"></script>
<script>
    require(['dojo/request/xhr'],
    function (xhr) {
        xhr('/m3api-rest/execute/CRS610MI/LstByNumber', {
        method: 'GET',
        withCredentials: true,
        user: 'Tschneider',
        password: '********',
        headers: {'Accept': 'application/json'},
        handleAs: 'json',
    }).then(function (response) {
        for (var i in response.MIRecord) {
            var record = {};
            response.MIRecord[i].NameValue.map(function (o) {
                record[o.Name] = o.Value; // transform each record to an associative array accessible by a key
            });
            console.log(record['CONO'] + ': ' + record['CUNO'] + ': ' + record['COR2'] + ': ' + record['WHLO'] + ': ' + record['TOWN']);
        }
    });
});
</script>
</head>
<body>
</body>
</html>

Then, open the webpage in a browser, in my case I used the Google Chrome JavaScript console (CTRL+SHIFT+J) to output the M3 API response:
2
That’s it! In a next post, I will show how to render the data using the Dojo DataGrid.

UPDATE 2013-07-10: To improve performance of client-side code for multiple M3 API requests, we can use the M3 API Pooling, the Generic pooling mechanism for client programs.