Application messages in Infor Smart Office

Here is an illustration of application messaging in Infor Smart Office to send, broadcast, and receive messages, and process responses between applications in Smart Office, whether in scripts, Mashups, or other entities.

Documentation

The Infor Smart Office SDK Developer’s Guide has Chapter 19 Application messages, and the Smart Office SDK help file has the API reference for Mango.UI.Services.Messages.ApplicationMessageService:
3

Note: For more information on the Smart Office SDK refer to my previous post.

Scripts

Here are some examples of sending, broadcasting and receiving messages, and processing responses in Smart Office scripts; the other party in the communication can be another script, a Mashup or another entity in Smart Office.

To send a message and process the response:

import Mango.UI.Services.Messages;

package MForms.JScript {
	class ApplicationA {
		public function Init(element: Object, args: Object, controller : Object, debug : Object) {
			// send message
			var message: ApplicationMessage = new ApplicationMessage();
			message.Sender = "ApplicationA";
			message.Recipient = "ApplicationB";
			message.Parameter = "Hello World";
			var response: ApplicationMessageResponse = ApplicationMessageService.Current.SendMessage(message);
			// process response
			response.MessageStatus;
			response.Result;
		}
	}
}

To receive a message and return a response:

import Mango.UI.Services.Messages;

package MForms.JScript {
	class ApplicationB {
		public function Init(element: Object, args: Object, controller : Object, debug : Object) {
			ApplicationMessageService.Current.AddRecipient("ApplicationB", OnMessage);
		}
		function OnMessage(message: ApplicationMessage): ApplicationMessageResponse {
			message.Sender;
			message.Recipient;
			message.Parameter;
			var response: ApplicationMessageResponse = new ApplicationMessageResponse();
			response.MessageStatus = MessageStatus.OK;
			response.Result = "Bonjour";
			return response;
		}
	}
}

To broadcast a message (there is no response):

import Mango.UI.Services.Messages;

package MForms.JScript {
	class ApplicationC {
		public function Init(element: Object, args: Object, controller : Object, debug : Object) {
			var broadcastMessage: ApplicationMessage = new ApplicationMessage();
			broadcastMessage.Sender = "ApplicationC";
			broadcastMessage.Recipient = "GroupX";
			broadcastMessage.Parameter = "HELLO WRRRLD!!!!!!";
			ApplicationMessageService.Current.SendBroadcastMessage(broadcastMessage);
		}
	}
}

To receive a broadcasted message (there is no response):

import Mango.UI.Services.Messages;

package MForms.JScript {
	class ApplicationD {
		public function Init(element: Object, args: Object, controller : Object, debug : Object) {
			ApplicationMessageService.Current.AddBroadcastRecipient("GroupX", OnBroadcastMessage);
		}
		function OnBroadcastMessage(message: ApplicationMessage) {
			message.Sender;
			message.Recipient;
			message.Parameter;
		}
	}
}

Mashups

Here are some examples of sending, broadcasting and receiving messages in Smart Office Mashups (there are no responses); the other party in the communication can be another Mashup, a script or another entity in Smart Office.

To send a message (there is no response):

<Grid xmlns="http://schemas.microsoft.com/winfx/2006/xaml/presentation" xmlns:x="http://schemas.microsoft.com/winfx/2006/xaml" xmlns:ui="clr-namespace:Mango.UI.Controls;assembly=Mango.UI" xmlns:mashup="clr-namespace:Mango.UI.Services.Mashup;assembly=Mango.UI">
	<Button Name="BtnMessage" Content="Send" Width="150" />
	<mashup:ApplicationMessageControl Name="test">
		<mashup:ApplicationMessageControl.Events>
			<mashup:Events>
				<mashup:Event SourceName="BtnMessage" SourceEventName="Click" TargetEventName="Send" Debug="True">
					<mashup:Parameter TargetKey="Sender" Value="MashupE" />
					<mashup:Parameter TargetKey="Recipient" Value="MashupF" />
					<mashup:Parameter TargetKey="Parameter" Value="Hello World" />
				</mashup:Event>
			</mashup:Events>
		</mashup:ApplicationMessageControl.Events>
	</mashup:ApplicationMessageControl>
</Grid>

To receive a message (there is no response):

 <Grid xmlns="http://schemas.microsoft.com/winfx/2006/xaml/presentation" xmlns:x="http://schemas.microsoft.com/winfx/2006/xaml" xmlns:ui="clr-namespace:Mango.UI.Controls;assembly=Mango.UI" xmlns:mashup="clr-namespace:Mango.UI.Services.Mashup;assembly=Mango.UI">
	<mashup:ApplicationMessageControl Name="test" Recipient="MashupF">
		<mashup:ApplicationMessageControl.Events>
			<mashup:Events>
				<mashup:Event SourceEventName="Received" Debug="True">
					<mashup:Parameter SourceKey="Sender" />
					<mashup:Parameter SourceKey="Recipient" />
					<mashup:Parameter SourceKey="Parameter" />
				</mashup:Event>
			</mashup:Events>
		</mashup:ApplicationMessageControl.Events>
	</mashup:ApplicationMessageControl>
</Grid>

To broadcast a message:

<mashup:Event...TargetEventName="Broadcast">

To receive a broadcasted message:

<mashup:ApplicationMessageControl...BroadcastRecipient="Everyone">

Illustration

Here is an illustration of messages going in all directions between scripts and Mashups:
r

More

The ApplicationMessageService API has more methods and properties available:

  • You can send multiple parameters and multiple result values with Dictionary<string, Object>.
  • You can return different MessageStatus values depending on your needs, for example OK, Failed or InvalidMessage.
  • You can send a message asynchronously to not block the UI; but there is no response.
  • You should verify if the recipient already exists before adding a message handler; otherwise you will get the exception “A recipient with the key has already been added.”
  • You can remove recipients.

Refer to the SDK documentation for more information.

That’s it. Please like, comment, share, follow, contribute.

Integrating Zeacom call center with Infor Smart Office

Here is a source code that a customer and I worked out to integrate the Zeacom call center with Infor Smart Office such that their customer service representatives can receive phone calls from their customers and automatically launch the respective M3 customer programs; this is similar to the previous integration work with Cisco Agent Desktop, Twilio, Skype, etc.

This source code is a script assembly in C#; for more information on script assemblies see here and here. The trick was to keep the z variable as a global variable, not as a local variable, so it can survive in memory for the event handlers.

You will need to reference the DLL files from your Zeacom software.

using Mango.UI;
using MForms;
using System;
using System.Collections.Generic;
using System.Linq;
using System.Text;
using System.Windows;

namespace MForms.JScript
{
	public class ZeacomAssembly
	{
		MLINTERFACELib.ZeacomMLI z = new MLINTERFACELib.ZeacomMLI();

		public void Init(object element, object args, object controller, object debug)
		{
			string phoneExt = "1234";
			if (z.AddExtension(phoneExt))
				if (z.Initialise())
					z.OnNewExtensionCall += OnNewExtensionCall;
		}

		private void OnNewExtensionCall(object Extension, object Call)
		{
			Application.Current.Dispatcher.Invoke(new ShowInformationDelegate(ShowInformation), new object[] {Extension, Call});
		}

		private delegate void ShowInformationDelegate(object Extension, object Call);

		private void ShowInformation(object Extension, object Call)
		{
			ConfirmDialog.ShowInformationDialog("Incoming Call", "MLI Event: OnNewExtensionCall(: " + ((MLINTERFACELib.IExtension)Extension).AddressName + ", " + ((MLINTERFACELib.ICall)Call).CallReference + OutputCallInfo((MLINTERFACELib.ICall)Call));
		}
		private string OutputCallInfo(MLINTERFACELib.ICall Call)
		{
			StringBuilder CallString = new StringBuilder();
			if (Call != null)
			{
				CallString.AppendLine("CalledID = " + Call.CalledId);
				CallString.AppendLine("Caller = " + Call.Caller);
				CallString.AppendLine("CallOrigin = 0x" + Call.CallOrigin.ToString("X"));
				CallString.AppendLine("CallReason = 0x" + Call.CallReason.ToString("X"));
				CallString.AppendLine("CallReference = 0x" + Call.CallReference.ToString("X"));
				CallString.AppendLine("CLI = " + Call.CLI);
				CallString.AppendLine("CLIA = " + Call.CLIA);
				CallString.AppendLine("CLIF = " + Call.CLIF);
				CallString.AppendLine("CLIP = " + Call.CLIP);
				CallString.AppendLine("DNIS = " + Call.DNIS);
				CallString.AppendLine("Pilot = " + Call.Pilot);
				CallString.AppendLine("Query = " + Call.Query);
				CallString.AppendLine("QueryName = " + Call.QueryName);
				CallString.AppendLine("Queue = " + Call.Queue);
				CallString.AppendLine("RelatedRef = 0x" + Call.RelatedRef.ToString("X"));
				CallString.AppendLine("TransferredID = " + Call.TransferredId);
				CallString.AppendLine("TransferrerID = " + Call.TransferrerId);
				CallString.AppendLine("Trunk = " + Call.Trunk);
				CallString.AppendLine("Type = " + Call.Type);
				CallString.AppendLine("Wait = " + Call.Wait);

				if (Call.DataCallPayloadString.Length > 0)
					CallString.AppendLine("DataCallPayloadString = '" + Call.DataCallPayloadString + "'");

				CallString.AppendLine("");
			}
			return CallString.ToString();
		}
	}
}

Open source address validation for Infor M3 using UPS

In the series for the open source address validation for Infor M3, I just added to the GitHub repository a sample script to do address validation using the UPS Address Validation – Street Level API.

UPS Address Validation – Street Level

You will need an access key with UPS to access the API, documentation and samples:
2

Sample HTTP request/response

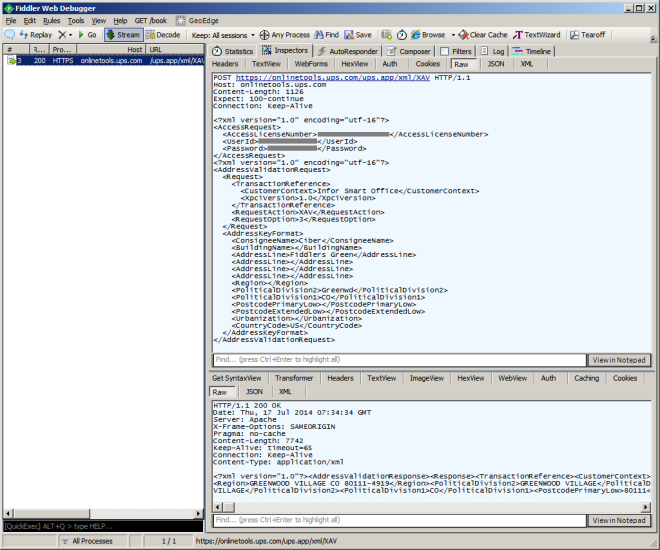
Once you have the access key and documentation, you need to submit an HTTP POST request with two concatenated XML documents:
5

Sample script

Here is the sample TestUPS.js script for Infor Smart Office:

 import System;
 import System.IO;
 import System.Net;
 import System.Xml;
 import System.Xml.Linq;

 /*
     Sample script for Infor Smart Office to validate addresses with the UPS Street Level API
     PENDING: replace authentication and address values + error handling + background thread + user interface
     https://www.ups.com/upsdeveloperkit
 */

 package MForms.JScript {
     class TestUPS {
         public function Init(element: Object, args: Object, controller : Object, debug : Object) {
             // authentication
             var doc1: XDocument = new XDocument(
                 new XDeclaration("1.0", "utf-8"),
                 new XElement("AccessRequest",
                     new XElement("AccessLicenseNumber", "****************"),
                     new XElement("UserId", "******"),
                     new XElement("Password", "********")
                 )
             );
             // address
             var doc2: XDocument = new XDocument(
                 new XDeclaration("1.0", "utf-8"),
                 new XElement("AddressValidationRequest",
                     new XElement("Request",
                         new XElement("TransactionReference",
                             new XElement("CustomerContext", "Infor Smart Office"),
                             new XElement("XpciVersion", "1.0"),
                         ),
                         new XElement("RequestAction", "XAV"),
                         new XElement("RequestOption", "3")
                     ),
                     new XElement("AddressKeyFormat",
                         new XElement("ConsigneeName", "Ciber"),          // Name
                         new XElement("BuildingName", ""),
                         new XElement("AddressLine", "Fiddlers Green"),   // Address line 1
                         new XElement("AddressLine", ""),                 // Address line 2
                         new XElement("AddressLine", ""),                 // Address line 3
                         new XElement("AddressLine", ""),                 // Address line 4
                         new XElement("Region", ""),
                         new XElement("PoliticalDivision2", "Greenwd"),   // City
                         new XElement("PoliticalDivision1", "CO"),        // State
                         new XElement("PostcodePrimaryLow", ""),          // Zip5
                         new XElement("PostcodeExtendedLow", ""),         // Zip4
                         new XElement("Urbanization", ""),
                         new XElement("CountryCode", "US")                // Country
                     )
                 )
             );
             // concatenate both XML docs
             var sw: StringWriter = new StringWriter();
             doc1.Save(sw);
             doc2.Save(sw);
             var docs: String = sw.GetStringBuilder().ToString();
             // HTTP request
             var request: HttpWebRequest = HttpWebRequest(WebRequest.Create("https://onlinetools.ups.com/ups.app/xml/XAV"));
             request.Method = "POST";
             var byteArray: byte[] = System.Text.Encoding.UTF8.GetBytes(docs);
             var dataStream: Stream = request.GetRequestStream();
             dataStream.Write(byteArray, 0, byteArray.Length);
             dataStream.Close();
             // HTTP response
             var response: HttpWebResponse = request.GetResponse();
             var data: Stream = response.GetResponseStream();
             var doc: XmlDocument = new XmlDocument();
             doc.Load(data);
             data.Close();
             response.Close();
             // check for errors
             var error: XmlNode = doc.SelectSingleNode("//Response/Error");
             if (error != null) {
                 debug.WriteLine("Error " + error.SelectSingleNode("ErrorCode").InnerText + ": " + error.SelectSingleNode("ErrorDescription").InnerText);
                 return;
             }
             // show results
             var nodes: XmlNodeList = doc.SelectNodes("//AddressKeyFormat");
             var keys : String[] = [
                 "AddressClassification/Description",
                 "ConsigneeName",
                 "BuildingName",
                 "AddressLine[1]",
                 "AddressLine[2]",
                 "PoliticalDivision2",
                 "PoliticalDivision1",
                 "PostcodePrimaryLow",
                 "PostcodeExtendedLow",
                 //"Region",
                 "Urbanization",
                 "CountryCode"
             ];
             for (var node: XmlNode in nodes) {
                 for (var i: int in keys) {
                     var value: XmlNode = node.SelectSingleNode(keys[i]);
                     debug.Write(value != null ? value.InnerText + ", " : "");
                 }
                 debug.WriteLine("");
             }
         }
     }
 }

That was a sample Smart Office Script to do address validation for M3 using UPS.

Also, check out the samples for USPS and Eniro and the Mashup.

That’s it! Please comment, follow, share, contribute, and donate your source code. Thank you.

UPDATE: I would like to specially acknowledge the contribution of William Dale at Augusta Sportswear for allowing me to use his UPS and USPS accounts so I can do my tests and write the scripts. Thank you William!

Open source address validation of US addresses for Infor M3

As part of the open source address validation project for Infor M3, I just uploaded to the GitHub repository a sample script for Infor Smart Office to validate an address in the US using the United States Postal Service USPS Web Tools API. I provide the script as proof-of-concept for the interested reader to complete to suit their needs.

USPS Web Tools API

The USPS Web Tools API has the Verify and ZipCodeLookup APIs that validate one or more addresses using XML over HTTP GET:
1
2

Sample request/response

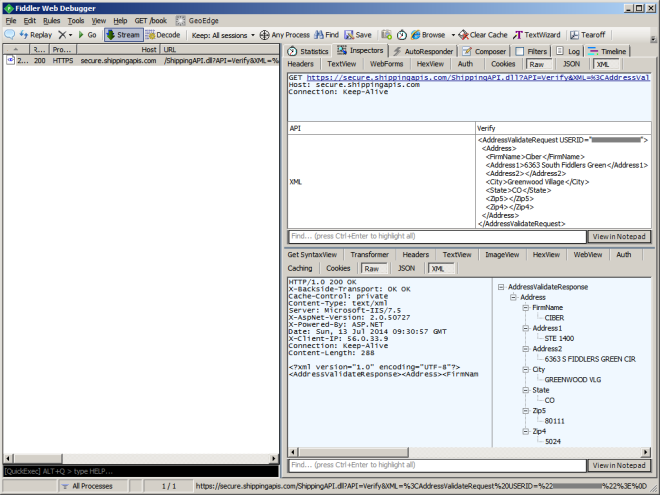
Here is a sample XML request and the URL:

https://secure.shippingapis.com/ShippingAPI.dll?API=Verify&XML=…

<AddressValidateRequest USERID="************">
   <Address>
      <FirmName>Ciber</FirmName>
      <Address1>6363 South Fiddlers Green</Address1>
      <Address2></Address2>
      <City>Greenwood Village</City>
      <State>CO</State>
      <Zip5></Zip5>
      <Zip4></Zip4>
   </Address>
</AddressValidateRequest>

Here is the XML response:

<?xml version="1.0" encoding="UTF-8"?>
<AddressValidateResponse>
   <Address>
      <FirmName>CIBER</FirmName>
      <Address1>STE 1400</Address1>
      <Address2>6363 S FIDDLERS GREEN CIR</Address2>
      <City>GREENWOOD VLG</City>
      <State>CO</State>
      <Zip5>80111</Zip5>
      <Zip4>5024</Zip4>
   </Address>
</AddressValidateResponse>

Sample script

Here is the sample script TestUSPS.js in Smart Office:
3

Here are the resulting XML and HTTP request and response:
4


That was how to do address validation for M3 in Infor Smart Office for US addresses using USPS Web Tools.

If you like this, please comment, subscribe, share, contribute to the project, donate your code. Thank you.

UPDATE: I would like to specially acknowledge the contribution of William Dale at Augusta Sportswear for allowing me to use his UPS and USPS accounts so I can do my tests and write the scripts. Thank you William!

Open source address validation of Nordic addresses for Infor M3

As part of the open source address validation project for Infor M3, I just uploaded to the GitHub repository two sample scripts for Infor Smart Office to do address validation in Nordic countries: Sweden (eniro.se), Denmark (krak.dk), and Norway (gulesider.no). I provide the scripts as proof-of-concept for the interested reader to complete to suit their needs.

Eniro Geocode

The script TestEniroGeocode.js uses the Eniro geocode API. This API seems to be best for address validation, and you don’t need an account for it. But it seems to be deprecated, and I was only able to find an old copy of the documentation.
EniroGeocode
TestEniroGeocode_

Eniro API

The script TestEniroAPI.js uses the Eniro API. This API seems to be for searching places only, like “restaurants in Stockholm”, and doesn’t seem usable for address validation for M3. Also, you will need an account with Eniro, and you will need to sign in to api.eniro.com to see your account profile, key, and documentation.
EniroAPI
TestEniroAPI_


Those were two quick proof-of-concepts scripts for Infor Smart Office to illustrate how to use Eniro to do address validation for Infor M3.

That’s it! Please comment, like, share, follow, author, contribute to the project, donate your source code. Thank you.

Content-aware re-sizing of M3 programs, and text interpolation

Today I’ll illustrate two usability ideas for Infor M3 – content-aware re-sizing of M3 programs, and text interpolation – to make M3 more usable on high resolution screens.

Synopsis

The M3 user interface was built over 20 years ago for AS/400 and 5250 screens of 73 up to 98 columns and 23 rows, that’s about 0.0022 Mega-characters. The M3 user interface has evolved over the years and has stabilized in Smart Office around the same number of columns and rows as 20 years ago with each cell measuring 10 x 22 pixels at 100% zoom level, that’s about 0.5 Megapixels. It’s about the same for Infor H5 Client.

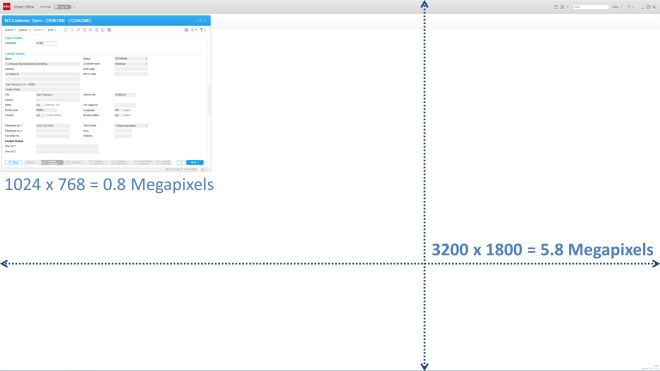
Meanwhile, screen resolutions and pixel density have continued to increase at an incredible pace. Mobile phones are being produced in China with a horizontal resolution of 3,000 pixels (3K). Televisions are being produced in Japan with a horizontal resolution of 8,000 pixels (8K). And the trend will continue. I even started working on a laptop that has a 3K screen, 3200 x 1800, that’s 5.8 Megapixels or a seven-fold increase in available pixels compared to 1024 x 768. The number of pixels on the surface grows to the square of the linear resolution, for example if we multiply by two the screen resolution on each axis from 1600 x 900 to 3200 x 1800 that’s a four-fold increase in surface.

Despite those technological advances, the M3 user interface hasn’t adapted. Here is a screenshot of Smart Office on my laptop with a screen resolution of 3200 x 1800 pixels, showing CRS610/E sized to 1024 x 768 pixels at the top left corner; the result evidently illustrates how the majority of the space is unused:
3200x1800

There are numerous technical challenges to increasing the number of rows and columns of M3 programs, leading to problems in the database and in legacy source code, but there are several steps we can take in that direction.

Two years ago I illustrated the usability idea how to tile windows in Smart Office. Today, I will illustrate two new ideas: content-aware re-sizing of M3 programs, and text interpolation.

Content-aware re-sizing of M3 programs

The first usability idea is to implement content-aware re-sizing of M3 programs with inspiration from seam carving as introduced by Shai Avidan and Ariel Shamir in 2007. You can watch a demonstration of seam carving in the authors video here. The idea of seam carving is to calculate the energy function of neighboring pixels and remove paths of lowest energy in a way that respects the overall composition of the image. We can manipulate the energy values to keep certain pixels and discard others.

To try seam carving, you can use the Content Aware Scaling feature in Adobe Photoshop, or the Liquid Rescale plugin for Gimp, or the online tool RSIZR.

Here is an example of CRS610/E in RSIZR; I used the preserve and remove brushes to mark in green the important portions of CRS610/E to keep and in red the portions to discard:
mask

Previous known techniques to re-size windows include re-scaling but it causes cropping and scrollbar hell, and re-sizing but it causes the image to be squooshed and minimized. The ideal solution is re-targeting with content-aware re-sizing.

Here is a video of the result using a screenshot of CRS610/E in RSIZR:

It’s not possible to simply implement seam carving to M3 because the rendering of the M3 user interface is based on text and not on pixels. Yet, we can approximate an implementation by choosing which parts of the user interface we want to keep and which parts we can discard. We can do this with a hierarchy of importance. And we can do this programmatically. The new M3 user interface does something similar with the adaptable panel sequence ribbon.

Text interpolation

The second usability idea is text interpolation in M3 programs for text like column headers and labels.

M3 is translated in multiple languages by professional translators. You can read more about it in the two blog posts: Translate M3 with Google Translate API, and Write a Mashup in multiple languages.

The language constants are chosen in different widths to fit the varying space of the target medium. The size ids are: 03, 05, 10, 15, AA, C0, C1, C2, CA, and CF.

The text is retrieved at run-time based on the user’s language settings in MNS150.

The Java source code of each M3 program maps the fields and message identifiers. For example CRS610DSP.java:

static final String[] fieldNames={
"X0RCID","PXFKEY","WWCLIN","WWCPOS","WBOPT2","S0SFH","WWCOLN","WWPSEQ","WOPAVR","WOUPVR",
"WWQTTP","WWNFTR","WWAGGR","WXSLCT","WFSLCT","WTSLCT","WXSLC2","WFSLC2","WTSLC2","WXSLC3",
"WFSLC3","WTSLC3","WXTXT1","WXTXT2","WXTXT3","WXTXT4","WXTXT5","WXTXT6","WXTXT7","WXTXT8",
...
"WRGEOC","WRTECN","WRTEEC","WRTAXC","WTTAXC","WRAGBP","WRAGPY","WRACLB","WRAACB","WRAGCP",
"WRAGAC","WRAGPN","WRAGBG","WRAGPG","WRAGTD","OKAGTN","WRAGCA","WTRTEP","WRRPLT","WRRDIS",
"WRRTEP","WRRSMC","WRAOTP","WTRPLT","WTRDIS","WTRSMC","WTAOTP","PXPDSE","WWSPIC","WWDSEQ",
"WWCFEN","WWTPIC","WWTXVR","WWLNCD"};

static final String[] fieldMessageIds={
null,null,null,null,null,null,null,null,null,null,
...
"WGE10","WTE26",null,"WTA39","WDE03","WAGB0","WAG69","WAC95","WAACB","WAG78",
"WAG70","WAG73","WAG77","WAG76",null,"WAG75","WAG72","WDE03","WRPLT","WRDIS",
"WRTEP","WRSMC","WAT90",null,null,"WDE03",null,null,null,null,
null,null,null,null};

For example, here are the identifiers of some common fields in CRS610:

  • Customer name – CUNM: WNA01
  • Customer number – CUNO: WCU02
  • Telephone number 1 – PHNO: WPH01

We can get the values in a Smart Office script with:

function ... {
    var list: ArrayList = new ArrayList();
    list.Add(new TranslationItem(messageId + width, "MVXCON"));
    TranslationService.Current.Translate(list, OnTranslation, "GB");
}
function OnTranslation(items: IEnumerable) {
    for (var item: TranslationItem in items) {
        if (!String.IsNullOrEmpty(item.Text)) {
            if (item.Text != item.Key) {
                debug.WriteLine('Translated ' + item.Key + ' to ' + item.Text);
            } else {
                debug.WriteLine('Key ' + item.Key + ' not found in file ' + item.File);
            }
        } else {
            debug.WriteLine('item.Text is null or empty');
        }
    }
}

That calls the Net Extension command TRANSLATE.

The result would be for example:

PHNO[WPH0103]=Tl1
PHNO[WPH0105]=Tel 1
PHNO[WPH0110]=Tel no 1
PHNO[WPH0115]=Telephone no 1
PHNO[WPH01AA]=telephone number 1

We can then interpolate the resulting Strings, for example my simple algorithm returns:


Tl1
Tel1
Tel 1
Tel n1
Tel nb1
Tel nb 1
Tele nb 1
Telep nb 1
Teleph nb 1
Telepho nb 1
Telephon nb 1
Telephone nb 1
Telephone nub 1
Telephone numb 1
Telephone numbe 1
Telephone number 1

Here’s the simple algorithm I used for that:

/*
    Returns the specified headers interpolated one character at a time, first ocurrence of any different character, from left-to-right.
*/
function interpolate(headers) {
    var interpolated = new ArrayList();
    var str1;
    var str2;
    for (var i = 0; i < headers.length - 1; i++) {
        str1 = headers[i];
        str2 = headers[i + 1];
        interpolated.Add(str1);
        for (var j = 0; j < (str2.length - 1) && str1 != str2; j++) {
            if (j < str1.length) {
                if (str1[j] != str2[j]) {
                    // the character at this position of str2 doesn't exist in str1, add it to str1
                    str1 = str1.Insert(j, str2[j]);
                    interpolated.Add(str1);
                }
            } else {
                // we reached the tail of str1, add the tail of str2 to str1
                str1 = str1.Insert(j, str2[j]);
                interpolated.Add(str1);
            }
        }
    }
    interpolated.Add(str2);
    return interpolated;
}

It turns out the algorithm is not that simple to implement as not all the language constants in M3 can be automatically interpolated, for example the abbreviation no (letter O) would have to be specially interpolated to number (no letter O).

Here is a resulting video of column header interpolation in CRS610/B; I manually sanitized the interpolated Strings and added the field name in parenthesis:

Summary

In this post I illustrated two usability ideas – content-aware re-sizing of M3 programs, and text interpolation – to benefit from the technological advances in ever higher resolution screens and to improve the M3 user interface. This would be specially ideal for large Mashups.


That’s it! If you liked this post, please click the Follow button to subscribe to this blog, leave your comments in the section below, click Like, and share with your peers.


Open source release of Address Validation for M3

I’m please to announce I finally released the first free and open source version of the Address Validation for M3, and I published the code on GitHub at https://github.com/M3OpenSource/AddressValidation . It’s a combination of a Mashup and a Script for Infor Smart Office, so it’s easy for you to modify, deploy, and run. Currently, it only supports the Google Geocoding API with more address providers to be added later.

I had implemented the first proprietary version of the script for Lawson Software in 2009. Then I had implemented several variants for various customers while working at Lawson Software and Infor. I’ve always wanted it to become available to more customers, so I decided to make it free and open source. But in order to not infringe any intellectual property and copyrights over the previous source code, I had to re-write everything from scratch. The opportunity came up when I quit Infor, and before I joined Ciber, in between the two, so there was no question on the ownership of the source code, and I had made an announcement. It took me a while but here it is. And I made some improvements over to the previous proprietary code.

Self-configuration

The script is self-configurable for the following M3 Panels, i.e. just add the script to one of the supported M3 Panels and execute, without any modifications nor arguments:

  • Customer. Open – CRS610/E
  • Customer. Connect Addresses – OIS002/E
  • Supplier. Connect Address – CRS622/E
  • Customer Order. Connect Address – OIS102/E
  • Internal Address. Open – CRS235/E1
  • Company. Connect Division – MNS100/E
  • Ship-Via Address. Open – CRS300/E
  • Service Order. Connect Delivery Address – SOS005/E
  • Shop. Open – OPS500/I
  • Bank. Open – CRS690/E
  • Bank. Connect Bank Branch Office – CRS691/E
  • Equipment Address. Open – MOS272/E

Deploy locally and test

To start using the script, download the Mashup’s Manifest and XAML and the Script from the GitHub repository. Save the three files somewhere temporary on your computer. Then, install the Mashup locally using the Mashup Designer at designer://mashup (watch the video below), and run the Script with the Script Tool at mforms://jscript (watch the video below). Then, enter an address in M3, click the validate button (the little globe icon), you can also use the TAB key from Address line 1 to focus the button and press SPACE to click it, then the Mashup will pop-up with a list of possible matches, and select an address by pressing ENTER or double-clicking the address.

Screenshots

Here are some screenshots:

1 2 3 4 5

Videos

Here are some videos (watch in full-screen and high-definition for better view):

  • How to deploy the Mashup locally
  • How to test the Script
  • Sample address searches:

Then, you can deploy the Mashup globally with LifeCycle Manager, and set the script to everybody with the Smart Office Personalization Manager in the Navigator widget > Administration tools.

Future work

There’s still more work to do. For instance, it appears the Google Geocoding API doesn’t follow the same format for all addresses, they’re local to each country, so right now we have to manually change the address layout based on the country, and I would like to improve that.

Also, I want to add a WebBrowser control to show the addresses in Google Maps.

Also, this first release only supports the Google Geocoding API. I want to add support for other address providers, like Experian QAS, FedEx, Microsoft Bing Maps, UPS, United States Postal Service, and local address providers like Pages Jaunes in France, and Eniro in Sweden.

If you like it, join the project and become a contributor!

Thibaud Lopez Schneider

Data conversion techniques

Here below is an old slide I found in my archives where I list my known techniques for data conversion, i.e. how to push data into Infor M3, also known as data entry. This list intends to remind readers there are more solutions than the traditional techniques.

Data conversionTechniques

Traditional entry points

The two traditional entry points are:

  1. API – The traditional entry point is to call M3 API. Advantages: it’s the fastest and most reliable technique, and the most widespread in terms of platforms supported, libraries, tools, and documentation. Disadvantages: there aren’t M3 API available for every program/field/operation in M3, as given by the M3 API Repository – MRS001.
  2. MDP – When there’s no M3 API available, we use the other traditional entry point, Lawson Web Services (LWS) of type M3 Display Program (MDP) to simulate a user going through the screens at the middleware level in M3 Net Extension (MNE). Advantages: with the Lawson Web Services Designer we can create the equivalent of an M3 API, for most M3 Programs, in almost no time. Disadvantage: it’s less efficient to run than M3 API as there are more layers to traverse.

Those are the traditional techniques. And we massively call them with for example M3 Data Import (MDI), Smart Data Tool (SDT), M3 E-Collaborator (MeC), Visual Basic macros in Microsoft Excel, ProcessFlow Integrator (PFI), Infor Process Automation (IPA), Tibco, WebMethods, or custom Java/C#/VB programs, with the data coming from a source like for example a Microsoft Excel spreadsheet, a CSV or plain text file, or a staging database.

Alternate techniques

If the traditional entry points fail, there are two alternate techniques.

  1. Manual entry – We can always do manual data entry. Advantage: it requires almost no skills, no programming, and no tools. Disadvantage: it can become humanly impossible to manually enter large amounts of data.
  2. MAK – Alternatively, we can write an M3 modification with MAK, to create a new API or modify an existing one. Advantages: it’s the ultimate solution. Disadvantages: it requires an MAK developer, it can take time, and M3 mods create a maintenance problem.

Despair techniques

Then, there are the following techniques which are less know and which I use when I’m at a loss of ideas:

  1. MForms Automation – When there are no M3 API available, and when Lawson Web Services of type MDP fail for rare M3 programs, we can try to reproduce the steps with MForms Automation and write a Smart Office Script that loops thru a data source and executes the MForms Automation at each iteration. This is a proven technique and Seth will soon write a post illustrating this solution. Advantage: It’s the last card on the deck when you lost hope. Disadvantage: It’s less efficient because it’s at the user interface level.
  2. Bookmarks – Similarly, we can write a Smart Office Script to execute Bookmarks in a loop of the form mforms://bookmark?program=CRS620&tablename=CIDMAS&keys=IDCONO…
  3. MNEAI – Likewise, we can inject a piece of JavaScript in M3 Workplace to simulate a user’s data entry, and loop through a data source we get with JavaScript.
  4. H5 Client – We can do the same JavaScript injection for H5 Client.
  5. Macro – We can record the mouse movement and click events, and the keyboard keystrokes, and use a Windows program to replay them. Advantages: It’s the last solution available out of desperation. Disadvantage: it will break at the slightest change in window position or popup, and it will be slow.

Forbidden techniques

Finally, as a reminder, we never use SQL INSERT/UPDATE/DELETE to M3, as that would break the integrity of the ERP, it would bypass the cache of the data abstraction layer, and it would void warranty for support.

That’s it! Thanks for reading. Subscribe below.

Using Dynamic WS to consume a LWS in a script

Here is a new solution to call SOAP Web Services from a Smart Office script that complements the previous known solutions. It’s a very easy and fast way to call LWS and does not require you to write any C# or XML.

It’s using a private API in Smart Office so it might change in future releases, without any announcement.

Continue reading Using Dynamic WS to consume a LWS in a script