Continuing to build an Infor ION Grid laboratory for my learning purposes, today I will install the Grid on a $10/month virtual [private] cloud, with DigitalOcean. Random fact: DigitalOcean is headquartered a few blocks from Infor’s headquarters down the Avenue of the Americas in New York.
Competition
There are various cloud hosting service providers for Infor M3 that compete with Infor. Some use cloud computing platforms other than Amazon Web Services. Competition is good to foster innovation, to drive prices down for customers, and to resist vendor lock-in. But it is a tough market as cloud infrastructure is a commodity, and unless those providers can differentiate themselves with a competitive advantage, they will be unable to survive against the utter economies of scale and expertise of Infor and Amazon and their thousands of employees dedicated to the cloud. As a laboratory for learning purposes, however, DigitalOcean or any other cloud platform are sufficient.
Disclaimers
The Grid bundled installer is available for internal use only, not for production use. ** Infor M3 only supports Red Hat Enterprise Linux (see the announcement thing), not CentOS. ** I am not revealing any internal information as Infor made the Installation Guide available online, and the rest can be achieved by inductive reasoning as I am doing. ** I will use Cygwin for the Unix tools on my Windows computer.
1. Create Droplet
In this step we will create a droplet in DigitalOcean:
- Click
Create Droplet, choose the CentOS distribution, and chose the $10/month size, it has the necessary and sufficient amount of memory (in my local virtual machine of 512 Mb RAM the Grid ran fine, but strangely in a droplet of the same 512 Mb RAM there was not enough memory and the Grid kept crashing, so I upgraded to the next bigger size; 1 Gb of RAM is sufficient as we do not need more):

- Generate an SSH key pair on your computer, if you do not already have one:
ssh-keygen

- Add your public key to the droplet (copy/paste):
cat ~/.ssh/id_rsa.pub


- Set the hostname, e.g.
droplet2, and clickCreate:

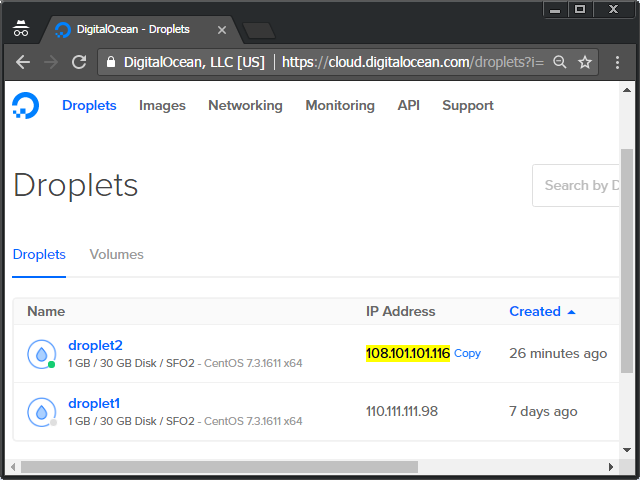
- Get the IP address of your droplet:

- SSH into it:
ssh root@108.101.101.116

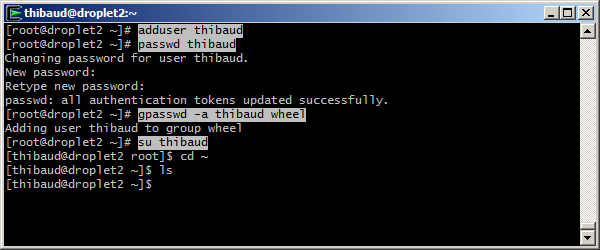
- Create a new user, e.g.
thibaud, with administrative privileges (the built-in groupwheelis allowedsudo), and switch to it:adduser thibaud passwd thibaud gpasswd -a thibaud wheel su thibaud cd ~
- Setup SSH for that user (I will use the same key setup earlier):
mkdir ~/.ssh/
chmod 700 ~/.ssh/
sudo cp /root/.ssh/authorized_keys .ssh/
sudo chown thibaud .ssh/authorized_keys
chmod 600 ~/.ssh/authorized_keys

- Disallow SSH as root (uncomment
PermitRootLogin, and change it fromyestono):sudo vi /etc/ssh/sshd_config PermitRootLogin no
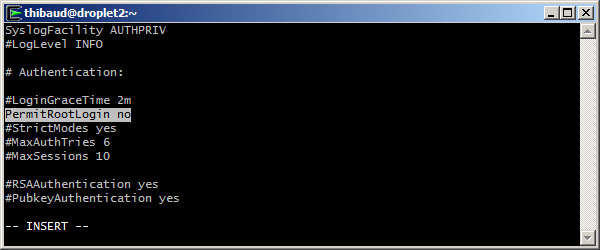
Note: to use vim, move with the cursor until you reach the desired location, press INSERTto enter edit mode, change the text as desired, pressESCto return to command mode, type:wqand pressENTERto write your changes to file and quit. - Restart the SSH service:
sudo systemctl reload sshd


We now have a droplet ready to use.
2. Preparation
In this step, we will install the JDK, PostgreSQL, and the Grid database, as shown in part 6bis.
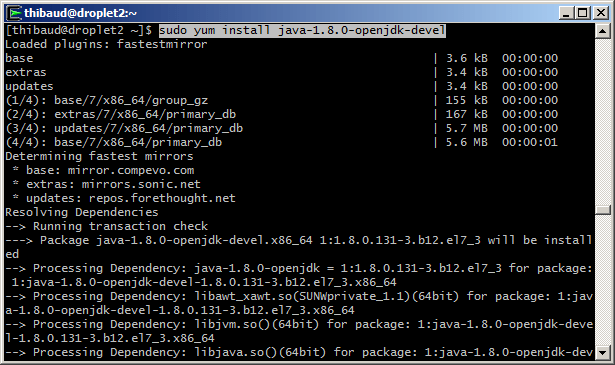
- Install the JDK:
sudo yum install java-1.8.0-openjdk-devel
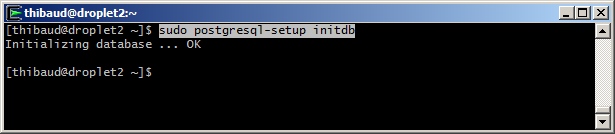
- Install PostgreSQL:
sudo yum install postgresql-server

sudo postgresql-setup initdb

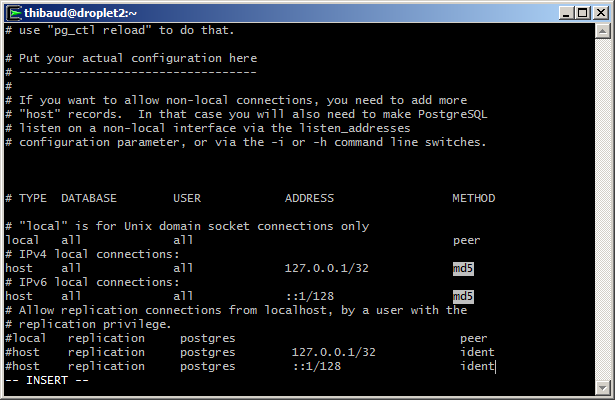
- Setup password authentication (change these two
hostlines fromidenttomd5):sudo vi /var/lib/pgsql/data/pg_hba.conf

- Start PostgreSQL, and enable it on reboot:
sudo systemctl start postgresql
sudo systemctl enable postgresql

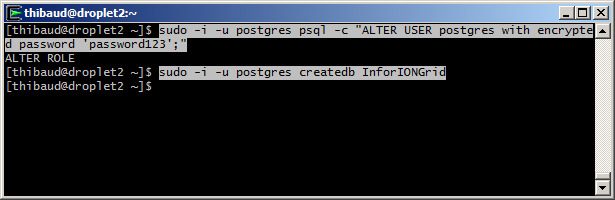
- Change the password of user
postgresand create theInforIONGriddatabase:sudo -i -u postgres psql -c "ALTER USER postgres with encrypted password 'password123';" sudo -i -u postgres createdb InforIONGrid
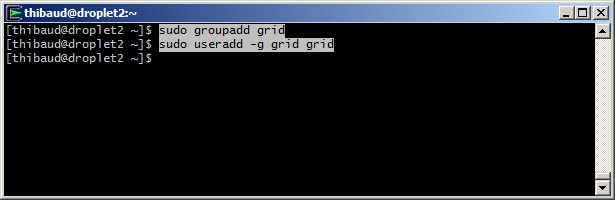
- Create the user and group for the Grid service:
sudo groupadd grid
sudo useradd -g grid grid


The droplet is now ready to install the Grid.
3. Install the Grid
In this step, we will install the Grid in unattended installation mode as shown in part 4bis.
- Copy the Grid installer to somewhere in the droplet, e.g.
~/Downloads/:mkdir ~/Downloads/ exit exit scp ~/Downloads/installer-1.13.77.jar thibaud@108.101.101.116:~/Downloads/ ssh thibaud@108.101.101.116

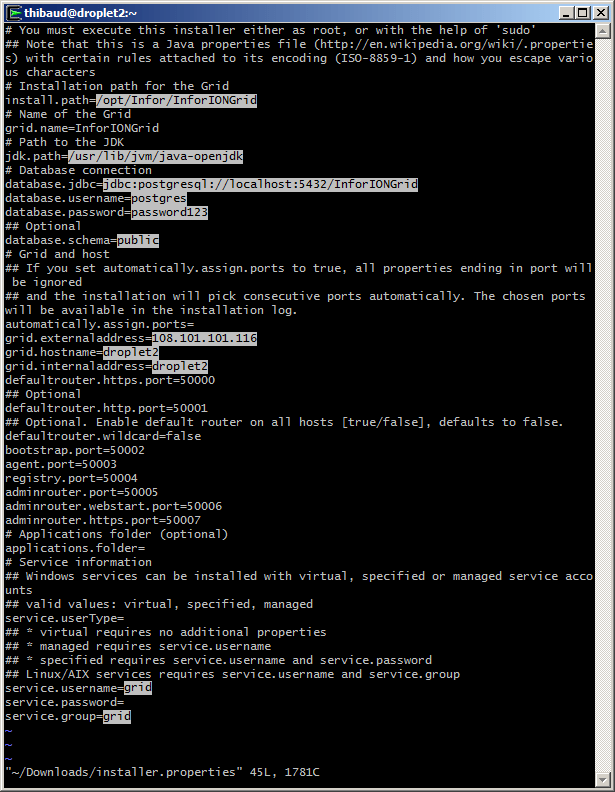
- Create a template file
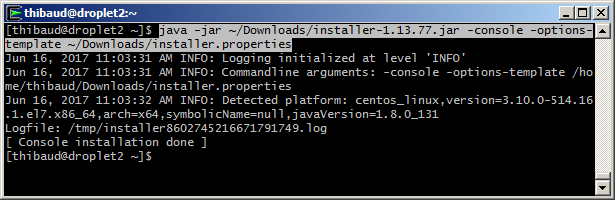
installer.properties:java -jar ~/Downloads/installer-1.13.77.jar -console -options-template ~/Downloads/installer.properties

- Set the following properties (change the IP address and hostname accordingly; use a text editor, e.g. vim):
install.path=/opt/Infor/InforIONGrid
jdk.path=/usr/lib/jvm/java-openjdk
database.jdbc=jdbc:postgresql://localhost:5432/InforIONGrid
database.username=postgres
database.password=password123
database.schema=public
grid.externaladdress=108.101.101.116
grid.hostname=droplet2
grid.internaladdress=droplet2
service.username=grid
service.group=grid
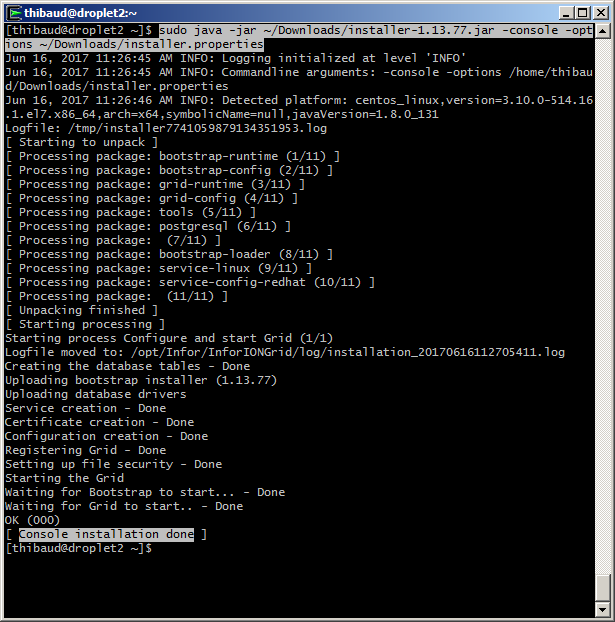
- Install the Grid in silent mode:
sudo java -jar ~/Downloads/installer-1.13.77.jar -console -options ~/Downloads/installer.properties

- Check the log files if needed.
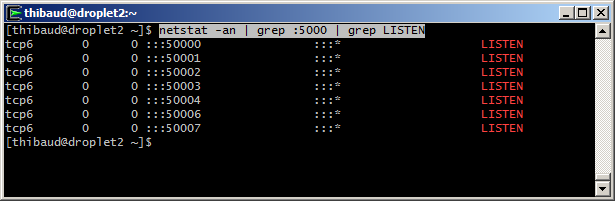
- Ensure all the Grid nodes are listening:
netstat -an | grep :5000 | grep LISTEN

- Verify the Grid status is
Started:curl http://localhost:50002/status


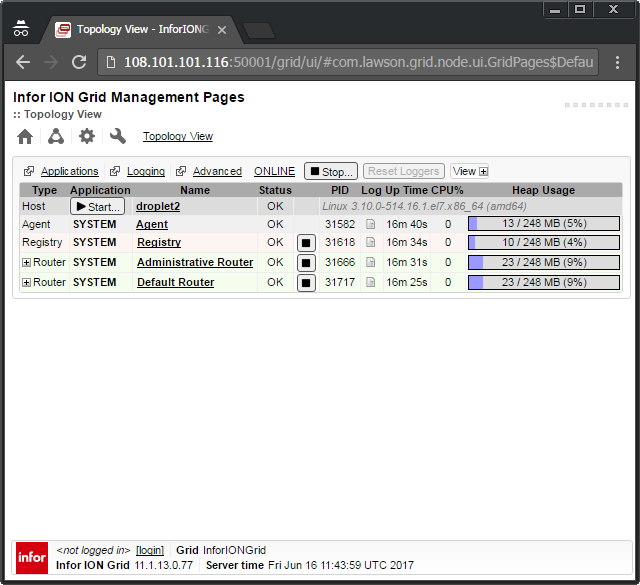
Result
The result is a usual Grid, on a cloud:


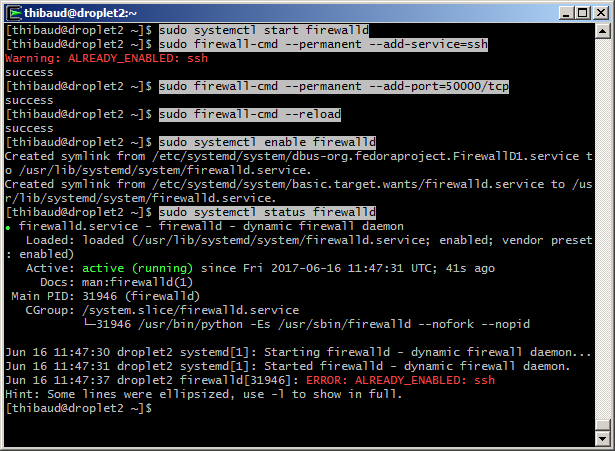
Firewall
To setup the firewall to block all incoming connections except SSH and Grid https port 50000:
sudo systemctl start firewalld
sudo firewall-cmd --permanent --add-service=ssh
sudo firewall-cmd --permanent --add-port=50000/tcp
sudo firewall-cmd --reload
sudo systemctl enable firewalld
sudo systemctl status firewalld
Next
The droplet is publicly available on the Internet. At this point you should secure it as per your needs, for example with DMZ and VPN. Here are Infor’s installation topology considerations, recommended installation scenarios, and network topology considerations. To make your cloud private, set it up in a private subnet.
GitHub
I put it all together in the install.sh script on my GitHub.
Future work
- Install Grid session providers
- Install GDBC
- Install Grid applications
- Grid pentesting
- Proof-of-concept of Grid database on homomorphic encryption with CryptDB or Microsoft’s Always Encrypted SQL Server
Conclusion
That was an illustration of how to install the Infor ION Grid on a virtual [private] cloud as a laboratory for learning purposes, using DigitalOcean as the cloud provider. The installation is remote with SSH, no graphical user interface.
Related posts
- Building an Infor Grid Lab – Part 1 – early Grid version 0.x
- Building an Infor Grid Lab – Part 2 – latest Grid version 11.x
- Building an Infor Grid Lab – Part 2bis – Configuration Manager
- Building an Infor Grid Lab – Part 3 – Cryptographic keys
- Building an Infor Grid Lab – Part 4 – Grid installer
- Building an Infor Grid Lab – Part 4bis – Console and silent install
- Building an Infor Grid Lab – Part 5 – PostgreSQL database
- Building an Infor Grid Lab – Part 6 – Ubuntu Linux
- Building an Infor Grid Lab – Part 6bis – CentOS Linux
- Building an Infor Grid Lab – Part 7 – Virtual Private Cloud

UPDATE: I did some corrections of text and screenshots.
LikeLike
BTW, the IP addresses 108.101.101.116 and 110.111.111.98 are not the real ones, I replaced them for anonymity. Props if you find their meaning.
LikeLike