API write example out of Pentaho Spoon

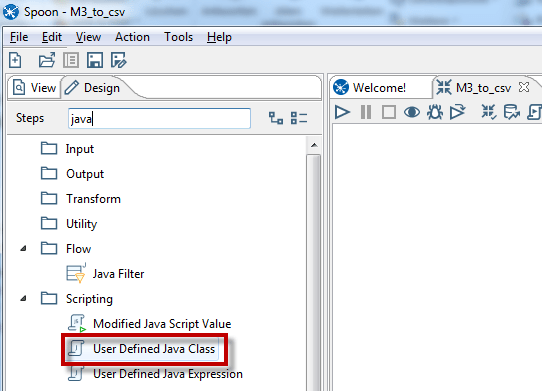
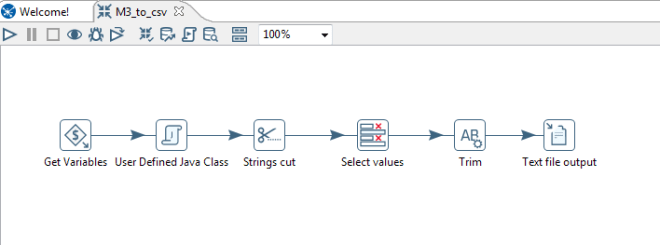
This is an example how content can be send to M3 via Pentaho Spoon. I am using a “User defined java class” to perform the API calls.

Here is my transformation:

spoon_pms070mi

Basically we have 3 parts in this transformation:

spoon_pms070mi_2

In this first part I am reading informations from a csv file and prepare all stuff that the input is ready for upload via API


spoon_pms070mi_3

In this central part the API is called to write the informations to M3. All stuff is done via Java in a “user defined java class” step


spoon_pms070mi_4

In the 3. part basically I am looking for errors and write a success and error log. finally an email is send to an elaborator with the faulty records.


Here is the content of my “user defined java class” step. In it I call 2 transaction from the PMS070MI. First the GetOperation to retrieve missing informations and then the RptOperation to reports hours on operations of production orders.

import java.util.regex.Pattern;
import java.io.FileWriter;
import java.io.IOException;
import java.util.*;
import java.text.*;
import MvxAPI.*;

private StringBuffer transStr;
private StringBuffer transStr3;
private StringBuffer sErrLine;
private StringBuffer sSucLine;
private StringBuffer sHeader;

private boolean firstErrLogLine;
private boolean firstSucLogLine;

private String mvxCONO; // Company
private String mvxFACI; // Facility
private String mvxPRNO; // Product number
private String mvxMFNO; // Manufacturing order number
private String mvxOPNO; // Operation number
private String mvxWOSQ; // Reporting number
private String mvxPLNO; // Production lot number
private String mvxRPDT; // Reporting date
private String mvxRPTM; // Reporting time
private String mvxPEWA; // Payroll period
private String mvxUMAT; // Used labor run time
private String mvxUMAS; // Used labor setup time
private String mvxUPIT; // Used machine run time
private String mvxUSET; // Used machine setup time
private String mvxRUDI; // Run disturbance
private String mvxSEDI; // Setup disturbance
private String mvxMAQA; // Manufactured quantity
private String mvxMAUN; // Manufacturing U/M
private String mvxSCQA; // Scrap quantity alternative unit
private String mvxSCRE; // Rejection reason
private String mvxSCWC; // Scrap source work center
private String mvxREND; // Manual completion flag
private String mvxEMNO; // Employee number
private String mvxPCTP; // Costing type
private String mvxSHFC; // Shift
private String mvxMSNO; // Resource
private String mvxTRDT; // Transaction date(not used)
private String mvxTRTM; // Transaction time(not used)
private String mvxPRNP; // Planned number of workers – run time
private String mvxSENP; // Planned number of workers – setup
private String mvxREWK; // Rework
private String mvxDPLG; // Deviating work center
private String mvxSEPR; // Setup price
private String mvxSUNO; // Supplier number
private String mvxPIPR; // Unit price
private String mvxTODL; // Total amount direct labor
private String mvxREMK; // Remark
private String mvxWAFA; // Time rate
private String mvxKIWG; // Pay element
private String mvxCHID; // Changed by
private String mvxDSP1; // Warning indicator 1
private String mvxDSP2; // Warning indicator 2
private String mvxDSP3; // Warning indicator 3
private String mvxDSP4; // Warning indicator 4
private String mvxCAMU; // Container
private String mvxBANO; // Lot number
private String mvxRMAQ; // Remaining quantity to manufacture

private String Status;

MvxSockJ obj2, obj3;
int i, j;
String str,str2, str3;
String sendstr;
double ver;
String test, MvxERR;

public boolean processRow(StepMetaInterface smi, StepDataInterface sdi) throws KettleException
{

Object[] r = getRow();

if (r == null) {
setOutputDone();
return false;
}

String M3_System = get(Fields.In, “M3_System”).getString(r);
int M3_Port = get(Fields.In, “M3_Port”).getInteger(r).intValue();
String M3_User = get(Fields.In, “M3_User”).getString(r);
String M3_Pass = get(Fields.In, “M3_Pass”).getString(r);
String OutPath = get(Fields.In, “OutPath”).getString(r);
//TimeStamp
Date dNow = new Date( );
//SimpleDateFormat ft = new SimpleDateFormat (“E yyyy.MM.dd ‘at’ hh:mm:ss a zzz”);
SimpleDateFormat ft = new SimpleDateFormat (“yyyyMMdd_HHmmss”);

Object[] outputRow = RowDataUtil.createResizedCopy(r, data.outputRowMeta.size());

//Initialize Log file first line check
firstErrLogLine = true;
firstSucLogLine = true;

// prepare regex and field helpers
if (first){
first = false;
// get the input and output fields
//assign system variables

// get all rows from the info stream and compile the regex field to patterns
//FieldHelper regexField = get(Fields.Info, “WHLO”);
RowSet infoStream = findInfoRowSet(“api_transactions”);
Object[] infoRow = null;
//Open M3 connection
obj2=new MvxSockJ(M3_System, M3_Port, “”, 0, “”);
obj2.DEBUG = true; // Have MvxSockJ print out debug info

/**
* For old FPW we give LOCALA as the system name, new FPW and NextGen does not care.
* We use the AS400 account USER with password PASSWORD
* We want to connect to program CRS610MI in library MVXBOBJ.
*/

i = obj2.mvxInit(“”, M3_User, M3_Pass, “PMS070MI”);
if(i>0) {
//System.out.println(“mvxInit() returned “+i+” “+obj2.mvxGetLastError());
get(Fields.Out, “Status”).setValue(outputRow, “Error: ” +obj2.mvxGetLastError());
putRow(data.outputRowMeta, outputRow);
return true;
}

ver=obj2.mvxVersion();
//System.out.println(“The current version of MvxSockJ is: ” +ver);
get(Fields.Out, “version”).setValue(outputRow, ver);

//Prepare filenames for logging
String ErrorLogPatch = OutPath + “Log/ErrorLog_B4E2M3_” + new SimpleDateFormat(“yyyyMMdd_HHmmss”).format(Calendar.getInstance().getTime()) + “.txt”;
String SuccessLogPatch = OutPath + “Log/SuccessLog_B4E2M3_” + new SimpleDateFormat(“yyyyMMdd_HHmmss”).format(Calendar.getInstance().getTime()) + “.txt”;

while((infoRow = getRowFrom(infoStream)) != null){

mvxCONO = “001”;
mvxFACI = get(Fields.Info, “FACI”).getString(infoRow);
mvxPRNO = get(Fields.Info, “PRNO”).getString(infoRow);
mvxMFNO = get(Fields.Info, “MFNO”).getString(infoRow);
mvxOPNO = get(Fields.Info, “OPNO”).getString(infoRow);
mvxWOSQ = get(Fields.Info, “WOSQ”).getString(infoRow);
mvxPLNO = null;
mvxRPDT = get(Fields.Info, “RPDT”).getString(infoRow);
mvxRPTM = “”;
mvxPEWA = “”;
mvxUMAT = get(Fields.Info, “UMAT”).getString(infoRow);
mvxUMAS = null;
mvxUPIT = get(Fields.Info, “UPIT”).getString(infoRow);
mvxUSET = “”;
mvxRUDI = “”;
mvxSEDI = “”;
mvxMAQA = get(Fields.Info, “MAQA”).getString(infoRow);
mvxMAUN = “”;
mvxSCQA = “”;
mvxSCRE = “”;
mvxSCWC = “”;
mvxREND = get(Fields.Info, “REND”).getString(infoRow);
if (mvxREND == null) { mvxREND = “0”; }
mvxEMNO = get(Fields.Info, “EMNO”).getString(infoRow);
mvxPCTP = “”;
mvxSHFC = “”;
mvxMSNO = “”;
mvxTRDT = “”;
mvxTRTM = “”;
mvxPRNP = “”;
mvxSENP = “”;
mvxREWK = “”;
mvxDPLG = get(Fields.Info, “DPLG”).getString(infoRow);
mvxSEPR = “”;
mvxSUNO = “”;
mvxPIPR = “”;
mvxTODL = “”;
mvxREMK = “”;
mvxWAFA = “”;
mvxKIWG = “”;
mvxCHID = “”;
mvxDSP1 = “”;
mvxDSP2 = “”;
mvxDSP3 = “”;
mvxDSP4 = “”;
mvxCAMU = “”;
mvxBANO = “”;
//When operation is marked as finished first
if (mvxREND.equals(“1”)) {
/**
* Build the priliminary transaction to catch the remaining quantity, if the operation should be closed
*/

transStr3 = new StringBuffer(1024);
transStr3.setLength(1024);

//Build the transaction string
for(int x=0; x<1024; x++) {
transStr3.setCharAt(x,’ ‘);
}

transStr3.insert(0, “GetOperation”);
transStr3.insert(15, mvxCONO);
//transStr3.insert(15, “002”);
transStr3.insert(18, mvxFACI);
transStr3.insert(21, mvxPRNO);
transStr3.insert(36, mvxMFNO);
transStr3.insert(43, mvxOPNO);

transStr3.setLength(75); // Adjust the length

//Run the transaction

str3=obj2.mvxTrans(transStr3.toString());

if(str3.startsWith(“NOK”)) {
Status = “Error in retrieving open quantity, check reported quantity of operation:” + str3;

} else {
//Extract needed fields for second transaction
mvxRMAQ = str3.substring(385, 402).trim();
mvxMAQA = mvxRMAQ; // Assign the retrieved value to Manufactured quantity
Status = “Operation completed, remaining quantity will be reported”;

}

} else {
Status = “Operation not completed, no quantity reporting!”;
mvxRMAQ = “0”;
mvxMAQA = mvxRMAQ; // Assign the retrieved value to Manufactured quantity

}

/**
* Build the main transaction – reporting of operation
*/

transStr = new StringBuffer(1024);
transStr.setLength(1024);

//Build the transaction string
for(int x=0; x<1024; x++) {
transStr.setCharAt(x,’ ‘);
}

transStr.insert(0, “RptOperation”);
//transStr.insert(15, “003”);
if (mvxCONO != null) { transStr.insert(15, mvxCONO);}
if (mvxFACI != null) { transStr.insert(18, mvxFACI);}
if (mvxPRNO != null) { transStr.insert(21, mvxPRNO);}
if (mvxMFNO != null) { transStr.insert(36, mvxMFNO);}
if (mvxOPNO != null) { transStr.insert(43, mvxOPNO);}
if (mvxWOSQ != null) { transStr.insert(47, mvxWOSQ);}
if (mvxPLNO != null) { transStr.insert(56, mvxPLNO);}
if (mvxRPDT != null) { transStr.insert(66, mvxRPDT);}
if (mvxRPTM != null) { transStr.insert(76, mvxRPTM);}
if (mvxPEWA != null) { transStr.insert(82, mvxPEWA);}
if (mvxUMAT != null) { transStr.insert(88, mvxUMAT);}
if (mvxUMAS != null) { transStr.insert(97, mvxUMAS);}
if (mvxUPIT != null) { transStr.insert(106, mvxUPIT);}
if (mvxUSET != null) { transStr.insert(115, mvxUSET);}
if (mvxRUDI != null) { transStr.insert(124, mvxRUDI);}
if (mvxSEDI != null) { transStr.insert(127, mvxSEDI);}
if (mvxMAQA != null) { transStr.insert(130, mvxMAQA);}
if (mvxMAUN != null) { transStr.insert(147, mvxMAUN);}
if (mvxSCQA != null) { transStr.insert(150, mvxSCQA);}
if (mvxSCRE != null) { transStr.insert(167, mvxSCRE);}
if (mvxSCWC != null) { transStr.insert(169, mvxSCWC);}
if (mvxREND != null) { transStr.insert(177, mvxREND);}
if (mvxEMNO != null) { transStr.insert(178, mvxEMNO);}
if (mvxPCTP != null) { transStr.insert(188, mvxPCTP);}
if (mvxSHFC != null) { transStr.insert(189, mvxSHFC);}
if (mvxMSNO != null) { transStr.insert(192, mvxMSNO);}
if (mvxTRDT != null) { transStr.insert(207, mvxTRDT);}
if (mvxTRTM != null) { transStr.insert(217, mvxTRTM);}
if (mvxPRNP != null) { transStr.insert(223, mvxPRNP);}
if (mvxSENP != null) { transStr.insert(229, mvxSENP);}
if (mvxREWK != null) { transStr.insert(235, mvxREWK);}
if (mvxDPLG != null) { transStr.insert(236, mvxDPLG);}
if (mvxSEPR != null) { transStr.insert(244, mvxSEPR);}
if (mvxSUNO != null) { transStr.insert(262, mvxSUNO);}
if (mvxPIPR != null) { transStr.insert(272, mvxPIPR);}
if (mvxTODL != null) { transStr.insert(290, mvxTODL);}
if (mvxREMK != null) { transStr.insert(308, mvxREMK);}
if (mvxWAFA != null) { transStr.insert(338, mvxWAFA);}
if (mvxKIWG != null) { transStr.insert(356, mvxKIWG);}
if (mvxCHID != null) { transStr.insert(360, mvxCHID);}
if (mvxDSP1 != null) { transStr.insert(370, mvxDSP1);}
if (mvxDSP2 != null) { transStr.insert(371, mvxDSP2);}
if (mvxDSP3 != null) { transStr.insert(372, mvxDSP3);}
if (mvxDSP4 != null) { transStr.insert(373, mvxDSP4);}
if (mvxCAMU != null) { transStr.insert(374, mvxCAMU);}
if (mvxBANO != null) { transStr.insert(386, mvxBANO);}

transStr.setLength(400); // Adjust the length

//Run the transaction
str=obj2.mvxTrans(transStr.toString());

// Start Log file Handling, if NOK write Error Log, if OK write Success Log
if(str.startsWith(“NOK”)) {
Status = Status + “; ” + “Error in time reporting:” + str;

//write errors to Error Log File
try
{
//as first line write the header
if (firstErrLogLine){
firstErrLogLine = false;

sHeader = new StringBuffer(1024);
sHeader.setLength(1024);

//Build the transaction string
for(int x=0; x<1024; x++) {
sHeader.setCharAt(x,’ ‘);
}

sHeader.insert(0, “Product”);
sHeader.insert(16, “MO No.”);
sHeader.insert(24, “OP No.”);
sHeader.insert(31, “Rep.No.”);
sHeader.insert(41, “Rep.Date”);
sHeader.insert(52, “Man.Qty”);
sHeader.insert(70, “Rep.Time”);
sHeader.insert(80, “Compl.”);
sHeader.insert(87, “Emp.No.”);
sHeader.insert(98, “Dev.WC”);
sHeader.insert(106, “Status”);
sHeader.insert(367,”API String”);

FileWriter writer = new FileWriter(ErrorLogPatch, true);
writer.append(sHeader.toString().trim());
writer.append(“\r\n”);
writer.flush();
writer.close();
sHeader.delete(0, sHeader.length());
}

//Write the lines
sErrLine = new StringBuffer(1024);
sErrLine.setLength(1024);

//Build the transaction string
for(int x=0; x<1024; x++) {
sErrLine.setCharAt(x,’ ‘);
}

if (mvxPRNO != null) { sErrLine.insert(0, mvxPRNO);}
if (mvxMFNO != null) { sErrLine.insert(16, mvxMFNO);}
if (mvxOPNO != null) { sErrLine.insert(24, mvxOPNO);}
if (mvxWOSQ != null) { sErrLine.insert(31, mvxWOSQ);}
if (mvxRPDT != null) { sErrLine.insert(41, mvxRPDT);}
if (mvxMAQA != null) { sErrLine.insert(52, mvxMAQA);}
if (mvxUMAT != null) { sErrLine.insert(70, mvxUMAT);}
if (mvxREND != null) { sErrLine.insert(80, mvxREND);}
if (mvxEMNO != null) { sErrLine.insert(87, mvxEMNO);}
if (mvxDPLG != null) { sErrLine.insert(98, mvxDPLG);}
if (Status != null) { sErrLine.insert(106, Status);}
if (transStr != null) { sErrLine.insert(367, transStr);}
FileWriter writer = new FileWriter(ErrorLogPatch, true);
writer.append(sErrLine.toString().trim());
writer.append(“\r\n”);
writer.flush();
writer.close();
sErrLine.delete(0, sErrLine.length());
}
catch(IOException e)
{
e.printStackTrace();
}

} else {
Status = Status + “; ” + “Transaction OK”;

//Write successed transactions to Success Log File
try
{

//as first line write the header
if (firstSucLogLine){
firstSucLogLine = false;

sHeader = new StringBuffer(1024);
sHeader.setLength(1024);

//Build the transaction string
for(int x=0; x<1024; x++) {
sHeader.setCharAt(x,’ ‘);
}

sHeader.insert(0, “Product”);
sHeader.insert(16, “MO No.”);
sHeader.insert(24, “OP No.”);
sHeader.insert(31, “Rep.Number”);
sHeader.insert(41, “Rep.Date”);
sHeader.insert(52, “Man.Qty”);
sHeader.insert(70, “Rep.Time”);
sHeader.insert(80, “Compl.”);
sHeader.insert(87, “Emp.No.”);
sHeader.insert(98, “Dev.WC”);
sHeader.insert(106, “Status”);
//sHeader.insert(367,”API String”);

FileWriter writer = new FileWriter(SuccessLogPatch, true);
writer.append(sHeader.toString().trim());
writer.append(“\r\n”);
writer.flush();
writer.close();
sHeader.delete(0, sHeader.length());
}

//Write the lines
sSucLine = new StringBuffer(1024);
sSucLine.setLength(1024);

//Build the transaction string
for(int x=0; x<1024; x++) {
sSucLine.setCharAt(x,’ ‘);
}

if (mvxPRNO != null) { sSucLine.insert(0, mvxPRNO);}
if (mvxMFNO != null) { sSucLine.insert(16, mvxMFNO);}
if (mvxOPNO != null) { sSucLine.insert(24, mvxOPNO);}
if (mvxWOSQ != null) { sSucLine.insert(31, mvxWOSQ);}
if (mvxRPDT != null) { sSucLine.insert(41, mvxRPDT);}
if (mvxMAQA != null) { sSucLine.insert(52, mvxMAQA);}
if (mvxUMAT != null) { sSucLine.insert(70, mvxUMAT);}
if (mvxREND != null) { sSucLine.insert(80, mvxREND);}
if (mvxEMNO != null) { sSucLine.insert(87, mvxEMNO);}
if (mvxDPLG != null) { sSucLine.insert(98, mvxDPLG);}
if (Status != null) { sSucLine.insert(106, Status);}
//if (transStr != null) { sSucLine.insert(367, transStr);}

FileWriter writer = new FileWriter(SuccessLogPatch, true);
writer.append(sSucLine.toString().trim());
writer.append(“\r\n”);
writer.flush();
writer.close();
sSucLine.delete(0, sSucLine.length());
}
catch(IOException e)
{
e.printStackTrace();
}

}

get(Fields.Out, “TimeStamp”).setValue(outputRow, ft.format(dNow));
get(Fields.Out, “ErrorLogPatch”).setValue(outputRow, ErrorLogPatch);
get(Fields.Out, “SuccessLogPatch”).setValue(outputRow, SuccessLogPatch);
putRow(data.outputRowMeta, outputRow);

}
}

i=obj2.mvxClose(); // close connection
return true;
}


Hope this is may usefull for someone… if you have questions please let me know


Optimap_v4

The big deal

So one of well known swiss speciality is milk chocolates. Taking into consideration that it will be soon Christmas, i have a very few days to organize my chocolate boxes distribution roundtrip. Chocolate does not wait. I also know my friends are eager to taste them… My deliveries are packed but in which order should i load them in my car ? So many destination points, are you kidding me ?!

Hopefully, Optimap will help me find the best trip to drop my boxes on time. A few settings in TOI module plus the use of API MYS450MI and i am ready to go !

Not reinventing the wheel

Starting from Thibaud’s last post, i would like to present you an example of integration with M3.

As soon as you have exported your deliveries to Optimap, it calculates the fastest round trip :

  • each delivery point is tied to a label (DLIX value) and you are able to manually modify the order on the Optimap site by playing with the “edit route” functionality; simply drag and drop the label up or down through the list

opti_v4_1

  • the START label represents the starting/ending point of the roundtrip and corresponds to the departure warehouse
  • once you are done, go to sub-menu “export / raw path with labels” and drag and drop the result in the textbox at the top of the window

opti_v4_2

API MYS450MI/AddDelivery is used to update loading and unloading sequences of each DLIX. This way, you are able to print the loading list from DRS100 for example with the proper order you have chosen.


Functional tips :

MYS450MI uses files from TOI : MYOPIH, MYOPID, MYOPIU

opti_v4_3

To make it work, we need a partner described in MMS865. This partner should be the default value in MWS410/P. The loop is the following one :

  1. starting point : deliveries are not downloaded (message OQMSGN = blank, download status OQIRST = 10 “ready to be downloaded”)
  2. download deliveries to MYS450 (use MYS410 or MWS410+related option 54) (OQMSGN gets a new value, OQIRST = 20)
  3. Update status of the message in MYS450 (from 10 to 20) to tell M3 the external system has downloaded those deliveries (mandatory to avoid error message later during API call)
  4. Call MYS450MI/AddDelivery to upload new values for OQSULS and OQMULS fields on each delivery + execute the message (MSGN in MYS450 should get status 90 = finished, OQIRST is reset to 10 and OQSULS/OQMULS are updated)

opti_v4_4

Business rules :

  • all deliveries sent to Optimap have the same departure warehouse
  • the partner E0PA is set in MWS410/P. If you change this value in MWS410/P you must close the panel and re-open it (because CSYSTR is updated on closing the panel)
  • in our example, all deliveries have the same unloading place. As a result, we will force OQMULS = 1. MULS normally depends from DRS021 settings.
  • the first DLIX to ship is the last one loaded on the truck; OQSULS has the same sorting as Optimap roundtrip


Technical choice :

As you can manually drag to re-order stop points on the website, the drop event in WPF to catch the desired route has been chosen. The update in M3 is done after a confirm dialog box and uses a background worker with a progress bar. The navigator is closed to minimize the memory consumption.

As there is no API to retrieve the partner E0PA, an SQL statement is done to retrieve the proper value in CSYSTR.

If one of the delivery of the selected list has no message OQMSGN or a bad download status (OQIRST < 20), the progress bar displays an error message and is stucked at 99%. You can enhance business rules checks at will.


Other possibility : you can also explore the XMLHttpRequest. Some examples are available into the LSO developers guide (example with PFI integration). A good idea for v5 !

Source code

Available on Thibaud’s GitHub.


Demo

Example here.


Conclusion

Sigh ! Here was an example of M3 integration with Optimap round trip solver, TOI module and WPF event drag and drop.

I can’t imagine the complexity Santa Claus will face in a few days…


That’s it !

Maxime.


How to call M3 API from Pentaho Spoon (PDI)

HI, I am Walter. This is my first post in this blog which was usefull just more than once for me in past … now I want to contribute something also from my side…

In past I have done a lot of data exports and imports via M3API over VBA in Excel. This works fine too, but this has 2 problems:

  1. you have to pay attention if you share the files (security)
  2. there are no good practicable solution for automation of the scripts

In past I have done a lot of work also with data integration tools, one of the most used is Pentaho Spoon (PDI). So I startet some investigation of how to integrate M3 API with PDI. This is a short how to call M3 API using the data integration tool Pentaho Spoon (ex. Kettle), also known as Pentaho PDI.

Data integration tools are usefull for extracting, manipulating and writing data from and to different in and outputs.

pdi-screen2

In this example I use Kettle to extract Customerdata, transform it and save it in a csv file.

Pentaho Spoon is a very powerful tool, is based on a opensource licence and the community edition can be downloaded here. The package is platform independent and the transformation files can be build in Windows, and used on a Linux environemnt or viceversa. Probably only some path variables must be changed.

Preparation

This example is based on windows environment, but the same can be done without any problems also on Linux environment.

  1. Download the Pentaho PDI package from the link above. Unzip the package and copy/paste the folder where every you want. For example directly under C:\
  2. You need a newer version of API Toolkit where also java library is available. All you need for this example is the library MvxAPI.jar which normally is located in the MvxAPI Folder.
  3. Copy the MvxAPI.jar lib to the lib Folder of Pentaho PDI, normally located in the data-integration folder.
  4. Start Pentaho PDI

Lets start

The target is to read data from M3 via the M3 API. For this purpose we use the Java library. Pentaho PDI uses graphical transformation steps which help you to create a data transformation. For some of this steps it needs also little bit of programming knowledge. But don’t worry, there are many examples in the MvxAPI package about calling M3 API via Java. And also for Pentaho PDI there are many examples for each transformation step.

For calling M3 API via PDI we use the transformation step “User Defined Java Class” (UDJC)

pdi_java2

In total for this example I have used 6 different transformation steps:

  1. Get Variables – call variables from kettle.properties file located under your home/.kettle directory
    sysvar
  2. User defined Java Class – Call API and forward all retrieved records to next step.
  3. Strings cut – split the API stream in individual fields.
  4. Select values – filtering of columns which should be forwarded to next step.
  5. Trim – trim the blanks before and after the column values.
  6. Text file output – write the selected and cleaned values in a csv file.

It looks like this now:

trans

As just explained you need to make some java development in the UDJC (User defined java class) step. Here is my piece of cake:

import java.util.regex.Pattern;
import java.util.*;
import MvxAPI.*;

private Pattern p = null;
private FieldHelper fieldToTest = null;
private FieldHelper outputField = null;

private ArrayList keys = null;
private int idx = 0;

MvxSockJ obj2;
int i, j, x;
String str,str2;
String sendstr;
double ver;
String test, MvxERR;

public boolean processRow(StepMetaInterface smi, StepDataInterface sdi) throws KettleException
{
//Initialize rows
Object[] r = getRow();
if (r == null) {
setOutputDone();
return false;
}

//assign system variables from previous step (kettle.properties)
String M3_System = get(Fields.In, “M3_System”).getString(r);
int M3_Port = get(Fields.In, “M3_Port”).getInteger(r).intValue();
String M3_User = get(Fields.In, “M3_User”).getString(r);
String M3_Pass = get(Fields.In, “M3_Pass”).getString(r);

//Create new row output
r = createOutputRow(r, data.outputRowMeta.size());

/**
* Setup communication parameters for M3
*/
//open the connection with system variables forwarded from previous step
obj2=new MvxSockJ(M3_System, M3_Port, “”, 0, “”);

obj2.DEBUG = true; // Have MvxSockJ print out debug info

//Call the MI with user and pass forwarded from previous step
i = obj2.mvxInit(“”, M3_User, M3_Pass, “CRS610MI”);

if(i>0) {
get(Fields.Out, “error”).setValue(r, “Error: ” +obj2.mvxGetLastError());
putRow(data.outputRowMeta, r);
return true;
}

ver=obj2.mvxVersion();
get(Fields.Out, “version”).setValue(r, ver);

/**
* Build the transaction
*/
sendstr = “LstByNumber    1            “;

//Set max records
str=obj2.mvxTrans(“SetLstMaxRec   50          “);

//Run the transaction
str=obj2.mvxTrans(sendstr);

if(str.startsWith(“NOK”)) {
get(Fields.Out, “error”).setValue(r, “Error:” +str);
}

x=0;

if(str != null) {
while (str.startsWith(“REP”)) {
x=x+1;
/**
* This prints out the whole returned string without trying to
* extract particular fields from the layout.
*/

// Set key and value in a new output row
get(Fields.Out, “crs610_stream”).setValue(r, str);
get(Fields.Out, “idx”).setValue(r, x);

// Send the row to the next step.
putRow(data.outputRowMeta, r);
str=obj2.mvxRecv();
}
}
else
get(Fields.Out, “error”).setValue(r, “Error: ” +obj2.mvxGetLastError());
putRow(data.outputRowMeta, r);
i=obj2.mvxClose(); // close connection
return true;
}

The class is calling the CRS610MI and reads the first 50 records. This records are forwarded then to the next step.

At the end the of the transformation the output is saved in the file C:\TEMP\crs610.csv

The whole transformation with all contained steps will be saved in a file with .ktr extension. Here you can download the example file! You have to accept the self signed certificate. Don’t worry, there is no risk 😉

Conclusion

After a short time of investigation I was able to build a really performant transformation. For reading, transforming and writing up to 10.000 records the transformation it needs less the 30 seconds. In my eyes a good performance.

Clearly you can do all what do you want with the data, save in another database, combine the data with additional datasources, save in Excel or send to another server via REST, SOAP, JSON webservice, or whatever is your requirement.

If you are not familiar with Pentaho PDI (Spoon) there are many How to’s in the web, in the Examples folder are many examples which gives you an idea how to work with PDI.

And for me the most important function that the transformation can be scheduled in combination with “Kittchen”, which is also part of Pentaho PDI.

Next steps

My next target is to write data via API in M3 using PDI. I will keep you updated about it. Hope this is may usefull for somebody of you! Let me know.. if you have any questions let me know.

Thank you,
Walter

More interfaces

If you need to integrate Infor M3 with any of the following interfaces, here are most of the interfaces with which I have worked in the past two years for which I have not posted anything on this blog yet, and for which I may be able to help you if you have questions (contact me here). For that, I used a variety of Enterprise Collaborator, Smart Office scripts, and other code.

Also, check-out the other interfaces I have worked with.

Procurement PunchOut with cXML

Hi colleagues. It has been a while since I posted anything. Today I will write a quick post as part of an interface I am currently developing to do procurement PunchOut using cXML, an old protocol from 1999, for my customer and its suppliers. This will eventually end up in their Infor M3 and M3 Enterprise Collaborator implementation.

I only needed to test the Message Authentication Code (MAC) so I wrote a quick prototype in Python.

The cXML User’s Guide describes the MAC algorithm using HMAC-SHA1-96:

Here is my implementation in Python:

# Normalize the values
data = [fromDomain.lower(),
        fromIdentity.strip().lower(),
        senderDomain.lower(),
        senderIdentity.strip().lower(),
        creationDate,
        expirationDate]

# Concatenate the UTF-8-encoded byte representation of the strings, each followed by a null byte (0x00)
data = b''.join([(bytes(x, "utf-8") + b'\x00') for x in data])

# Calculate the Message Authentication Code (MAC)
digest = hmac.new(password.encode("utf-8"), data, hashlib.sha1).digest()

# Truncate to 96 bits (12 bytes)
truncated = digest[0:12]

# Base-64 encode, and convert bytearray to string
mac = str(base64.b64encode(truncated), "utf-8")

# Set the CredentialMac in the XML document
credentialMac = xml.find("Header/Sender/Credential").find("CredentialMac")
credentialMac.attrib["creationDate"] = creationDate
credentialMac.attrib["expirationDate"] = expirationDate
credentialMac.text = mac

Here is my resulting MAC, and it matches that of the cXML User’s Guide, good:

I posted the full source code in my GitHub repository at https://github.com/M3OpenSource/cXML/blob/master/Test.py .

That’s it!

Thank you for continuing to support this blog.

Integrating Zeacom call center with Infor Smart Office

Here is a source code that a customer and I worked out to integrate the Zeacom call center with Infor Smart Office such that their customer service representatives can receive phone calls from their customers and automatically launch the respective M3 customer programs; this is similar to the previous integration work with Cisco Agent Desktop, Twilio, Skype, etc.

This source code is a script assembly in C#; for more information on script assemblies see here and here. The trick was to keep the z variable as a global variable, not as a local variable, so it can survive in memory for the event handlers.

You will need to reference the DLL files from your Zeacom software.

using Mango.UI;
using MForms;
using System;
using System.Collections.Generic;
using System.Linq;
using System.Text;
using System.Windows;

namespace MForms.JScript
{
	public class ZeacomAssembly
	{
		MLINTERFACELib.ZeacomMLI z = new MLINTERFACELib.ZeacomMLI();

		public void Init(object element, object args, object controller, object debug)
		{
			string phoneExt = "1234";
			if (z.AddExtension(phoneExt))
				if (z.Initialise())
					z.OnNewExtensionCall += OnNewExtensionCall;
		}

		private void OnNewExtensionCall(object Extension, object Call)
		{
			Application.Current.Dispatcher.Invoke(new ShowInformationDelegate(ShowInformation), new object[] {Extension, Call});
		}

		private delegate void ShowInformationDelegate(object Extension, object Call);

		private void ShowInformation(object Extension, object Call)
		{
			ConfirmDialog.ShowInformationDialog("Incoming Call", "MLI Event: OnNewExtensionCall(: " + ((MLINTERFACELib.IExtension)Extension).AddressName + ", " + ((MLINTERFACELib.ICall)Call).CallReference + OutputCallInfo((MLINTERFACELib.ICall)Call));
		}
		private string OutputCallInfo(MLINTERFACELib.ICall Call)
		{
			StringBuilder CallString = new StringBuilder();
			if (Call != null)
			{
				CallString.AppendLine("CalledID = " + Call.CalledId);
				CallString.AppendLine("Caller = " + Call.Caller);
				CallString.AppendLine("CallOrigin = 0x" + Call.CallOrigin.ToString("X"));
				CallString.AppendLine("CallReason = 0x" + Call.CallReason.ToString("X"));
				CallString.AppendLine("CallReference = 0x" + Call.CallReference.ToString("X"));
				CallString.AppendLine("CLI = " + Call.CLI);
				CallString.AppendLine("CLIA = " + Call.CLIA);
				CallString.AppendLine("CLIF = " + Call.CLIF);
				CallString.AppendLine("CLIP = " + Call.CLIP);
				CallString.AppendLine("DNIS = " + Call.DNIS);
				CallString.AppendLine("Pilot = " + Call.Pilot);
				CallString.AppendLine("Query = " + Call.Query);
				CallString.AppendLine("QueryName = " + Call.QueryName);
				CallString.AppendLine("Queue = " + Call.Queue);
				CallString.AppendLine("RelatedRef = 0x" + Call.RelatedRef.ToString("X"));
				CallString.AppendLine("TransferredID = " + Call.TransferredId);
				CallString.AppendLine("TransferrerID = " + Call.TransferrerId);
				CallString.AppendLine("Trunk = " + Call.Trunk);
				CallString.AppendLine("Type = " + Call.Type);
				CallString.AppendLine("Wait = " + Call.Wait);

				if (Call.DataCallPayloadString.Length > 0)
					CallString.AppendLine("DataCallPayloadString = '" + Call.DataCallPayloadString + "'");

				CallString.AppendLine("");
			}
			return CallString.ToString();
		}
	}
}

Walking directions in a warehouse (part 2)

Today I will illustrate how I started implementing my proof-of-concept for walking directions in a warehouse, and I will provide the source code. The goal is to show the shortest path a picker would have to walk in a warehouse to complete a picking list and calculate the distance for it. This is most relevant for big warehouses and for temporary staff that are not yet familiar with a warehouse. The business benefit is to minimize picking time, reduce labor costs, increase throughput, and gather performance metrics. I used this for my demo of M3 picking lists in Google Glass.

A* search algorithm

I used Will Thimbleby’s wonderful illustration of A* shortest path in Javascript. We can drag and drop the start and stock locations to move them around and recalculate the path, and we can draw walls. I made the map bigger, and I put a warehouse image as a background.

Implementation

Here are the steps I performed:

  1. Double the map’s width/height
  2. Un-hard-code the map width/height
  3. Set the cell size and calculate the canvas width/height
  4. Un-hard-code the cell size
  5. Make a warehouse image in an image editor (I used Gimp)
  6. Add the warehouse image as background of the map
  7. Hide the heat map (search scores)
  8. Patiently draw the map, the walls, the doors, and the stock locations
  9. Save the drawing by serializing the map to JavaScript source code
  10. Replace startMap with the saved drawing
  11. Thicken the path’s stroke
  12. Hide the grid lines
  13. Hide the map
  14. Use diagonals
  15. Emphasize the path length

Here is a video of the making process (watch it in full-screen, HD, and 2x speed):

Result

You can test the result for yourself on my website here.

Here is an animated GIF of the result:
result1

Here is a video of the result for a small warehouse:

Here is a video of the result for a big warehouse:

Source code

I put the resulting HTML, JavaScript source code and images in my GitHub repository for you to download and participate.

Future work

Some of the future work includes:

  • Convert the path length into meters or feet
  • Project the geocoded stock location coordinates to the map’s coordinates
  • Set the start and end locations as input parameters
  • Automatically generate a screenshot of the path for printing alongside the picking list
  • Show the shortest path for an entire picking list using a Traveling Salesman Problem (TSP) algorithm
  • Improve performance for big maps
  • Provide a map editor to more accurately align the warehouse image with the map

Also, a much better implementation would be to use Google Maps Indoors.


That’s it. If you liked this, please thumbs up, leave a comment in the section below, share around you, and come author the next post with me.

How to run a Google Glass app in Infor Grid

Today I will detail the steps to run a Google Glass app in Infor Grid. This is part of my project to have M3 Picking Lists in Google Glass.
glass

For that, I will develop a very simple Glassware using the Google Mirror API Java Quick Start Project, and I will use the technique I learned in Hacking Infor Grid application development. The integration will be bi-directional: the Grid app will communicate to the Glass API on Google’s servers to insert cards in the timeline, and conversely when the user replies to a timeline card Google’s servers will send notifications to the Grid app provided it is located at a routable address with a valid SSL certificate.

This is a great demo of the integration capabilities of the Infor Grid. I worked a little bit here and there on evenings and week-ends over several months, and I distilled the resulting steps here and in a 15mn video so you can play along. You will need a pair of Google Glass.

STEP 1: Setup Eclipse with Maven

I will start with the instructions for the Google Mirror API Java Quick Start Project:
step1a

For the Prerequisites I need Java 1.6 and Apache Maven for the build process. I will download Eclipse IDE for Java Developers that has the Maven plugin integrated:step1

STEP 2: Setup the Glass Mirror API Java Quick Start Project

Then, I will download the Glass Mirror API Java Quick Start Project from the GitHub repository:
step2.1

Then, I will import it in Eclipse as an Existing Maven Project with the pom.xml:
step2.2

I will import the Infor Grid library grid-core.jar:
step2.3

Then, I will replace some of the source code to adapt it to the Infor Grid, using Eclipse File Search and Replace:
step2.4

I will replace the code for the Logger in all files (from/to):

import java.util.logging.Logger;
import com.lawson.grid.util.logging.GridLogger;
Logger LOG = Logger.getLogger
GridLogger LOG = GridLogger.getLogger
LOG.severe
LOG.error
LOG.fine
LOG.info
LOG.warning
LOG.warn

Then, I will add the context path to the URLs of all files (from/to):

href="/
href="
src="/static
src="static
url.setRawPath(
url.setRawPath(req.getContextPath() +
RegEx:
(getRequestURI\(\).*\()"/
$1httpRequest.getContextPath() + "/

For the subscription to notifications I will replace the callback URL in NewUserBootstrapper.java by a routable FQDN or IP address with a valid SSL certificate to handle the notification:

Subscription subscription = MirrorClient.insertSubscription(credential, WebUtil.buildUrl(req, "/notify").replace("m3app-2013.company.net", "11.22.33.44"), userId, "timeline");

Then, I will replace the code in NotifyServlet.java that processes the notification from the HTTP request body because apparently notificationReader.ready() always returns false in the Infor Grid and that throws IllegalArgumentException: no JSON input found. Here is the new code:

int lines = 0;
String line;
while ((line = notificationReader.readLine()) != null) {
	notificationString += line;
	...
}
notificationReader.close();

Then, I will setup the Project in the Google Developers Console with the Google Mirror API, the client ID and client secret credentials for OAuth 2.0, and the Consent screen:
step2.5a step2.5b step2.5c

Then, I will paste the client ID and secret in the oauth.properties of the project:
step2.6

Then, I will create and run a new Maven Build Configuration using goal war:war:
step2.7a

That will create a WAR file that I will use to deploy as a web application in my Grid application:
step2.7b

STEP 3: Setup the Infor Grid application

Then, create and install an Infor Grid application GoogleGlass based on the HelloWorld app:
step3.2b_i step3.2b_ii step3.2b_iii step3.2b_iv

STEP 4: Test

Then, launch the app:
step4.1a

Authenticate to the Google account associated with Glass, and click Accept to grant app permissions:
step4.1b

Use the app, insert cards in the timeline:
step4.2step4.5

You can also tap Glass to reply to a timecard:
step4.8

And the Grid app will receive the notification with a JSON string:
step4.12

Resulting video

Here is the video with hours of work distilled in 15mn (I recommend watching in full screen, HD, and 2x speed):

STEP 5: Summary

That was how to run a Google Glass app in Infor Grid. The main steps are:

  1. Setup Eclipse with Maven
  2. Setup the Glass Mirror API Quick Start Java project
  3. Setup the Infor Grid application
  4. Test

The integration is bi-directional: the Grid app adds cards to the Glass timeline, and when the user takes action on a card Google’s servers send a JSON notification to the Grid app.

The result is great to demo the integration capabilities of the Infor Grid, and it will be useful for my project to show M3 picking lists in Glass.

Future work

In future work, I will use the bi-directional communication for pickers in a warehouse to tap Glass to confirm picking lists, have Google’s servers send the JSON notification to the Grid app, and have the Grid app call an M3 API MHS850MI AddCOPick and AddCfmPickList to confirm picking.

That’s it. If you liked this, please give it a thumbs up, leave your comments, share around you, and contribute back by writing your own ideas. Thank you.

Open source address validation for Infor M3 using UPS

In the series for the open source address validation for Infor M3, I just added to the GitHub repository a sample script to do address validation using the UPS Address Validation – Street Level API.

UPS Address Validation – Street Level

You will need an access key with UPS to access the API, documentation and samples:
2

Sample HTTP request/response

Once you have the access key and documentation, you need to submit an HTTP POST request with two concatenated XML documents:
5

Sample script

Here is the sample TestUPS.js script for Infor Smart Office:

 import System;
 import System.IO;
 import System.Net;
 import System.Xml;
 import System.Xml.Linq;

 /*
     Sample script for Infor Smart Office to validate addresses with the UPS Street Level API
     PENDING: replace authentication and address values + error handling + background thread + user interface
     https://www.ups.com/upsdeveloperkit
 */

 package MForms.JScript {
     class TestUPS {
         public function Init(element: Object, args: Object, controller : Object, debug : Object) {
             // authentication
             var doc1: XDocument = new XDocument(
                 new XDeclaration("1.0", "utf-8"),
                 new XElement("AccessRequest",
                     new XElement("AccessLicenseNumber", "****************"),
                     new XElement("UserId", "******"),
                     new XElement("Password", "********")
                 )
             );
             // address
             var doc2: XDocument = new XDocument(
                 new XDeclaration("1.0", "utf-8"),
                 new XElement("AddressValidationRequest",
                     new XElement("Request",
                         new XElement("TransactionReference",
                             new XElement("CustomerContext", "Infor Smart Office"),
                             new XElement("XpciVersion", "1.0"),
                         ),
                         new XElement("RequestAction", "XAV"),
                         new XElement("RequestOption", "3")
                     ),
                     new XElement("AddressKeyFormat",
                         new XElement("ConsigneeName", "Ciber"),          // Name
                         new XElement("BuildingName", ""),
                         new XElement("AddressLine", "Fiddlers Green"),   // Address line 1
                         new XElement("AddressLine", ""),                 // Address line 2
                         new XElement("AddressLine", ""),                 // Address line 3
                         new XElement("AddressLine", ""),                 // Address line 4
                         new XElement("Region", ""),
                         new XElement("PoliticalDivision2", "Greenwd"),   // City
                         new XElement("PoliticalDivision1", "CO"),        // State
                         new XElement("PostcodePrimaryLow", ""),          // Zip5
                         new XElement("PostcodeExtendedLow", ""),         // Zip4
                         new XElement("Urbanization", ""),
                         new XElement("CountryCode", "US")                // Country
                     )
                 )
             );
             // concatenate both XML docs
             var sw: StringWriter = new StringWriter();
             doc1.Save(sw);
             doc2.Save(sw);
             var docs: String = sw.GetStringBuilder().ToString();
             // HTTP request
             var request: HttpWebRequest = HttpWebRequest(WebRequest.Create("https://onlinetools.ups.com/ups.app/xml/XAV"));
             request.Method = "POST";
             var byteArray: byte[] = System.Text.Encoding.UTF8.GetBytes(docs);
             var dataStream: Stream = request.GetRequestStream();
             dataStream.Write(byteArray, 0, byteArray.Length);
             dataStream.Close();
             // HTTP response
             var response: HttpWebResponse = request.GetResponse();
             var data: Stream = response.GetResponseStream();
             var doc: XmlDocument = new XmlDocument();
             doc.Load(data);
             data.Close();
             response.Close();
             // check for errors
             var error: XmlNode = doc.SelectSingleNode("//Response/Error");
             if (error != null) {
                 debug.WriteLine("Error " + error.SelectSingleNode("ErrorCode").InnerText + ": " + error.SelectSingleNode("ErrorDescription").InnerText);
                 return;
             }
             // show results
             var nodes: XmlNodeList = doc.SelectNodes("//AddressKeyFormat");
             var keys : String[] = [
                 "AddressClassification/Description",
                 "ConsigneeName",
                 "BuildingName",
                 "AddressLine[1]",
                 "AddressLine[2]",
                 "PoliticalDivision2",
                 "PoliticalDivision1",
                 "PostcodePrimaryLow",
                 "PostcodeExtendedLow",
                 //"Region",
                 "Urbanization",
                 "CountryCode"
             ];
             for (var node: XmlNode in nodes) {
                 for (var i: int in keys) {
                     var value: XmlNode = node.SelectSingleNode(keys[i]);
                     debug.Write(value != null ? value.InnerText + ", " : "");
                 }
                 debug.WriteLine("");
             }
         }
     }
 }

That was a sample Smart Office Script to do address validation for M3 using UPS.

Also, check out the samples for USPS and Eniro and the Mashup.

That’s it! Please comment, follow, share, contribute, and donate your source code. Thank you.

UPDATE: I would like to specially acknowledge the contribution of William Dale at Augusta Sportswear for allowing me to use his UPS and USPS accounts so I can do my tests and write the scripts. Thank you William!

Open source address validation of US addresses for Infor M3

As part of the open source address validation project for Infor M3, I just uploaded to the GitHub repository a sample script for Infor Smart Office to validate an address in the US using the United States Postal Service USPS Web Tools API. I provide the script as proof-of-concept for the interested reader to complete to suit their needs.

USPS Web Tools API

The USPS Web Tools API has the Verify and ZipCodeLookup APIs that validate one or more addresses using XML over HTTP GET:
1
2

Sample request/response

Here is a sample XML request and the URL:

https://secure.shippingapis.com/ShippingAPI.dll?API=Verify&XML=…

<AddressValidateRequest USERID="************">
   <Address>
      <FirmName>Ciber</FirmName>
      <Address1>6363 South Fiddlers Green</Address1>
      <Address2></Address2>
      <City>Greenwood Village</City>
      <State>CO</State>
      <Zip5></Zip5>
      <Zip4></Zip4>
   </Address>
</AddressValidateRequest>

Here is the XML response:

<?xml version="1.0" encoding="UTF-8"?>
<AddressValidateResponse>
   <Address>
      <FirmName>CIBER</FirmName>
      <Address1>STE 1400</Address1>
      <Address2>6363 S FIDDLERS GREEN CIR</Address2>
      <City>GREENWOOD VLG</City>
      <State>CO</State>
      <Zip5>80111</Zip5>
      <Zip4>5024</Zip4>
   </Address>
</AddressValidateResponse>

Sample script

Here is the sample script TestUSPS.js in Smart Office:
3

Here are the resulting XML and HTTP request and response:
4


That was how to do address validation for M3 in Infor Smart Office for US addresses using USPS Web Tools.

If you like this, please comment, subscribe, share, contribute to the project, donate your code. Thank you.

UPDATE: I would like to specially acknowledge the contribution of William Dale at Augusta Sportswear for allowing me to use his UPS and USPS accounts so I can do my tests and write the scripts. Thank you William!