Procurement PunchOut with cXML

Hi colleagues. It has been a while since I posted anything. Today I will write a quick post as part of an interface I am currently developing to do procurement PunchOut using cXML, an old protocol from 1999, for my customer and its suppliers. This will eventually end up in their Infor M3 and M3 Enterprise Collaborator implementation.

I only needed to test the Message Authentication Code (MAC) so I wrote a quick prototype in Python.

The cXML User’s Guide describes the MAC algorithm using HMAC-SHA1-96:

Here is my implementation in Python:

# Normalize the values
data = [fromDomain.lower(),
        fromIdentity.strip().lower(),
        senderDomain.lower(),
        senderIdentity.strip().lower(),
        creationDate,
        expirationDate]

# Concatenate the UTF-8-encoded byte representation of the strings, each followed by a null byte (0x00)
data = b''.join([(bytes(x, "utf-8") + b'\x00') for x in data])

# Calculate the Message Authentication Code (MAC)
digest = hmac.new(password.encode("utf-8"), data, hashlib.sha1).digest()

# Truncate to 96 bits (12 bytes)
truncated = digest[0:12]

# Base-64 encode, and convert bytearray to string
mac = str(base64.b64encode(truncated), "utf-8")

# Set the CredentialMac in the XML document
credentialMac = xml.find("Header/Sender/Credential").find("CredentialMac")
credentialMac.attrib["creationDate"] = creationDate
credentialMac.attrib["expirationDate"] = expirationDate
credentialMac.text = mac

Here is my resulting MAC, and it matches that of the cXML User’s Guide, good:

I posted the full source code in my GitHub repository at https://github.com/M3OpenSource/cXML/blob/master/Test.py .

That’s it!

Thank you for continuing to support this blog.

Experimenting with middle-side modifications

With Infor M3, there are server-side modifications, client-side modifications, and the unexplored middle-side modifications. I will experiment with servlet filters for the M3 UI Adapter.

Modification tiers

There are several options to modify M3 functionality:

  • Server-side modifications are M3 Java mods developed with MAK; they propagate to all tiers, including M3 API, but they are often avoided due to the maintenance nightmare during M3 upgrades, and they are banned altogether from Infor CloudSuite multi-tenant. There are also Custom lists made with CMS010 which are great, they are simply configured by power users without requiring any programming, and they survive M3 upgrades.
  • Client-side modifications for Smart Office are Smart Office scripts in JScript.NET, Smart Office SDK features, applications and MForms extensions in C#, Smart Office Mashups in XAML, and Personalizations with wizards. They do not affect M3 upgrades but they apply only to Smart Office. And client-side modifications for H5 Client are H5 Client scripts in JavaScript, and web mashups converted from XAML to HTML5. Likewise, they do not affect M3 upgrades but they apply only to H5 Client.
  • Middle-side modifications are servlet filters for the M3 UI Adapter. They propagate to all user interfaces – Smart Office AND H5 Client – but this is unexplored and perilous. In the old days, IBrix lived in this tier.

M3 UI Adapter

The M3 UI Adapter (MUA), formerly known as M3 Net Extension (MNE), is the J2EE middleware that talks the M3 Business Engine protocol (MEX?) and serves the user interfaces. It was written mostly single-handedly by norpe. It is a simple and elegant architecture that runs As Fast As Fucking Possible (TM) and that is as robust as The Crazy Nastyass Honey Badger [1]. The facade servlet is MvxMCSvt. All the userids/passwords, all the commands, for all interactive programs, for all users, go thru here. It produces an XML response that Smart Office and H5 Client utilize to render the panels. The XML includes the options, the lists, the columns, the rows, the textboxes, the buttons, the positioning, the panel sequence, the keys, the captions, the help, the group boxes, the data, etc.

For example, starting CRS610/B involves:
com.intentia.mc.servlet.MvxMCSvt.doTask()
com.intentia.mc.command.MCCmd.execute()
com.intentia.mc.command.RunCmd.doRunMovexProgram()
com.intentia.mc.engine.ProtocolEngine.startProgram()

The following creates a list with columns:

import com.intentia.mc.metadata.view.ListColumn;
import com.intentia.mc.metadata.view.ListView;

ListView listView = new ListView();
ListColumn listColumn = new ListColumn();
listColumn.setWidth(length);
listColumn.setConstraints(constraints);
listColumn.setCaption(new Caption());
listColumn.setConditionType(1);
listColumn.setHeader(headerSplitterAttr);
listColumn.setName("col" + Integer.toString(columnCount));
listColumn.setJustification(1);
listColumns.add(listColumn);
listView.addFilterField(posField, listColumn);
listView.setListColumns((ListColumn[])listColumns.toArray(new ListColumn[0]));

Here is an excerpt of the XML response for CRS610/B that shows the list columns and a row of data:
Fiddler

Experiment

This experiment involves adding a servlet filter to MvxMCSvt to transform the XML response. Unfortunately, MNE is a one-way function that produces XML in a StringBuffer, but that cannot conversely parse the XML back into its data structures. Thus, we have to transform the XML ourselves. I will not make any technical recommendations for this because it is an experiment. You can refer to the existing MNE filters for examples on how to use the XML Pull Parser (xpp3-1.1.3.4.O.jar) that is included in MNE. And you can use com.intentia.mc.util.CstXMLNames for the XML tag names.

To create a servlet filter:

/*
D:\Infor\LifeCycle\host\grid\XYZ\runtimes\1.11.47\resources\servlet-api-2.5.jar
D:\Infor\LifeCycle\host\grid\XYZ\grids\XYZ\applications\M3_UI_Adapter\lib\mne-app-10.2.1.0.jar
javac -cp servlet-api-2.5.jar;mne-app-10.2.1.0.jar TestFilter.java
*/

package net.company.your;

import java.io.IOException;
import javax.servlet.Filter;
import javax.servlet.FilterChain;
import javax.servlet.FilterConfig;
import javax.servlet.ServletException;
import javax.servlet.ServletRequest;
import javax.servlet.ServletResponse;
import com.intentia.mc.util.Logger;

public class TestFilter implements Filter {

    private static final Logger logger = Logger.getLogger(TestFilter.class);

    public void init(FilterConfig filterConfig) throws ServletException {}

    public void doFilter(ServletRequest request, ServletResponse response, FilterChain chain) throws IOException, ServletException {
        if (logger.isDebugEnabled()) {
            logger.debug("Hello, World");
        }
        chain.doFilter(request, response);
    }

    public void destroy() {}

}

Add the servlet filter to the MNE deployment descriptor at D:\Infor\LifeCycle\host\grid\XYZ\grids\XYZ\applications\M3_UI_Adapter\webapps\mne\WEB-INF\web.xml:

<filter>
    <filter-name>TestFilter</filter-name>
    <filter-class>net.company.your.TestFilter</filter-class>
</filter>
<filter-mapping>
    <filter-name>TestFilter</filter-name>
    <servlet-name>MvxMCSvt</servlet-name>
</filter-mapping>

Then, reload the M3UIAdapterModule in the Infor Grid. This will destroy the UI sessions, and users will have to logout and logon M3 again.

Optionally, set the log level of the servlet filter to DEBUG.

Limitations

MvxMCSvt is the single point of entry. If you fuck it up, it will affect all users, all programs, on all user interfaces. So this experiment is currently a Frankenstein idea that would require a valid business case, a solid design, and great software developers to make it into production.

Also, changes to the web.xml file will be overriden with a next software update.

Discussion

Is this idea worth pursuing? Is this another crazy idea? What do you think?

Infor launches Infor M3 13.3

Infor announced that M3 13.3 is now generally available. Noticeable for me are:

  • Documentation available online at docs.infor.com
  • SSH FTP (SFTP) channel available for M3 Enterprise Collaborator (MEC)
  • New richer F4-browse selectors
  • M3 now available on Red Hat Enterprise Linux and PostgreSQL
  • New M3 API available to query Custom Lists (CMS015)
  • New techniques to avoid modifications

For more details, visit the Infor M3 page on the Infor Sales Portal.

Application messages in Infor Smart Office

Here is an illustration of application messaging in Infor Smart Office to send, broadcast, and receive messages, and process responses between applications in Smart Office, whether in scripts, Mashups, or other entities.

Documentation

The Infor Smart Office SDK Developer’s Guide has Chapter 19 Application messages, and the Smart Office SDK help file has the API reference for Mango.UI.Services.Messages.ApplicationMessageService:
3

Note: For more information on the Smart Office SDK refer to my previous post.

Scripts

Here are some examples of sending, broadcasting and receiving messages, and processing responses in Smart Office scripts; the other party in the communication can be another script, a Mashup or another entity in Smart Office.

To send a message and process the response:

import Mango.UI.Services.Messages;

package MForms.JScript {
	class ApplicationA {
		public function Init(element: Object, args: Object, controller : Object, debug : Object) {
			// send message
			var message: ApplicationMessage = new ApplicationMessage();
			message.Sender = "ApplicationA";
			message.Recipient = "ApplicationB";
			message.Parameter = "Hello World";
			var response: ApplicationMessageResponse = ApplicationMessageService.Current.SendMessage(message);
			// process response
			response.MessageStatus;
			response.Result;
		}
	}
}

To receive a message and return a response:

import Mango.UI.Services.Messages;

package MForms.JScript {
	class ApplicationB {
		public function Init(element: Object, args: Object, controller : Object, debug : Object) {
			ApplicationMessageService.Current.AddRecipient("ApplicationB", OnMessage);
		}
		function OnMessage(message: ApplicationMessage): ApplicationMessageResponse {
			message.Sender;
			message.Recipient;
			message.Parameter;
			var response: ApplicationMessageResponse = new ApplicationMessageResponse();
			response.MessageStatus = MessageStatus.OK;
			response.Result = "Bonjour";
			return response;
		}
	}
}

To broadcast a message (there is no response):

import Mango.UI.Services.Messages;

package MForms.JScript {
	class ApplicationC {
		public function Init(element: Object, args: Object, controller : Object, debug : Object) {
			var broadcastMessage: ApplicationMessage = new ApplicationMessage();
			broadcastMessage.Sender = "ApplicationC";
			broadcastMessage.Recipient = "GroupX";
			broadcastMessage.Parameter = "HELLO WRRRLD!!!!!!";
			ApplicationMessageService.Current.SendBroadcastMessage(broadcastMessage);
		}
	}
}

To receive a broadcasted message (there is no response):

import Mango.UI.Services.Messages;

package MForms.JScript {
	class ApplicationD {
		public function Init(element: Object, args: Object, controller : Object, debug : Object) {
			ApplicationMessageService.Current.AddBroadcastRecipient("GroupX", OnBroadcastMessage);
		}
		function OnBroadcastMessage(message: ApplicationMessage) {
			message.Sender;
			message.Recipient;
			message.Parameter;
		}
	}
}

Mashups

Here are some examples of sending, broadcasting and receiving messages in Smart Office Mashups (there are no responses); the other party in the communication can be another Mashup, a script or another entity in Smart Office.

To send a message (there is no response):

<Grid xmlns="http://schemas.microsoft.com/winfx/2006/xaml/presentation" xmlns:x="http://schemas.microsoft.com/winfx/2006/xaml" xmlns:ui="clr-namespace:Mango.UI.Controls;assembly=Mango.UI" xmlns:mashup="clr-namespace:Mango.UI.Services.Mashup;assembly=Mango.UI">
	<Button Name="BtnMessage" Content="Send" Width="150" />
	<mashup:ApplicationMessageControl Name="test">
		<mashup:ApplicationMessageControl.Events>
			<mashup:Events>
				<mashup:Event SourceName="BtnMessage" SourceEventName="Click" TargetEventName="Send" Debug="True">
					<mashup:Parameter TargetKey="Sender" Value="MashupE" />
					<mashup:Parameter TargetKey="Recipient" Value="MashupF" />
					<mashup:Parameter TargetKey="Parameter" Value="Hello World" />
				</mashup:Event>
			</mashup:Events>
		</mashup:ApplicationMessageControl.Events>
	</mashup:ApplicationMessageControl>
</Grid>

To receive a message (there is no response):

 <Grid xmlns="http://schemas.microsoft.com/winfx/2006/xaml/presentation" xmlns:x="http://schemas.microsoft.com/winfx/2006/xaml" xmlns:ui="clr-namespace:Mango.UI.Controls;assembly=Mango.UI" xmlns:mashup="clr-namespace:Mango.UI.Services.Mashup;assembly=Mango.UI">
	<mashup:ApplicationMessageControl Name="test" Recipient="MashupF">
		<mashup:ApplicationMessageControl.Events>
			<mashup:Events>
				<mashup:Event SourceEventName="Received" Debug="True">
					<mashup:Parameter SourceKey="Sender" />
					<mashup:Parameter SourceKey="Recipient" />
					<mashup:Parameter SourceKey="Parameter" />
				</mashup:Event>
			</mashup:Events>
		</mashup:ApplicationMessageControl.Events>
	</mashup:ApplicationMessageControl>
</Grid>

To broadcast a message:

<mashup:Event...TargetEventName="Broadcast">

To receive a broadcasted message:

<mashup:ApplicationMessageControl...BroadcastRecipient="Everyone">
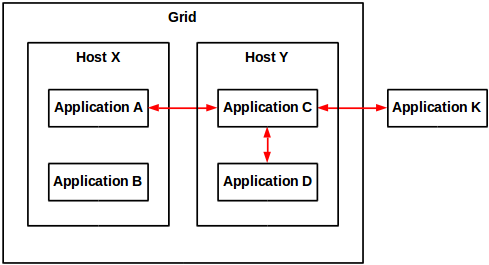
Illustration

Here is an illustration of messages going in all directions between scripts and Mashups:
r

More

The ApplicationMessageService API has more methods and properties available:

  • You can send multiple parameters and multiple result values with Dictionary<string, Object>.
  • You can return different MessageStatus values depending on your needs, for example OK, Failed or InvalidMessage.
  • You can send a message asynchronously to not block the UI; but there is no response.
  • You should verify if the recipient already exists before adding a message handler; otherwise you will get the exception “A recipient with the key has already been added.”
  • You can remove recipients.

Refer to the SDK documentation for more information.

That’s it. Please like, comment, share, follow, contribute.

Integrating Zeacom call center with Infor Smart Office

Here is a source code that a customer and I worked out to integrate the Zeacom call center with Infor Smart Office such that their customer service representatives can receive phone calls from their customers and automatically launch the respective M3 customer programs; this is similar to the previous integration work with Cisco Agent Desktop, Twilio, Skype, etc.

This source code is a script assembly in C#; for more information on script assemblies see here and here. The trick was to keep the z variable as a global variable, not as a local variable, so it can survive in memory for the event handlers.

You will need to reference the DLL files from your Zeacom software.

using Mango.UI;
using MForms;
using System;
using System.Collections.Generic;
using System.Linq;
using System.Text;
using System.Windows;

namespace MForms.JScript
{
	public class ZeacomAssembly
	{
		MLINTERFACELib.ZeacomMLI z = new MLINTERFACELib.ZeacomMLI();

		public void Init(object element, object args, object controller, object debug)
		{
			string phoneExt = "1234";
			if (z.AddExtension(phoneExt))
				if (z.Initialise())
					z.OnNewExtensionCall += OnNewExtensionCall;
		}

		private void OnNewExtensionCall(object Extension, object Call)
		{
			Application.Current.Dispatcher.Invoke(new ShowInformationDelegate(ShowInformation), new object[] {Extension, Call});
		}

		private delegate void ShowInformationDelegate(object Extension, object Call);

		private void ShowInformation(object Extension, object Call)
		{
			ConfirmDialog.ShowInformationDialog("Incoming Call", "MLI Event: OnNewExtensionCall(: " + ((MLINTERFACELib.IExtension)Extension).AddressName + ", " + ((MLINTERFACELib.ICall)Call).CallReference + OutputCallInfo((MLINTERFACELib.ICall)Call));
		}
		private string OutputCallInfo(MLINTERFACELib.ICall Call)
		{
			StringBuilder CallString = new StringBuilder();
			if (Call != null)
			{
				CallString.AppendLine("CalledID = " + Call.CalledId);
				CallString.AppendLine("Caller = " + Call.Caller);
				CallString.AppendLine("CallOrigin = 0x" + Call.CallOrigin.ToString("X"));
				CallString.AppendLine("CallReason = 0x" + Call.CallReason.ToString("X"));
				CallString.AppendLine("CallReference = 0x" + Call.CallReference.ToString("X"));
				CallString.AppendLine("CLI = " + Call.CLI);
				CallString.AppendLine("CLIA = " + Call.CLIA);
				CallString.AppendLine("CLIF = " + Call.CLIF);
				CallString.AppendLine("CLIP = " + Call.CLIP);
				CallString.AppendLine("DNIS = " + Call.DNIS);
				CallString.AppendLine("Pilot = " + Call.Pilot);
				CallString.AppendLine("Query = " + Call.Query);
				CallString.AppendLine("QueryName = " + Call.QueryName);
				CallString.AppendLine("Queue = " + Call.Queue);
				CallString.AppendLine("RelatedRef = 0x" + Call.RelatedRef.ToString("X"));
				CallString.AppendLine("TransferredID = " + Call.TransferredId);
				CallString.AppendLine("TransferrerID = " + Call.TransferrerId);
				CallString.AppendLine("Trunk = " + Call.Trunk);
				CallString.AppendLine("Type = " + Call.Type);
				CallString.AppendLine("Wait = " + Call.Wait);

				if (Call.DataCallPayloadString.Length > 0)
					CallString.AppendLine("DataCallPayloadString = '" + Call.DataCallPayloadString + "'");

				CallString.AppendLine("");
			}
			return CallString.ToString();
		}
	}
}

Call M3 API from Event Analytics rules

Here is how to call M3 API from a Drools rule in Infor Event Analytics; this is a common requirement.

Sample scenario

Here is my sample business case.

When a user changes the status of an approval line in OIS115 (OOAPRO), I have to find the order type (ORTP) of the order to determine which approval flow to trigger in Infor Process Automation (IPA), but ORTP is not part of the table OOAPRO, for that reason I must previously make a call to OIS100MI.GetHead.

I could call M3 in the approval flow, but false positives would generate noise in the WorkUnits.

Is it possible?

I asked Nichlas Karlsson, Senior Architect – Business Integration at Infor, if it was possible to call M3 API directly in the Drools rule. He is one of the original developers of Event Hub and Event Analytics and very helpful with my projects (thank you) although he does not work with these products any longer. He responded that Event Analytics is a generic software with no specific connection to M3, so unfortunately this is not possible out of the box, however it is a common requirement. He said I could solve it using MvxSockJ to call M3 APIs in my own Java class, included in a jar that I put in the lib folder. He added to not forget that the execution time for all rules within a session must be less than the proxy timeout, i.e. 30s. And I would also need to manage host, port, user, password and other properties in some way.

Instead of MvxSockJ I will use the MI-WS proxy of the Grid as illustrated in my previous post.

Sample Drools rule

Here is my sample Drools rule that works:

package com.lawson.eventhub.analytics.drools;

import java.util.List;
import com.lawson.eventhub.analytics.drools.model.Event;
import com.lawson.eventhub.analytics.drools.model.HubEvent;
import com.lawson.eventhub.EventOperation;
import com.lawson.grid.node.Node;
import com.lawson.grid.proxy.access.SessionId;
import com.lawson.grid.proxy.access.SessionProvider;
import com.lawson.grid.proxy.access.SessionUtils;
import com.lawson.grid.proxy.ProxyClient;
import com.lawson.grid.registry.Registry;
import com.lawson.miws.api.data.MIParameters;
import com.lawson.miws.api.data.MIRecord;
import com.lawson.miws.api.data.MIResult;
import com.lawson.miws.api.data.NameValue;
import com.lawson.miws.proxy.MIAccessProxy;

declare HubEvent
	@typesafe(false)
end

rule "TestSubscription"
	@subscription(M3:OOAPRO:U)
	then
end

rule "TestRule"
	no-loop
	when
		event: HubEvent(publisher == "M3", documentName == "OOAPRO", operation == EventOperation.UPDATE, elementOldValues["STAT"] == 10, elementValues["STAT"] == "20")
	then
		// connect to MI-WS
		Registry registry = Node.getRegistry();
		SessionUtils su = SessionUtils.getInstance(registry);
		SessionProvider sp = su.getProvider(SessionProvider.TYPE_USER_PASSWORD);
		SessionId sid = sp.logon("Thibaud", "******".toCharArray());
		MIAccessProxy proxy = (MIAccessProxy)registry.getProxy(MIAccessProxy.class);
		ProxyClient.setSessionId(proxy, sid);

		// prepare input parameters
		MIParameters p = new MIParameters();
		p.setProgram("OIS100MI");
		p.setTransaction("GetHead");
		MIRecord r = new MIRecord();
		r.add("CONO", event.getElementValue("CONO"));
		r.add("ORNO", event.getElementValue("ORNO"));
		p.setParameters(r);

		// execute and get output
		MIResult s = proxy.execute(p);
		List<MIRecord> records = s.getResult(); // all records
		if (records.isEmpty()) return;
		MIRecord record = records.get(0); // zeroth record
		List<NameValue> nameValues = record.getValues(); // all output parameters
		String ORTP = nameValues.get(4).getValue(); // PROBLEM: somehow nameValues.indexOf("X") returns -1

		// make decision
		if (ORTP.equals("100")) event.postEvent("ApprovalFlowA");
		if (ORTP.equals("200")) event.postEvent("ApprovalFlowB");
		if (ORTP.equals("300")) event.postEvent("ApprovalFlowC");
end

Note: You will need to drop foundation-client-10.1.1.3.0.jar in the lib folder of Event Analytics, and restart the application

Limitations

There are some limitations with this code:

  • The execution time must be less than the 30s proxy timeout
  • Limit the number of return columns; there is currently a bug with Serializable in ColumnList, see Infor Xtreme incident 8629267
  • If the M3 API returns an error message it will throw the bug with Serializable in MITransactionException, see Infor Xtreme incident 8629267
  • Somehow NameValue.indexOf(name) always returned -1 during my tests, it is probably a bug in the class, so I had to hard-code the index value of the output field (yikes)
  • I do not know how to avoid the logon to M3 with user and password to get a SessionId; I wish there was a generic SYSTEM account that Event Analytics could use
  • For simplicity of illustration I did not verify all the null pointers; you should do the proper verifications
  • The code may throw MITransactionException, ProxyException and IndexOutOfBoundsException
  • You can move the Java code to a separate class in the lib folder; for that refer to my previous post

Related articles

That’s it. Let me know what you think in the comments below.

How to call M3 API from the Grid application proxy

Here is how to call M3 API using the MI-WS application proxy of the Infor Grid.

This is useful if we want to benefit from what is already setup in the Grid and not have to deal with creating our own connection to the M3 API server with Java library, hostname, port number, userid, password, connection pool, etc.

Note: For details on what Grid application proxies are, refer to the previous post.

MI-WS application proxy

The MI-WS application is part of the M3 Business Engine Foundation. We will need foundation-client.jar to compile our classes:
1b

Step 1. Logon to the Grid

First, login to the Grid from your application and get a SessionId and optionally a GridPrincipal.

From a Grid application:

import com.lawson.grid.proxy.access.GridPrincipal;
import com.lawson.grid.proxy.access.SessionController;
import com.lawson.grid.proxy.access.SessionId;

// get session id
SessionId sid = ??? // PENDING
GridPrincipal principal = ??? // PENDING;

From a client application outside the Grid:

import com.lawson.grid.proxy.access.GridPrincipal;
import com.lawson.grid.proxy.access.SessionId;
import com.lawson.grid.proxy.access.SessionProvider;
import com.lawson.grid.proxy.access.SessionUtils;
import com.lawson.grid.proxy.ProxyException;

// logon and get session id
SessionUtils su = SessionUtils.getInstance(registry);
SessionProvider sp = su.getProvider(SessionProvider.TYPE_USER_PASSWORD);
SessionId sid;
try {
    sid = sp.logon(userid, password.toCharArray());
} catch (ProxyException e) {
    ...
}
GridPrincipal principal = su.getPrincipal(sid);

Step 2. Call the M3 API

Second, call the M3 API, for example CRS610MI.LstByNumber, and get the result:

import java.util.ArrayList;
import java.util.List;
import com.lawson.grid.proxy.ProxyClient;
import com.lawson.grid.proxy.ProxyException;
import com.lawson.miws.api.data.MIParameters;
import com.lawson.miws.api.data.MIParameters.ColumnList;
import com.lawson.miws.api.data.MIRecord;
import com.lawson.miws.api.data.MIResult;
import com.lawson.miws.api.MITransactionException;
import com.lawson.miws.proxy.MIAccessProxy;

// get the proxy
MIAccessProxy proxy = (MIAccessProxy)registry.getProxy(MIAccessProxy.class);

// login to M3
ProxyClient.setSessionId(proxy, sid);

// prepare the parameters
MIParameters paramMIParameters = new MIParameters();
paramMIParameters.setProgram("CRS610MI");
paramMIParameters.setTransaction("LstByNumber");
paramMIParameters.setMaxReturnedRecords(10);

// set the return columns
ColumnList returnColumns = new ColumnList();
List<String> returnColumnNames = new ArrayList<String>();
returnColumnNames.add("CONO");
returnColumnNames.add("CUNO");
returnColumnNames.add("CUNM");
returnColumns.setReturnColumnNames(returnColumnNames);
paramMIParameters.setReturnColumns(returnColumns);

// execute
MIResult result;
try {
	result = proxy.execute(paramMIParameters);
} catch (MITransactionException e) {
	...
} catch (ProxyException e) {
	...
}

// show the result
List<MIRecord> records = result.getResult();
for (MIRecord record: records) {
	record.toString();
}

Note: When I use ColumnList it throws java.io.NotSerializableException: com.lawson.miws.api.data.MIParameters$ColumnList. It appears to be a bug in that the ColumnList class is missing implements Serializable. I reported it in Infor Xtreme incident 8629267.

That’s it. Please let me know what you think in the comments below.

Application proxies in the Infor Grid

Here is how to create and invoke application proxies of the Infor Grid.

What is an application proxy?

An application proxy is an interface for a Grid application that other applications of the Grid or client applications outside the Grid can invoke; it is inter-process communication in a distributed environment.

Example. The proxy for Grid application C is invoked from grid application A of a different host, from grid application D of the same host, and from client application K outside the Grid.

How to create an application proxy?

To create a proxy for a Grid application:

package net.company.your;

import com.lawson.grid.node.application.ApplicationEntryPoint;
import com.lawson.grid.node.application.ModuleContext;
import com.lawson.grid.proxy.ProxyException;
import com.lawson.grid.proxy.ProxyServer;

public interface HelloWorldProxy {
    public String hello(String name) throws ProxyException;
}

public class HelloWorld implements HelloWorldProxy {
    public String hello(String name) {
        return "Hello, " + name;
    }
}

public class HelloWorldApp implements ApplicationEntryPoint {
    public boolean startModule(ModuleContext context) {
        ProxyServer.registerProxy(HelloWorldProxy.class, new HelloWorld());
        return true;
    }
    public void stopModule() {
    }
}

Note: For details on how to create a Grid application, refer to the previous post on the subject.

The proxy is now ready to be invoked:
8

How to call the proxy from a Grid application?

To invoke the proxy from a Grid application:

The short source code is:

Registry registry = Node.getRegistry();
HelloWorldProxy proxy = registry.getProxy(HelloWorldProxy.class);
String result = proxy.hello("Thibaud");

The long source code is:

package net.company2.your;

import com.lawson.grid.node.application.ApplicationEntryPoint;
import com.lawson.grid.node.application.ModuleContext;
import com.lawson.grid.node.Node;
import com.lawson.grid.proxy.ProxyException;
import com.lawson.grid.registry.Registry;
import net.company.your.HelloWorldProxy;

public class HelloWorldApp2 implements ApplicationEntryPoint {
	public boolean startModule(ModuleContext context) {
		// connect
		Registry registry = Node.getRegistry();
		if (!registry.isConnected()) {
			System.err.println("failed to connect");
			return false;
		} else {
			System.out.println("connected to " + registry.getGridName());
		}
		// get the proxy
		HelloWorldProxy proxy = (HelloWorldProxy)registry.getProxy(HelloWorldProxy.class);
		if (proxy == null) {
			System.err.println("failed to get proxy...exiting");
			return false;
		} else {
			System.out.println("got proxy");
		}
		// invoke the proxy
		try {
			String result = proxy.hello("Thibaud");
			System.out.println(result);
		} catch (ProxyException e) {
			System.err.println(e.getMessage());
			e.printStackTrace();
			return false;
		}
		return true;
	}

	public void stopModule() {
	}

}

How to call the proxy from a client application?

To invoke the application proxy from a client application outside the Grid:

First, choose a Grid registry’s hostname and port number (a registry is a special node that keeps track of all nodes in a Grid):

Then, connect to the Grid, get the proxy and invoke its methods.

The short source code is:

ClientRegistry registry = new ClientRegistry("Test");
registry.connect(hostname, portNumber);
HelloWorldProxy proxy = registry.getProxy(HelloWorldProxy.class);
String result = proxy.hello("Thibaud");

The long source code is:

import com.lawson.grid.proxy.ProxyConnectionFailedException;
import com.lawson.grid.proxy.ProxyException;
import com.lawson.grid.proxy.access.GridPrincipal;
import com.lawson.grid.proxy.access.SessionId;
import com.lawson.grid.proxy.access.SessionProvider;
import com.lawson.grid.proxy.access.SessionUtils;
import com.lawson.grid.registry.ClientRegistry;
import net.company.your.HelloWorldProxy;

public class Test {
    public static void main(String[] args) {

        // connect
        ClientRegistry registry = new ClientRegistry("Test");
        try {
            registry.connect("host1623", 22102);
        } catch (ProxyConnectionFailedException e) {
            System.err.println(e.getMessage());
            e.printStackTrace();
            return;
        }
        if (!registry.isConnected()) {
            System.err.println("failed to connect");
            return;
        } else {
            System.out.println("connected to " + registry.getGridName());
        }

        // get the proxy
        HelloWorldProxy proxy = (HelloWorldProxy)registry.getProxy(HelloWorldProxy.class);
        if (proxy == null) {
            System.err.println("failed to get proxy...exiting");
            return;
        } else {
            System.out.println("got proxy");
        }

        // invoke the proxy
        try {
            String result = proxy.hello("Thibaud");
            System.out.println(result);
        } catch (ProxyException e) {
            System.err.println(e.getMessage());
            e.printStackTrace();
            return;
        }

        // disconnect
        registry.close();
        if (!registry.isClosed()) {
            System.err.println("failed to close");
        } else {
            System.out.println("registry closed");
        }
    }

}

That’s it. Please like, subscribe, share.

Hosting a Custom Web Service with the M3 API Toolkit

There are a few tools that can be used to communicate with M3 outside of smart office including report writers like DB2 or MySQL for reading, M3 Enterprise Collaborator (MEC) for running transactions and of course my favorite the M3 API toolkit. Out of all these options there are drawbacks to each. The report writing is limited to reading data unless you are living life dangerously. The MEC tool can be complicated and time-consuming to set up and pretty much can’t be done without training or a consultant. The M3 API is not all that user-friendly and can be time-consuming especially with long transactions (like adding new items) and deployment can be a bit of a nightmare.

As mentioned above the M3 API toolkit is by far my favorite way of interacting with M3 outside of smart office typically with some added functionality of table lookups which is a much better way to get info out rather than an API call. The reason for choosing the API is simple. The documentation is excellent and the possibilities are endless! That being said there are still some drawbacks.

  1. While the API toolkit supports many different languages if you want to use more than one platform transactions will have to be completely rewritten.
  2. Deployment can be difficult. The toolkit needs to be installed on every computer or device that wants to communicate with M3.
  3. If database access is desired drivers are required and permissions will need to be granted for every client.
  4. Some transactions are long and time-consuming to set up.

There is good news though. Hosting your own custom web service using WCF that uses the M3 API toolkit eliminates all of these drawbacks. If your web service is well thought out expanding your functionality and streamlining day-to-day business activities becomes easy.

So let’s get started. Out of all of the transactions in M3 one of the simplest transactions is confirming a pick list because it only requires two inputs. For the sake of getting your feet wet with this new setup without overwhelming you we will start with this transaction. As we run through this example realize that while this transaction is simple the true power of the web service becomes more obvious with more complicated transactions.

Step 1 Start a new project

In Microsoft Visual Studio start a new project using the template WCF Service Application. I’ve named my project M3Ideas. (creative right?)

OpenProject

Once the project opens you will see two important files in the solution explorer on the right. One will be called Service1 and the other will be called IService1. Service1 is a class where all of the code for actually running transactions using the API will take place and IService1 is an example of what our client applications will see and be able to use. Notice that there is both Service Contracts with Operation Contracts which are the functions that our tablets or computer programs will call and there are Data Contracts with Data Members which is how data will be presented to our software. This is what makes the Web Service powerful, we get the ability to create our own objects and essentially make a wrapper class for the M3 API Toolkit that can be used by any program we want that needs to interact with M3.

NewWebService

So lets start renaming the items to suit our needs. Since our goal is to report Pick Lists I’ll chose to rename the IService1 interface to MWS420 after the M3 program for reporting pick lists. Do this in the solution explorer on the right and Visual Studio will rename it everywhere. I’ll also make just one Operation Contract for now called ConfirmPickList which takes two integers, the delivery number and the suffix. Right now I’ll go ahead and delete the CompositeType class below but don’t forget how to make Data Contracts this interface won’t be using them but with longer transactions they are pretty much the greatest thing on earth. At this point my interface looks something like this.

MWS420

Remember this is just a prototype for what the client applications will get to use. You might be wondering why I named the interface after only one program. What if you want to use more than one program in you web service? The reason I did this is simply for organization and clarity when making the client applications. When I go to run transactions in other programs I will make new interfaces which will look just like this one only with their own name. This will make it so that the client has to not only specify which transaction to run but which interface the transaction comes from. This enables me to use similar function names for more than one program and still know exactly which program the transaction goes with. A good example of this is if I wanted to confirm manufacturing operations in PMS070 I can use similar function names and the client application will easily know which program each transaction belongs to even if the name isn’t as descriptive as it probably should be. It will become more clear what this will look like in future posts where we connect to the web service from our various clients.

Step 2 Set up the transactions

Ok lets look at the Service1.svc file now which is where the code for this transaction will be placed. Go ahead and rename this file to M3.svc and rename the class M3 as well. This is where all the code for the transactions will go. The single most important thing in this file is the interface implementation right after the class name. In an effort to be organized we will use several partial classes rather than one class. Each partial class will implement one of the interfaces we set up for our program. The code will look like this.

PartialClasses

Notice that each partial class has a colon before the interface name that it implements. Since I’ve used partial classes each one implements just one of my interfaces. If you really wanted you could use just one regular class that implements all of the interfaces. All you would have to do is list them off and separate them by a comma. I think doing it this way will be a bit more straight forward though.

So now lets get to the fun part and set up the M3 APIs and show the program how to connect to M3 and make the transactions come to life. The first thing we need to do is add a reference to the M3 API. In this example we will use the 64 bit library although you can use whichever one you want. It is interesting to know that the target platform that this service will run on is completely unrelated to the programs that will connect to it. This is another huge advantage to using the web service instead of each client using the API toolkit directly.

To add the reference go ahead and right click on references in the solution explorer and select add reference. On the left select browse and again browse at the bottom and locate the file MVXSockNx64.dll. The file should be located in C:\MvxAPI. Once the file is added you should see the file in the list of references.

Reference

Once the reference has been added you can start using the library to communicate with M3. All you need to do is add the using statement at the top of the file and you can start using the library to run transactions. Don’t forget there is a help file that is well documented that will show you how to set up the transactions. Although running these transactions isn’t that elegant the documentation will tell you how to get it done.

To run transactions you will need the port number that the API uses to connect to M3 (there is one of these for each environment), a username and password that is set up in M3 and has permissions to use the APIs that you want to use, as well as the host name. When we are done our transaction will look like this. Note my port numbers might be the same as yours but they don’t have to be. Yours could be different.

ConfirmPickList

I went ahead and put some of the constant Information in a static class called Info. This will make it so I don’t have to type in the data each time and I can use it in all of my partial classes. I’ve also set up the transaction which is exactly how the documentation says to do it. This includes padding the spaces so that each input is in the correct position of the string.

Step 3 Publish

Now that we have our first transaction set up lets publish it and test it. Once it’s been tested we can change to the port to production. To host the web service you will need a computer or virtual machine that is running IIS. You might need to enable the feature in windows. If you are unsure how to enable the feature a simple google search will walk you through it.

Ok to publish the web service right click on project in the solutions explorer and select publish. Set up a publish configuration to publish to the file system in a folder of your choosing. We’ll copy these files to the computer that will host the service. You will also need to locate the file MvxSockx64.dll file and copy that to folder as well. Go ahead and put it in the bin subfolder with the other libraries that got published. Next copy that folder to the C drive of the computer that will host the service and open IIS. On the left side of the screen expand the tree and right click Default Web Site and select add application. Then show IIS what folder your files will be and name your service.

IISSetup

To verify that your service is up and running expand the tree on the left more and select the application you just added. Then on the far right select browse and it should open a browser. Select the SVC file and it should bring you to a screen with directions how to use it. In the next post I’ll run through some samples on how to use the service to streamline reporting pick lists.

Here is the screen that you should be able to get to. If something happened to go wrong it will be displayed on this screen.

BrowserM3Service

If you have any questions on what the web service can be used for please feel free to ask in the comments. Also if you run into any problems please let me know.

Happy coding.

-The Engineer

Subscribe to Event Hub in Java

To programmatically subscribe to Event Hub or Event Analytics with your own Java class:

Write the Java code, get the libraries from the Event Hub and Event Analytics applications in the Infor Grid, download the simple SLF4J logger, compile, and run. I used this code for my demo of picking lists in Google Glass; I would not use this in a production environment.

DISCLAIMER: INFOR DOES NOT SUPPORT USAGE OF CUSTOM SUBSCRIBER OR PUBLISHER CLIENTS IN EXTERNAL APPLICATIONS. ONLY INFOR PROCESS AUTOMATION (IPA) AND M3 ENTERPRISE COLLABORATOR (MEC) ARE ALLOWED TO CONNECT TO THE EVENT HUB. USE AT YOUR OWN RISK. MAY VOID YOUR WARRANTY.

/*
javac -cp eventhub-common-2.0.20.jar;eventhub-subscriber-2.0.20.jar;slf4j-api-1.6.2.jar TestEventSubscriber.java
java -cp eventhub-common-2.0.20.jar;eventhub-subscriber-2.0.20.jar;slf4j-api-1.6.2.jar;hornetq-core-client-2.3.0.CR1.jar;hornetq-commons-2.3.0.CR1.jar;slf4j-simple-1.7.12.jar;jboss-logging-3.1.0.GA.jar;jboss-logmanager-1.2.2.GA.jar;netty-3.6.2.Final.jar;. TestEventSubscriber
*/

import java.util.Date;
import java.util.HashMap;
import java.util.Map;
import org.slf4j.Logger;
import org.slf4j.LoggerFactory;
import com.lawson.eventhub.ElementData;
import com.lawson.eventhub.EventData;
import com.lawson.eventhub.Subscription;
import com.lawson.eventhub.Subscription.Builder;
import com.lawson.eventhub.subscriber.EventReceiver;
import com.lawson.eventhub.subscriber.Subscriber;
import com.lawson.eventhub.subscriber.SubscriberException;

public class TestEventSubscriber {

    static String name = "MyTest";
    static String hostName = "host";
    static int portNumber = 22110;
    static String subscription = "M3:OCUSMA:U"; // or EventAnalytics:something
    static Subscriber subscriber;
    static Logger log = LoggerFactory.getLogger(TestEventSubscriber.class);

    public static void main(String[] args) throws Exception {
        register();
        Runtime.getRuntime().addShutdownHook(new Thread() {
            /* stop when CTRL+C */
            public void run() {
                try {
                    unregister();
                } catch (Exception ex) {
                    log.error("CTRL+C", ex);
                }
            }
        });
    }

    public static void register() throws Exception {
        log.info("Registering...");
        // create subscriber
        Map<String, String> params = new HashMap<String, String>();
        params.put("subscriber-name", name);
        params.put("subscriber-persist", "false");
        params.put("subscriber-server-address", hostName);
        params.put("subscriber-server-port", Integer.toString(portNumber));
        subscriber = new Subscriber(params);
        // add subscription
        Subscription sub = Subscription.newBuilder(subscription).build();
        subscriber.add(sub);
        // register receiver
        EventReceiver receiver = new TestEventReceiver();
        subscriber.register(receiver);
        // probe
        log.info(
            "isActive: " + subscriber.isActive() +
            ", isConnected: " + subscriber.isConnected() +
            ", isRegistered: " + subscriber.isRegistered() +
            ", isFailed: " + subscriber.isFailed());
    }

    public static void unregister() throws Exception {
        log.info("Unregistering...");
        subscriber.unregister();
    }
}

class TestEventReceiver implements EventReceiver {
    static Logger log = LoggerFactory.getLogger(TestEventReceiver.class);
    public boolean receiveEvent(EventData event) throws SubscriberException {
        log.info(
            "Subscription: " + event.getSubscription() +
            ", Publisher: " + event.getPublisher() +
            ", DocumentName: " + event.getDocumentName() +
            ", Operation: " + event.getOperation().character() +
            ", TrackingId: " + event.getTrackingId() +
            ", SentTimestamp: " + new Date(event.getSentTimestamp()).toString() +
            ", CONO: " + event.getElementValue("CONO"));
        for (ElementData element : event.getElements()) {
            log.info(
                "Name: " + element.getName() +
                ", OldValue: " + element.getOldValue() +
                ", Value: " + element.getValue());
        }
        return true;
    }
}

b
It will persist a file data/subscriber/delivered/MyTest.rcv that contains a bunch of unique ids and that you can deserialize with a ConcurrentHashMap.
Thank you.