Content-aware re-sizing of M3 programs, and text interpolation

Today I’ll illustrate two usability ideas for Infor M3 – content-aware re-sizing of M3 programs, and text interpolation – to make M3 more usable on high resolution screens.

Synopsis

The M3 user interface was built over 20 years ago for AS/400 and 5250 screens of 73 up to 98 columns and 23 rows, that’s about 0.0022 Mega-characters. The M3 user interface has evolved over the years and has stabilized in Smart Office around the same number of columns and rows as 20 years ago with each cell measuring 10 x 22 pixels at 100% zoom level, that’s about 0.5 Megapixels. It’s about the same for Infor H5 Client.

Meanwhile, screen resolutions and pixel density have continued to increase at an incredible pace. Mobile phones are being produced in China with a horizontal resolution of 3,000 pixels (3K). Televisions are being produced in Japan with a horizontal resolution of 8,000 pixels (8K). And the trend will continue. I even started working on a laptop that has a 3K screen, 3200 x 1800, that’s 5.8 Megapixels or a seven-fold increase in available pixels compared to 1024 x 768. The number of pixels on the surface grows to the square of the linear resolution, for example if we multiply by two the screen resolution on each axis from 1600 x 900 to 3200 x 1800 that’s a four-fold increase in surface.

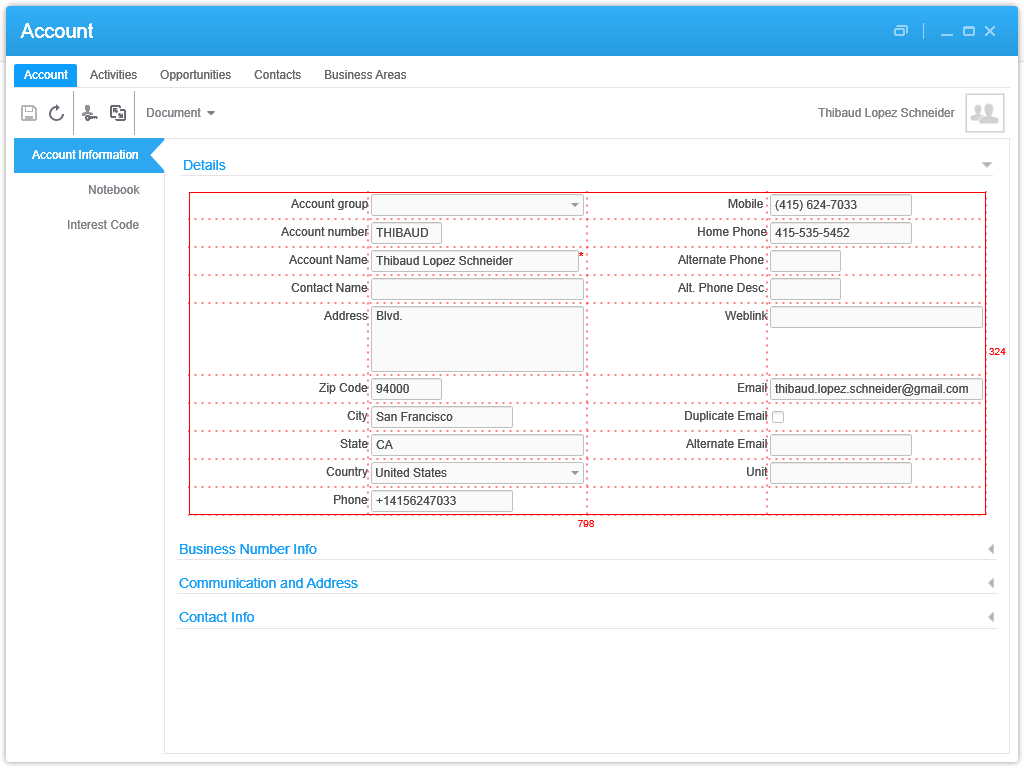
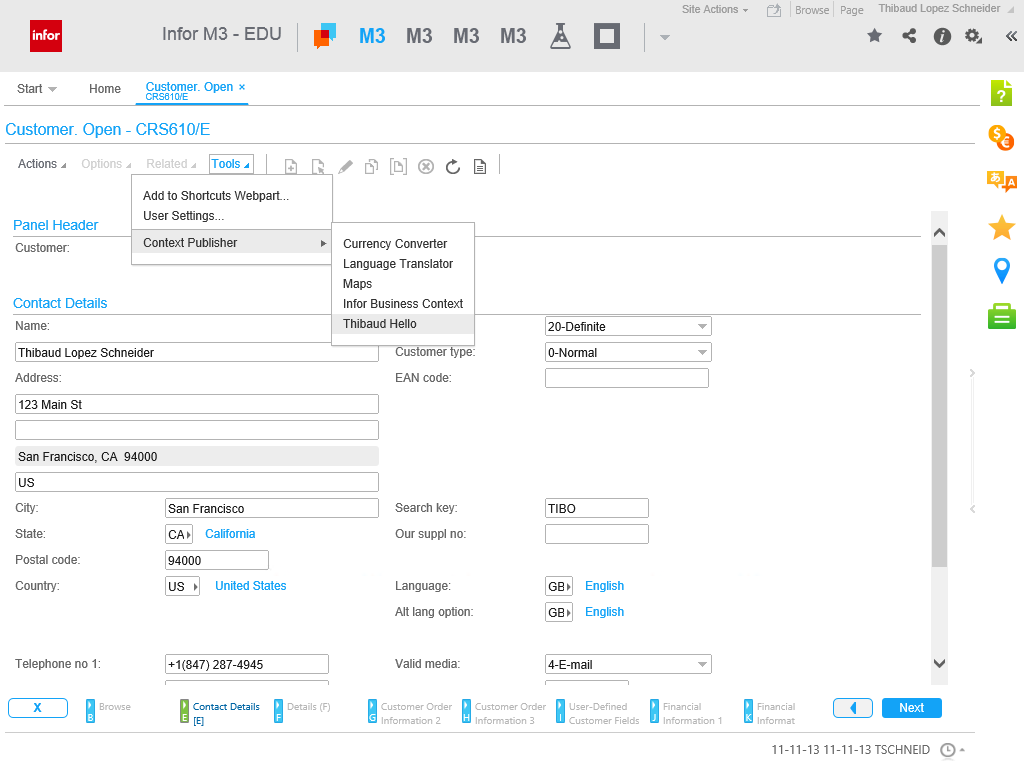
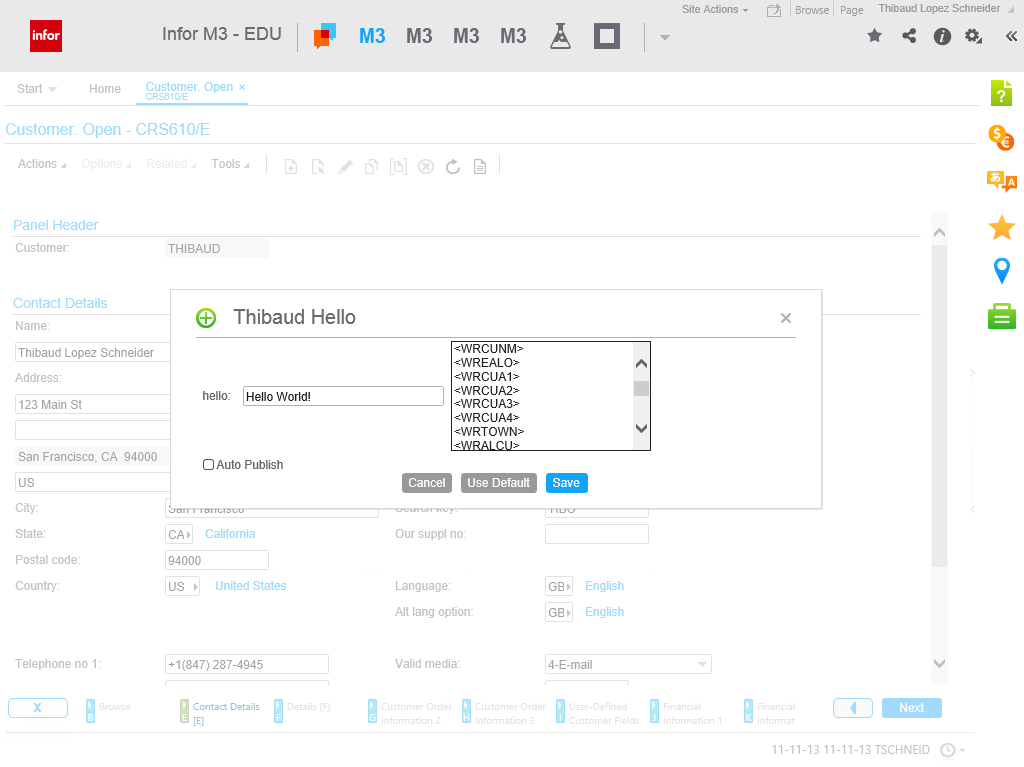
Despite those technological advances, the M3 user interface hasn’t adapted. Here is a screenshot of Smart Office on my laptop with a screen resolution of 3200 x 1800 pixels, showing CRS610/E sized to 1024 x 768 pixels at the top left corner; the result evidently illustrates how the majority of the space is unused:
3200x1800

There are numerous technical challenges to increasing the number of rows and columns of M3 programs, leading to problems in the database and in legacy source code, but there are several steps we can take in that direction.

Two years ago I illustrated the usability idea how to tile windows in Smart Office. Today, I will illustrate two new ideas: content-aware re-sizing of M3 programs, and text interpolation.

Content-aware re-sizing of M3 programs

The first usability idea is to implement content-aware re-sizing of M3 programs with inspiration from seam carving as introduced by Shai Avidan and Ariel Shamir in 2007. You can watch a demonstration of seam carving in the authors video here. The idea of seam carving is to calculate the energy function of neighboring pixels and remove paths of lowest energy in a way that respects the overall composition of the image. We can manipulate the energy values to keep certain pixels and discard others.

To try seam carving, you can use the Content Aware Scaling feature in Adobe Photoshop, or the Liquid Rescale plugin for Gimp, or the online tool RSIZR.

Here is an example of CRS610/E in RSIZR; I used the preserve and remove brushes to mark in green the important portions of CRS610/E to keep and in red the portions to discard:
mask

Previous known techniques to re-size windows include re-scaling but it causes cropping and scrollbar hell, and re-sizing but it causes the image to be squooshed and minimized. The ideal solution is re-targeting with content-aware re-sizing.

Here is a video of the result using a screenshot of CRS610/E in RSIZR:

It’s not possible to simply implement seam carving to M3 because the rendering of the M3 user interface is based on text and not on pixels. Yet, we can approximate an implementation by choosing which parts of the user interface we want to keep and which parts we can discard. We can do this with a hierarchy of importance. And we can do this programmatically. The new M3 user interface does something similar with the adaptable panel sequence ribbon.

Text interpolation

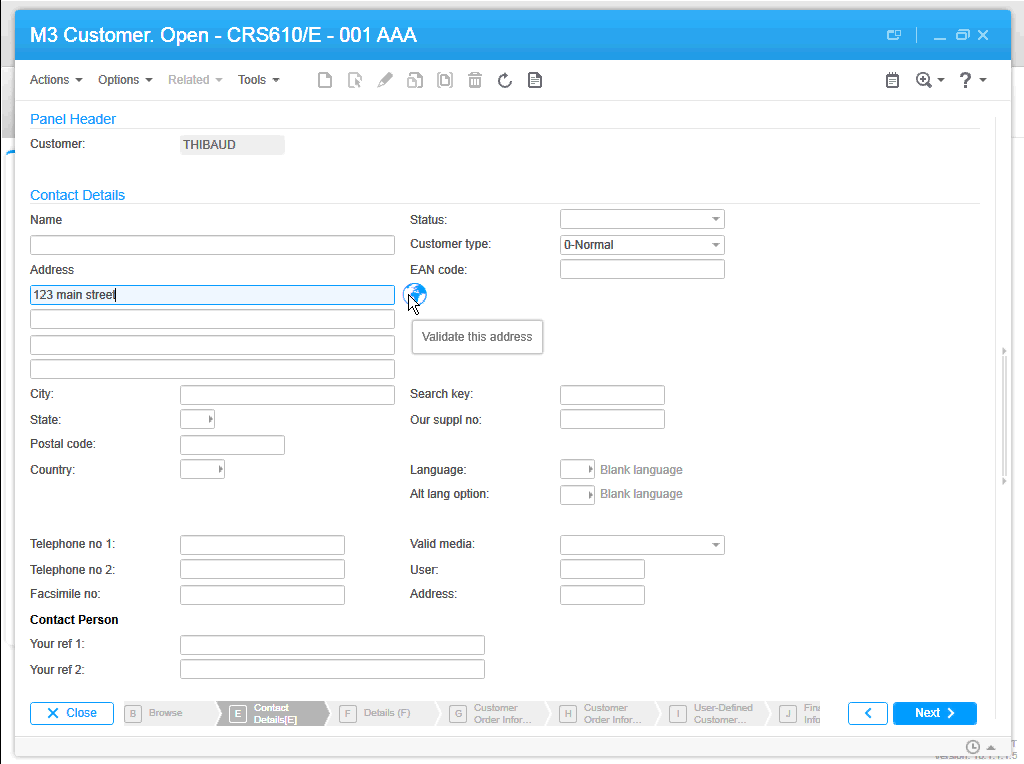
The second usability idea is text interpolation in M3 programs for text like column headers and labels.

M3 is translated in multiple languages by professional translators. You can read more about it in the two blog posts: Translate M3 with Google Translate API, and Write a Mashup in multiple languages.

The language constants are chosen in different widths to fit the varying space of the target medium. The size ids are: 03, 05, 10, 15, AA, C0, C1, C2, CA, and CF.

The text is retrieved at run-time based on the user’s language settings in MNS150.

The Java source code of each M3 program maps the fields and message identifiers. For example CRS610DSP.java:

static final String[] fieldNames={
"X0RCID","PXFKEY","WWCLIN","WWCPOS","WBOPT2","S0SFH","WWCOLN","WWPSEQ","WOPAVR","WOUPVR",
"WWQTTP","WWNFTR","WWAGGR","WXSLCT","WFSLCT","WTSLCT","WXSLC2","WFSLC2","WTSLC2","WXSLC3",
"WFSLC3","WTSLC3","WXTXT1","WXTXT2","WXTXT3","WXTXT4","WXTXT5","WXTXT6","WXTXT7","WXTXT8",
...
"WRGEOC","WRTECN","WRTEEC","WRTAXC","WTTAXC","WRAGBP","WRAGPY","WRACLB","WRAACB","WRAGCP",
"WRAGAC","WRAGPN","WRAGBG","WRAGPG","WRAGTD","OKAGTN","WRAGCA","WTRTEP","WRRPLT","WRRDIS",
"WRRTEP","WRRSMC","WRAOTP","WTRPLT","WTRDIS","WTRSMC","WTAOTP","PXPDSE","WWSPIC","WWDSEQ",
"WWCFEN","WWTPIC","WWTXVR","WWLNCD"};

static final String[] fieldMessageIds={
null,null,null,null,null,null,null,null,null,null,
...
"WGE10","WTE26",null,"WTA39","WDE03","WAGB0","WAG69","WAC95","WAACB","WAG78",
"WAG70","WAG73","WAG77","WAG76",null,"WAG75","WAG72","WDE03","WRPLT","WRDIS",
"WRTEP","WRSMC","WAT90",null,null,"WDE03",null,null,null,null,
null,null,null,null};

For example, here are the identifiers of some common fields in CRS610:

  • Customer name – CUNM: WNA01
  • Customer number – CUNO: WCU02
  • Telephone number 1 – PHNO: WPH01

We can get the values in a Smart Office script with:

function ... {
    var list: ArrayList = new ArrayList();
    list.Add(new TranslationItem(messageId + width, "MVXCON"));
    TranslationService.Current.Translate(list, OnTranslation, "GB");
}
function OnTranslation(items: IEnumerable) {
    for (var item: TranslationItem in items) {
        if (!String.IsNullOrEmpty(item.Text)) {
            if (item.Text != item.Key) {
                debug.WriteLine('Translated ' + item.Key + ' to ' + item.Text);
            } else {
                debug.WriteLine('Key ' + item.Key + ' not found in file ' + item.File);
            }
        } else {
            debug.WriteLine('item.Text is null or empty');
        }
    }
}

That calls the Net Extension command TRANSLATE.

The result would be for example:

PHNO[WPH0103]=Tl1
PHNO[WPH0105]=Tel 1
PHNO[WPH0110]=Tel no 1
PHNO[WPH0115]=Telephone no 1
PHNO[WPH01AA]=telephone number 1

We can then interpolate the resulting Strings, for example my simple algorithm returns:


Tl1
Tel1
Tel 1
Tel n1
Tel nb1
Tel nb 1
Tele nb 1
Telep nb 1
Teleph nb 1
Telepho nb 1
Telephon nb 1
Telephone nb 1
Telephone nub 1
Telephone numb 1
Telephone numbe 1
Telephone number 1

Here’s the simple algorithm I used for that:

/*
    Returns the specified headers interpolated one character at a time, first ocurrence of any different character, from left-to-right.
*/
function interpolate(headers) {
    var interpolated = new ArrayList();
    var str1;
    var str2;
    for (var i = 0; i < headers.length - 1; i++) {
        str1 = headers[i];
        str2 = headers[i + 1];
        interpolated.Add(str1);
        for (var j = 0; j < (str2.length - 1) && str1 != str2; j++) {
            if (j < str1.length) {
                if (str1[j] != str2[j]) {
                    // the character at this position of str2 doesn't exist in str1, add it to str1
                    str1 = str1.Insert(j, str2[j]);
                    interpolated.Add(str1);
                }
            } else {
                // we reached the tail of str1, add the tail of str2 to str1
                str1 = str1.Insert(j, str2[j]);
                interpolated.Add(str1);
            }
        }
    }
    interpolated.Add(str2);
    return interpolated;
}

It turns out the algorithm is not that simple to implement as not all the language constants in M3 can be automatically interpolated, for example the abbreviation no (letter O) would have to be specially interpolated to number (no letter O).

Here is a resulting video of column header interpolation in CRS610/B; I manually sanitized the interpolated Strings and added the field name in parenthesis:

Summary

In this post I illustrated two usability ideas – content-aware re-sizing of M3 programs, and text interpolation – to benefit from the technological advances in ever higher resolution screens and to improve the M3 user interface. This would be specially ideal for large Mashups.


That’s it! If you liked this post, please click the Follow button to subscribe to this blog, leave your comments in the section below, click Like, and share with your peers.


Hacking Customer Lifecycle Management (CLM)

Today I will show you how I made simple modifications to Infor Customer LifeCycle Management (CLM), the CRM product for Infor M3. With CLM standard out-of-the-box we only have the ability to show/hide fields, for example choosing whether or not we want the name, address, and phone number columns in the list or the fields in the details view. CLM is a great product, and by design it is intended to be simple to use. In my case I wanted something more: I needed to add a call button next to the phone number. That is not officially possible by default so I had to do some hacking.

I’m working on a project for a customer to integrate Cisco IP phones with CLM, such that when a customer service representative on the phone receives an incoming phone call we automatically pop-up the corresponding customer data on the screen, and conversely, such that they can click a phone number in CLM and make that outgoing phone call. I had already done some work in the past integrating Skype with Smart Office, and integrating ShoreTel phones with Smart Office. This time it’s Cisco IP phones. I cannot show you the entire source code as it’s propriety of the customer and my employer, but I will show you interesting bits and pieces, and the writing helps me clean-up my code too.

I will show you:

  • How to get the list of open CLM windows
  • How to find the phone number field
  • How to add a button to CLM and use the Design System Icons
  • How to make the outgoing phone call

About CLM

To tell if you have CLM, go to Smart Office > Help > About Infor Smart Office > View features, and you will see CLM Application:
1

Then, go to the Navigator widget, you will see the menu Customer Lifecycle Management, expand it and launch My Accounts > All:
2

It will open the list of accounts:
3_

Double-click one of the rows to open the account details:
4_

How to get the list of open CLM windows

Now we have two CLM windows open: the list of accounts, and the details of an account. To programmatically get that list, I use the DashboardTaskService.FindRunningTaskByUri method, to discriminate by Uri lclm://
0


var list /*System.Collections.Generic.List<Mango.UI.Services.FindTaskResult>*/ = DashboardTaskService.Manager.FindRunningTaskByUri("lclm://", TaskMatch.StartsWith);
for (var result : FindTaskResult in list) {
    var runner : IRunner = result.Runner;
    var task : ITask = runner.Task;
    debug.WriteLine(task.Uri);
}

That will return two tasks:
lclm://filter/?ActionType=View&MainTableID=…&FilterGroupID=…&SubFilterID=…
lclm://details/?ActionType=View&MainTableID=…&PrimaryKey=…

Now we need to tell apart the Accounts windows from the other potential CLM windows such as Activities or Contacts:

var host : IInstanceHost = runner.Host;
if (host.HostTitle.StartsWith("Account")) {
    // ...
}

This code will only work for English. Ideally we would use an official CLM API that returns the correct Tasks, but I haven’t found one. Let me know if you find one.

How to find the phone number field

Now that we have the correct window, we can get its contents and find the phone number field. First, I use WPF Inspector to visually introspect the window and find the phone number field in the visual tree:
6

The fields are layed out in one of the ancestor Grids:
5

More specifically the phone number field is itself a Grid of one row and three columns:
6_

That’s where I’ll inject my button. To get there programmatically, I use the VisualTreeHelper, and I do a pre-order depth first search:

function ... {
    //...
    var content : FrameworkElement = host.HostContent;
    if (content.GetType().ToString() == "lclmControls.Custom.TabularDetailsView") {
        var o: DependencyObject = FindPhoneTextBox(content);
        if (o != null) {
            var txtbox: SingleLineTextBox = o;
        }
    }
}
function FindPhoneTextBox(o : DependencyObject): DependencyObject {
    // visit node
    if (o != null) {
        if (o.GetType().ToString().EndsWith("SingleLineTextBox")) {
            var txtbox: SingleLineTextBox = o;
            if (txtbox.Name == "Phone") {
                return o;
            }
        }
    }
    // visit children
    for (var i = 0; i < VisualTreeHelper.GetChildrenCount(o); i++) {
        var child = VisualTreeHelper.GetChild(o, i);
        var result: DependencyObject = FindPhoneTextBox(child);
        if (result != null) {
            return result;
        }
    }
    // not found
    return null;
}

How to add a button to CLM and use the Design System Icons

Now that we found the phone number field and the Grid, we can add a button. I will use the IconButtons of the Design System as illustrated by norpe:

var btn: IconButton = new IconButton();
btn.IconName = "Phone";
btn.ToolTip = "Call this phone number."
btn.HorizontalAlignment = HorizontalAlignment.Left;
btn.Margin = new Thickness(5, 0, 0, 0);
btn.Tag = txtbox; // remember the textbox
Grid.SetRow(btn, 0);
Grid.SetColumn(btn, 2);
Grid.SetColumnSpan(btn, 2);
var grid: Grid = VisualTreeHelper.GetParent(txtbox);
grid.Children.Add(btn);
btn.add_Click(OnCall);

This is the result, with the IconButton hover and ToolTip:
7_

Note: to get the Grid I used the textboxe’s parent. This assumption is true in CLM version 1.0.0.99, but could be false in a future version of CLM in which case this code would break. Ideally we would have an official CLM API for this.

How to make the outgoing phone call

Now you can do whatever with the phone number, for example use the default operating system’s URI handler for the tel scheme which is Skype in my case.

function OnCall(sender: Object, e: RoutedEventArgs) {
    try {
        var btn: Button = sender;
        var txtbox: SingleLineTextBox = btn.Tag;
        var phoneNumber: String = txtbox.Text;
        var uri: Uri = new Uri("tel:" + phoneNumber); // RFC 3966
        ScriptUtil.Launch(uri);
    } catch (ex : Exception) {
        debug.WriteLine(ex);
    }
}

And here’s the result:
8_

The method ScriptUtil.Launch will instruct the operating system to execute the specified command. That’s the equivalent of typing start command at the DOS prompt. In our case it’s:

start tel:+14156247033

9

That means any special characters of the command must be escaped, such as white spaces and ampersands. To escape white spaces in DOS that means enclosing the entire string in double-quotes. I tried enclosing the URI in double quotes, and it didn’t work. I also tried other escaping and encoding techniques like using backslash, plus sign, and %20, and they didn’t work either. So let’s simply strip it out:

phoneNumber = phoneNumber.Replace(' ', '');

Also, in my example I used a phone number that’s already correctly formatted in international E.123 notation which Skype understands. To validate the phone number, we can use a regular expression. A simple one is to strip all characters and keep only the plus sign and the digits, but that’s probably not fully compliant with the E.123 specification so we need to work more on this in the future:

var regex = /[^\+^\d]/g;
phoneNumber =  phoneNumber.replace(regex, "");

Future work

Future work includes:

  • Use an event handler to listen for new CLM windows to automatically add the Call button as the user opens the Account views. I couldn’t find an event, and Karin confirmed it’s not currently supported. I tried MForms.MainController, DashboardTaskService, DashboardTaskBar, lclmControls.EventNotifier, WindowManager, etc. I found an event handler for M3 Forms, an event handler for the Quick Start CTRL+R, and private event handlers that would have worked had they been public. Nothing I could use. I ended up using a worker that’s polling Tasks every second in a background thread (yikes).
  • Remember we added the button so we don’t add it again next time.
  • Add the Call button on all phone number fields: fax, mobile phone, home phone, etc.
  • Validate the phone number with a regular expression that complies with the specifications.
  • Make the outgoing call thru the Cisco IP phone instead of using Skype.
  • Listen for incoming phone calls.
  • Move the script to a widget using the Smart Office SDK.

That’s it! If you like this post, subscribe to this blog. And if you rock, become an author to share your ideas.

Open source release of Address Validation for M3

I’m please to announce I finally released the first free and open source version of the Address Validation for M3, and I published the code on GitHub at https://github.com/M3OpenSource/AddressValidation . It’s a combination of a Mashup and a Script for Infor Smart Office, so it’s easy for you to modify, deploy, and run. Currently, it only supports the Google Geocoding API with more address providers to be added later.

I had implemented the first proprietary version of the script for Lawson Software in 2009. Then I had implemented several variants for various customers while working at Lawson Software and Infor. I’ve always wanted it to become available to more customers, so I decided to make it free and open source. But in order to not infringe any intellectual property and copyrights over the previous source code, I had to re-write everything from scratch. The opportunity came up when I quit Infor, and before I joined Ciber, in between the two, so there was no question on the ownership of the source code, and I had made an announcement. It took me a while but here it is. And I made some improvements over to the previous proprietary code.

Self-configuration

The script is self-configurable for the following M3 Panels, i.e. just add the script to one of the supported M3 Panels and execute, without any modifications nor arguments:

  • Customer. Open – CRS610/E
  • Customer. Connect Addresses – OIS002/E
  • Supplier. Connect Address – CRS622/E
  • Customer Order. Connect Address – OIS102/E
  • Internal Address. Open – CRS235/E1
  • Company. Connect Division – MNS100/E
  • Ship-Via Address. Open – CRS300/E
  • Service Order. Connect Delivery Address – SOS005/E
  • Shop. Open – OPS500/I
  • Bank. Open – CRS690/E
  • Bank. Connect Bank Branch Office – CRS691/E
  • Equipment Address. Open – MOS272/E

Deploy locally and test

To start using the script, download the Mashup’s Manifest and XAML and the Script from the GitHub repository. Save the three files somewhere temporary on your computer. Then, install the Mashup locally using the Mashup Designer at designer://mashup (watch the video below), and run the Script with the Script Tool at mforms://jscript (watch the video below). Then, enter an address in M3, click the validate button (the little globe icon), you can also use the TAB key from Address line 1 to focus the button and press SPACE to click it, then the Mashup will pop-up with a list of possible matches, and select an address by pressing ENTER or double-clicking the address.

Screenshots

Here are some screenshots:

1 2 3 4 5

Videos

Here are some videos (watch in full-screen and high-definition for better view):

  • How to deploy the Mashup locally
  • How to test the Script
  • Sample address searches:

Then, you can deploy the Mashup globally with LifeCycle Manager, and set the script to everybody with the Smart Office Personalization Manager in the Navigator widget > Administration tools.

Future work

There’s still more work to do. For instance, it appears the Google Geocoding API doesn’t follow the same format for all addresses, they’re local to each country, so right now we have to manually change the address layout based on the country, and I would like to improve that.

Also, I want to add a WebBrowser control to show the addresses in Google Maps.

Also, this first release only supports the Google Geocoding API. I want to add support for other address providers, like Experian QAS, FedEx, Microsoft Bing Maps, UPS, United States Postal Service, and local address providers like Pages Jaunes in France, and Eniro in Sweden.

If you like it, join the project and become a contributor!

Thibaud Lopez Schneider

Web parts for H5 Client – DRAFT

Here are illustrated steps to add a web part to H5 Client. This post follows-up my previous post where I introduced H5 Client. This is useful for creating personalizations in H5 Client.

As a reminder, H5 Client is a web client for M3 (HTML, CSS, JavaScript, jQuery, and XmlHttpRequests running in a browser) and if it runs as part of H5 Enterprise then we can add Web parts which are custom web development parts that we write to interact between H5 Client and our code. This technique is similar to Movex Next Extension Adaptation Interface (MNEAI) scripts for Movex Explorer around 1999 and Movex Workplace around 2000, and it is similar to Smart Office Scripts of today.

DRAFT

I started this post a long time ago, faced some technical issues, moved on to other assignments, and never managed to finish it nor polish it. So the screenshots don’t match with each other, and the steps are not necessarily all in order. It’s very much like a draft post. But I decided to post it anyway otherwise I’ll never post it. And there are enough steps and screenshots so you get the point. That will give you a head start.

M3 H5 Enterprise

First, you will need M3 H5 Enterprise to be able to use Web Parts; H5 Foundation will not be sufficient.

Create a webpage

Then, create a webpage and publish it on a web server of your choice. It will be run in an iframe in Ming.le and will communicate with H5 Client via message passing.

For example, I created a folder jscriptH5 next to the jscript folder that is used for Smart Office scripts, and I dump my HTML and JavaScript files there (this is probably not the best location as the parent folder is managed by LifeCycle Manager and might be deleted with upgrades…although so will the jscript folder):

\\yourhost\d$\Infor\LifeCycle\<yourhost>\grid\<yourgrid>\grids\<yourgrid>\applications\M3_UI_Adapter\webapps\mne\jscriptH5\

You will need to be a bit familiar with jQuery.

Add code like this for message passing:

<html>
    <head>
        <title>Thibauds web part test</title>
        <script src="somewhere/jquery-1.8.2.min.js"></script>
        <script src="somewhere/jquery.json-2.2.js"></script>
        <script>
            jQuery(function ($) {
                // register message handler
                infor.companyon.client.registerMessageHandler('inforBusinessContext', messageHandler);
                // send a message to Ming.le (for instance resize the Web Part)
                infor.companyon.client.sendMessage(window.name, { height : '235px' });
                // receive a message from Ming.le with the values of the Context
                function messageHandler(o) {
                    alert(o);
                }
            });
        </script>
    </head>
    <body>
        Hello World!!!
    </body>
</html>

Message definition

Then, follow these steps to add a message definition to the M3_UI_Adapter (mne) properties in LifeCycle Manager:

  1. Go to LifeCycle Manager
  2. In the Applications View, expand your environment (Development, Education, Test, etc.)
  3. Right-click M3_UI_Adapter and select Configure Application
  4. Click Edit Properties
  5. Expand Infor Workspace Settings
  6. Click the Value of the Property Context List to edit it (it will show the current number of Entries)
  7. Click Add New Line and select Append
  8. Enter a message definition as a JSON object, with

    uid, title, type, and data, where data is a JSON object with the key/value pairs you want to pass to your Web Part, for example:

    {“uid”:”M3_TBO”, “title”:”Thibaud Hello”, “type”:”thibaudHello”, “data”:{“hello”: “”}}

  9. Validate your JSON object for example with JSON lint
  10. Here’s a screenshot so far (the JSON in the screenshot was an old test with wrong values):
    14_
  11. Click Save to save changes to disk, a popup will appear
  12. Click Save again to confirm
  13. Now let’s verify it’s saved correctly
  14. Close the tab
  15. Back in the Applications View, right-click M3_UI_Adapter and select Monitor Application
  16. Expand the Node for Application M3_UI_Adapter and select M3UIAdapterModule
  17. Select Properties
  18. Double-check the Value of the ContextList Property and ensure your JSON object is correct; an incorrect value will break H5 Client without giving you any error messages and that will be difficult to troubleshoot.

Infor Ming.le administration

Then, follow these steps to become an administrator of Infor Ming.le:

  1. Go to Infor Ming.le at http://yourhost/SitePages/InforSuite.aspx
  2. Login as an administrator
  3. Select Site Actions > Site Permissions:
    1_
  4. Select Site Collection Administrators
  5. Enter the userids of those who will be administrators
  6. Click OK

Ming.le Application Viewer Web Part

Then, follow these steps to add your Web Part:

  1. Select Site Actions
  2. Select Ming.le Application Viewer Web Part:
    3_
  3. Select the Category, for example Infor
  4. Enter the Title, Description, and URL
  5. Select an Icon
  6. Click Save (the URL when I took the screenshot had an incorrect value):
    4__

Context Application Manager

Then, follow these steps to add the Context Application Manager:

  1. Select Context Application Manager in the top right corner of Ming.le
  2. Select your Web Part on the left, and click the right arrow
  3. Click Save (my screenshots don’t match my final test but you get the point):
    6__
  4. Now you have a Web Part on the Right Panel Zone:
    7_

Context Publisher

Then, configure the Context Publisher:

  1. Go to the desired M3 program/panel, for example CRS610/E
  2. Select Tools > Context Publisher, and select your Web Part
  3. Configure your Web Part by setting values for the keys, for example Hello World! <WRCUNM>:
    31
  4. Click Save:
    32

Start Web Part

Now start the Web Part by clicking on the Panel Zone. You web part code will get the parameters.

Future work

Future work would include:

  • Reduce the number of steps it takes
  • Configure the Web Part per M3 environment (DEV, EDU, TST, etc.). This seems like it’s not native to Ming.le Web Parts.
  • Un-hard-code the Web Part URL
  • Get any field dynamically in source code, ideally with a variable like controller or content, instead of having to configure the Message Definition and Web Part (I’m not an expert on this yet so there might already be some functions or variables available that I’m not seeing).
  • Apply the Web Part only to a desired program/panel.

Acknowledgement

Thanks to Joakim B. for all the help.

That’s it.

Command & Control a Mashup from an M3 program

Here’s an illustration of how to Command & Control a Mashup from an M3 program with a Smart Office Script, for example to launch a Mashup, to set values in a Mashup, to attach event handlers, to get values from the Mashup, and to close the Mashup. I learned this technique from norpe’s MashupBrowse post.

This is useful to add functionality in a Mashup where XAML alone is not sufficient.

You can attach the script to an M3 program, via Tools > Personalize > Scripts, via Tools > Personalize > Shortcut, or you can execute a stand-alone script.

Steps

First, create and deploy a simple Hello World Mashup (no values nor event handlers, to illustrate the point):

<Grid xmlns="http://schemas.microsoft.com/winfx/2006/xaml/presentation">
    <StackPanel>
        <Label Name="lblMessage" Content="Message" />
        <TextBox Name="txtValue" />
        <Button Name="btnOK" Content="OK" />
    </StackPanel>
</Grid>

1 2

Then, create a script that starts the Mashup:

var uri : String = "mashup:///?BaseUri=HelloWorld.mashup&RelativeUri=HelloWorld.xaml";
var task : Task = new Task(uri);
var handler : RunnerStatusChangedEventHandler = Mashup_OnStatusChanged;
DashboardTaskService.Current.LaunchTask(task, null, handler);

Then, get a reference to the Mashup:

function Mashup_OnStatusChanged(sender : Object, e : RunnerStatusChangedEventArgs) {
    if (e.NewStatus == RunnerStatus.Running) {
        // the Mashup is starting
        var runner : Runner = e.Runner;
    } else if (e.NewStatus == RunnerStatus.Closed) {
        // the Mashup is closing
    }
}

Then, set values in the Mashup:

txtValue = runner.Host.HostContent.FindName("txtValue");
txtValue.Text = "Hello World!";

Then, attach event handlers:

var btnOK : Button = runner.Host.HostContent.FindName("btnOK");
btnOK.add_Click(Mashup_OnBtnOK);

Result

And here’s the result, the Mashup launched, the value “Hello World!” set in the TextBox, the Click event handler added to the button, and the value of the TextBox retrieved back, all that commanded & controlled from the Script, which would not have been all possible with XAML alone:

3

Source code

Here’s the complete source code:

import System;
import System.Windows;
import System.Windows.Controls;
import Mango.Services;
import Mango.UI.Core;
import Mango.UI.Services;

package MForms.JScript {

class HelloWorldCC {
    var debug;
    var txtValue : TextBox;
    public function Init(element : Object, args : Object, controller : Object, debug : Object) {
        try {
            this.debug = debug;
            // launch the Mashup
            var uri : String = "mashup:///?BaseUri=HelloWorld.mashup&RelativeUri=HelloWorld.xaml";
            var task : Task = new Task(uri);
            var handler : RunnerStatusChangedEventHandler = Mashup_OnStatusChanged;
            DashboardTaskService.Current.LaunchTask(task, null, handler);
        } catch (ex : Exception) {
            debug.WriteLine(ex);
        }
    }
    function Mashup_OnStatusChanged(sender : Object, e : RunnerStatusChangedEventArgs) {
        try {
            if (e.NewStatus == RunnerStatus.Running) {
                // the Mashup is starting
                debug.WriteLine("Mashup is starting");
                var runner : Runner = e.Runner;
                // set values in the Mashup
                txtValue = runner.Host.HostContent.FindName("txtValue");
                txtValue.Text = "Hello World!";
                // attach an event handler to the Mashup
                var btnOK : Button = runner.Host.HostContent.FindName("btnOK");
                btnOK.add_Click(Mashup_OnBtnOK);
            } else if (e.NewStatus == RunnerStatus.Closed) {
                // the Mashup is closing
                debug.WriteLine("Mashup is closing");
            }
        } catch (ex : Exception) {
            debug.WriteLine(ex);
        }
    }
    function Mashup_OnBtnOK(sender : Object, e : RoutedEventArgs) {
        try {
            // get values from the Mashup
            MessageBox.Show(txtValue.Text);
        } catch (ex : Exception) {
            debug.WriteLine(ex);
        }
    }
}
}

Finally

Norpe’s code is more complete and you should implement its features in your script as well. For example norpe’s script checks if there is already an open instance of the Mashup, it can control the Mashup with keyboard shortcuts, it puts values back in the M3 panel, it closes the Mashup, it detaches event handlers, and it does cleanup.

That’s it!

Using Dynamic WS to consume a LWS in a script

Here is a new solution to call SOAP Web Services from a Smart Office script that complements the previous known solutions. It’s a very easy and fast way to call LWS and does not require you to write any C# or XML.

It’s using a private API in Smart Office so it might change in future releases, without any announcement.

Continue reading Using Dynamic WS to consume a LWS in a script

Progress indicator adorner

Last week in Stockholm norpe showed me how to add a progress indicator Adorner to a ListView when I call an M3 API in a background thread in a Personalized Script for Lawson Smart Office. When I execute a time consuming operation I like to maintain good usability by indicating activity to the user. For that, I used to display a message to the user in a Label like “Loading please wait…”, but that doesn’t catch the eye very well, and/or I used to changed the mouse cursor to Cursor.Wait. but I think that’s a shared resource. So I prefer this new technique.

It’s only two lines of code from Mango.UI.Controls:

ProgressIndicatorAdorner.AddAdorner(element, useOpacity, scaleFactor);
ProgressIndicatorAdorner.RemoveAdorner(element);

Here’s the method’s signature:
Reflector

Here’s the result:
1_ 2_

That’s it.

OptiMap_V2

Here is the second version of the OptiMap script for Smart Office that integrates the Delivery Toolbox – MWS410/B with OptiMap – Fastest Roundtrip Solver to calculate and show on Google Maps the fastest roundtrip for the selected Routes. This extends the first version of the script.

In this second version I added the possibility to set the starting address (for example the Warehouse) as the Script argument. See lines 52-54.

import System;
import System.Web;
import System.Windows;
import Mango.UI.Services.Lists;
import MForms;

/*

	OptiMap_V2 for M3
	Thibaud Lopez Schneider, Infor, October 19, 2012 (rev.2)

	This script illustrates how to integrate the Smart Office Delivery Toolbox - MWS410/B with OptiMap - Fastest Roundtrip Solver, http://www.optimap.net/
	to calculate and show on Google Maps the fastest roundtrip for the selected Routes; it's an application of the Traveling Salesman Problem (TSP) to M3.
	This is interesting for a company to reduce overall driving time and cost, and for a driver to optimize its truck load according to the order of delivery.

	To install this script:
	1) Deploy this script in the mne\jscript\ folder of your Smart Office server
	2) Create a Shortcut in MWS410/B to run this script; for that go to MWS410/B > Tools > Personalize > Shortcuts > Advanced > Script Shortcut, set the Name to OptiMap, and set the Script name to OptiMap
	3) Optionally, set the starting address (for example the Warehouse) as the Script argument; the address must be recognized by Google Maps
	4) Create a View (PAVR) in MWS410/B that shows the address columns ADR1, ADR2, ADR3

	To use this script:
	1) Start MWS410/B
	2) Switch to the View (PAVR) that shows the address columns ADR1, ADR2, ADR3
	3) Select multiple Routes in the list (press CTRL to select multiple rows)
	4) Click the OptiMap Shortcut
	5) The Shortcut will run the script, the script will launch OptiMap in a browser and pass the selected addresses as locN parameters in the URL, and OptiMap will optimize the roundtrip

	For more information and screenshots refer to:
	https://thibaudatwork.wordpress.com/2012/10/04/route-optimization-for-mws410-with-optimap/
	https://thibaudatwork.wordpress.com/2013/03/08/optimap_v2/

*/
package MForms.JScript {
	class OptiMap_V2 {
		public function Init(element: Object, args: Object, controller : Object, debug : Object) {
			try {
				// get a reference to the list
				var listControl: MForms.ListControl = controller.RenderEngine.ListControl;
				var listView: System.Windows.Controls.ListView = controller.RenderEngine.ListViewControl;
				if (listControl == null || listView == null) { MessageBox.Show('Error: Couldn\'t find the list.'); return; }
				// get the selected rows
				var rows = listView.SelectedItems; // System.Windows.Controls.SelectedItemCollection
				if (rows == null || rows.Count == 0) { MessageBox.Show('Error: Select multiple routes in the list (press CTRL to select multiple rows).'); return; }
				// get the address columns ADR1, ADR2, ADR3
				var column1: int = listControl.GetColumnIndexByName('ADR1');
				var column2: int = listControl.GetColumnIndexByName('ADR2');
				var column3: int = listControl.GetColumnIndexByName('ADR3');
				if (column1 == -1 || column2 == -1 || column3 == -1) { MessageBox.Show('Error: Couldn\'t find the address columns ADR1, ADR2, ADR3.'); return; }
				// construct the URL
				var query: String = 'http://www.optimap.net/?';
				// set the optional starting address
				var offset: int = 0;
				if (!String.IsNullOrEmpty(args)) { offset=1; query += 'loc0=' + HttpUtility.UrlEncode(args) + '&'; }
				// add the selected addresses
				for (var i: int = 0; i < rows.Count; i++) {
					var row: ListRow = rows[i];
					var ADR1: String = row[column1];
					var ADR2: String = row[column2];
					var ADR3: String = row[column3];
					var address: String = ADR1 + ',' + ADR2 + ',' + ADR3;
					query += 'loc' + (i+offset) + '=' + HttpUtility.UrlEncode(address) + '&';
				}
				// launch OptiMap in a browser
				ScriptUtil.Launch(new Uri(query));
			} catch (ex: Exception) {
				MessageBox.Show(ex);
			}
		}
	}
}

Here is a screenshot of how to set the address as an Argument of the script:

8_

That’s it!

(Oh, and I finally learned how to post source code to WordPress. Duh!)

Related Articles

Route optimization for MWS410 with OptiMap

Here is a script for Lawson Smart Office that integrates the Delivery Toolbox – MWS410/B with OptiMap – Fastest Roundtrip Solver to calculate and show on Google Maps the fastest roundtrip for the selected Routes. It’s a solution to the Travelling salesman problem (TSP) for M3 Routes.

This is interesting for a company to reduce overall driving time and cost, and it’s interesting for a driver to optimize its truck load according to the order of delivery.

To solve the TSP on Google Maps, the authors of OptiMap implemented several algorithms, including brute force, nearest-neighbor, and the Ant Colony Optimization, and released the code for the TSP Solver for Google Maps API as open source with an MIT License. Because the TSP is an NP-complete problem the solution only works well for up to 10 cities on current desktop computers. But OptiMap can apparently solve more than 15 cities. You can read more about OptiMap at Behind the Scenes of OptiMap and OptiMap version 4 is here.

To integrate OptiMap with Smart Office I wrote a simple Personalized Script that gets the addresses of the selected Routes in MWS410/B, and that opens OptiMap in a web browser with the delivery addresses in the URL. The GET parameters are explained in OptiMap’s Optimize Your Trips.

Setup

To install and use the script:

  1. Deploy this script in the mne\jscript\ folder in your Smart Office server:
  2. Create a Shortcut in MWS410/B to run this script; for that go to MWS410/B > Tools > Personalize > Shortcuts > Advanced, expand Script Shortcut, set the Name to OptiMap, set the Script name to OptiMap, click Add, and click Save:
  3. Create a View (PAVR) in MWS410/B that shows the address columns ADR1, ADR2, ADR3:
  4. Select multiple Routes in the list (press CTRL to select multiple rows), and click the OptiMap Shortcut to run the script:

Result

The script will launch OptiMap for the selected Routes, and OptiMap will optimize the order of delivery:

Source code
Here is the complete source code for the script:

import System;
import System.Web;
import System.Windows;
import Mango.UI.Services.Lists;
import MForms;

/*
Integrates the Smart Office Delivery Toolbox - MWS410/B with OptiMap - Fastest Roundtrip Solver, http://www.optimap.net/
to calculate and show on Google Maps the fastest roundtrip for the selected Routes.
This is interesting to reduce driving time and cost, and for a driver to optimize its truck load according to the order of delivery.
1) Deploy this script in the mne\jscript\ folder in your Smart Office server
2) Create a Shortcut in MWS410/B to run this script; for that go to MWS410/B > Tools > Personalize > Shortcuts > Advanced > Script Shortcut, set the Name to OptiMap, and set the Script name to OptiMap
3) Create a View (PAVR) in MWS410/B that shows the address columns ADR1, ADR2, ADR3
4) Select multiple Routes in the list (press CTRL to select multiple rows)
5) Click the OptiMap Shortcut to run this script and launch OptiMap for the selected Routes
For more information and screenshots refer to https://thibaudatwork.wordpress.com/2012/10/04/route-optimizer/
Thibaud Lopez Schneider, Infor, October 4, 2012 (rev.2)
*/
package MForms.JScript {
    class OptiMap {
        public function Init(element: Object, args: Object, controller : Object, debug : Object) {
            try {
                // get the list
                var listControl: MForms.ListControl = controller.RenderEngine.ListControl;
                var listView: System.Windows.Controls.ListView = controller.RenderEngine.ListViewControl;
                if (listControl == null || listView == null) { MessageBox.Show('Error: Couldn\'t find the list.'); return; }
                // get the selected rows
                var rows = listView.SelectedItems; // System.Windows.Controls.SelectedItemCollection
                if (rows == null || rows.Count == 0) { MessageBox.Show('Error: No rows selected.'); return; }
                // get the address columns ADR1, ADR2, ADR3
                var column1: int = listControl.GetColumnIndexByName('ADR1');
                var column2: int = listControl.GetColumnIndexByName('ADR2');
                var column3: int = listControl.GetColumnIndexByName('ADR3');
                if (column1 == -1 || column2 == -1 || column3 == -1) { MessageBox.Show('Error: Couldn\'t find the address columns ADR1, ADR2, ADR3.'); return; }
                // construct the URL
                var query: String = '';
                for (var i: int = 0; i < rows.Count; i++) {
                    var row: ListRow = rows[i];
                    var ADR1: String = row[column1];
                    var ADR2: String = row[column2];
                    var ADR3: String = row[column3];
                    var address: String = ADR1 + ',' + ADR2 + ',' + ADR3;
                    query += 'loc' + i + '=' + HttpUtility.UrlEncode(address) + '&';
                }
                var uri: Uri = new Uri('http://www.optimap.net/?' + query);
                // launch OptiMap
                ScriptUtil.Launch(uri);
            } catch (ex: Exception) {
                MessageBox.Show(ex);
            }
        }
    }
}

That’s it!

Related posts

See also version OptiMap_V2.

Geocoding of Stock Locations in MMS010

Here is a video that illustrates the process to set the Geo Codes XYZ of Stock Locations in MMS010 in Smart Office, i.e. to set the latitude, longitude, and altitude of Stock Locations, a.k.a. geocoding. In my example I determined the coordinates based on an 3D model built in Google SketchUp and geo-located in Google Earth; a GPS receiver with good indoor accuracy would work as well. With geocoded information, we can present data from the Warehouse Management System in a graphical way. This is important for applications such as showing Stock Locations on a map, or finding the shortest path for a picking list.

Demo video

How to proceed

These are the steps I followed in the video to geolocate the Stock Locations in MMS010:

  1. I used this SketchUp model of a 3D warehouse that I had previously geo-located:
  2. I also used this other SketchUp model of the Stock Locations that I had previously uniquely identified:
  3. Then, I used this Ruby script to get the geocoding of the floor plan:
  4. Then, I used this other Ruby script to get the geocoding of each Stock Location:
  5. The result is this CSV file of the floor plan’s geocodes and each Stock Location’s geocodes:
  6. Then, I used this Lawson Web Service of type Display Program to set the values for the fields Geo Code X (GEOX), Geo Code Y (GEOY), and Geo Code Z (GEOZ) in MMS010/F for a specified Warehouse (WHLO) and Stock Location (WHSL):
  7. Then, I used a Visual Basic macro for Microsoft Excel to call the Web Service for all Stock Locations:
  8. Finally, I used this script to display the Geo Codes XYZ in MMS010/B1:

Result

The result is the list of Stock Locations in MMS010/B1 displaying all the Geo Codes XYZ:

Resources

  • Download the SketchUp model of the geo-located 3D warehouse.
  • Download the SketchUp model of the uniquely identified Stock Locations.
  • Download the Ruby script to get the geocoding of the floor plan.
  • Download the Ruby script to get the geocoding of each Stock Location.
  • Download the resulting CSV file of all Stock Locations and their Geo Codes.
  • Download the Lawson Web Service to set the Geo Codes XYZ of a Stock Location.
  • Download the script to display the Geo Codes XYZ in MMS010/B1.
  • Watch the video of the entire process.

Related articles

UPDATE

2012-09-28: I had a bug in the Ruby script that miscalculated the Y and Z geocodes for the Stock Locations. I corrected the script and the resulting CSV file and I updated the links above.