Now I will do the initial mass load of users.
As a reminder, we create the identities and actors in the gen data area, and the users and tasks in the environment data area (e.g. DEV, TST). For more information, refer to part 1.
Design decisions: Command line or process flow?
We could use either the command line or the Landmark activity node in a process flow. I will explore the former now, and the latter next time. Note the command line is not available in Infor CloudSuite.
1. Identities and actors
I will generate a file of identities and actors, reading from M3, and I will use the secadm command to import the file to the gen data area in IPA.
1.1. Documentation
There is some documentation for the secadm command at Infor Landmark Technology Administration Guides > Infor Landmark Technology User Setup and Security > Landmark for Administrators > Using the Administrative Tools > The Security Administration Utility (secadm):

1.2. Extract the data
Extract all the users (MNS150) and email addresses (CRS111) from M3, and save them to a file somewhere (e.g. semi-colon separated users.csv):
SELECT DISTINCT JUUSID, JUTX40, CBEMAL
FROM MVXJDTA.CMNUSR U
LEFT OUTER JOIN MVXJDTA.CEMAIL E
ON U.JUUSID=E.CBEMKY AND E.CBEMTP='04'

Note: If you already know the subset, you can filter the list to only the users that will participate in approval flows, and discard the rest.
PROBLEM: M3 is environment specific (e.g. DEV, TST), but the gen data area is not. And M3 is company (CONO) specific, whereas IPA is not. So we will have collisions and omissions.
1.3. Transform
Transform the list of users to a list of secadm commands, where for each user, we have the commands to create the identity, actor, actor-identity, and actor-role, e.g.:
identity add SSOPV2 USER123 --password null
actor add USER123 --firstname Thibaud --lastname "Lopez Schneider" --ContactInfo.EmailAddress thibaud.lopez.schneider@example.com
actor assign USER123 SSOPV2 USER123
role assign USER123 InbasketUser_ST
Not all attribute keys are documented, but you can find them all here:


For the transformation you can use the following DOS batch file (e.g. users.bat):
@echo off
for /f "tokens=1-3 delims=;" %%a in (users.csv) do (
    echo identity add SSOPV2 %%a --password null
    for /f "usebackq tokens=1,* delims= " %%j in ('%%b') do (
        echo actor add %%a --firstname %%j --lastname "%%k" --ContactInfo.EmailAddress %%c
    )
    echo actor assign %%a SSOPV2 %%a
    echo role assign %%a InbasketUser_ST
)
Note 1: Replace delims with the delimiter of your file (e.g. semi-colon in my case).
Note 2: The command will naively split the name TX40 in two, where the first word is the first name and the rest is the last name; this will be an incorrect split in many cultures.
Save the result to a text file (e.g. users.txt):
users.bat > users.txt
We now have a list of commands ready to be executed:

1.4. secadm
Execute the secadm command to import the file to the gen data area:
cd D:\Infor\LMTST\
enter.cmd
secadm -f users.txt -d gen

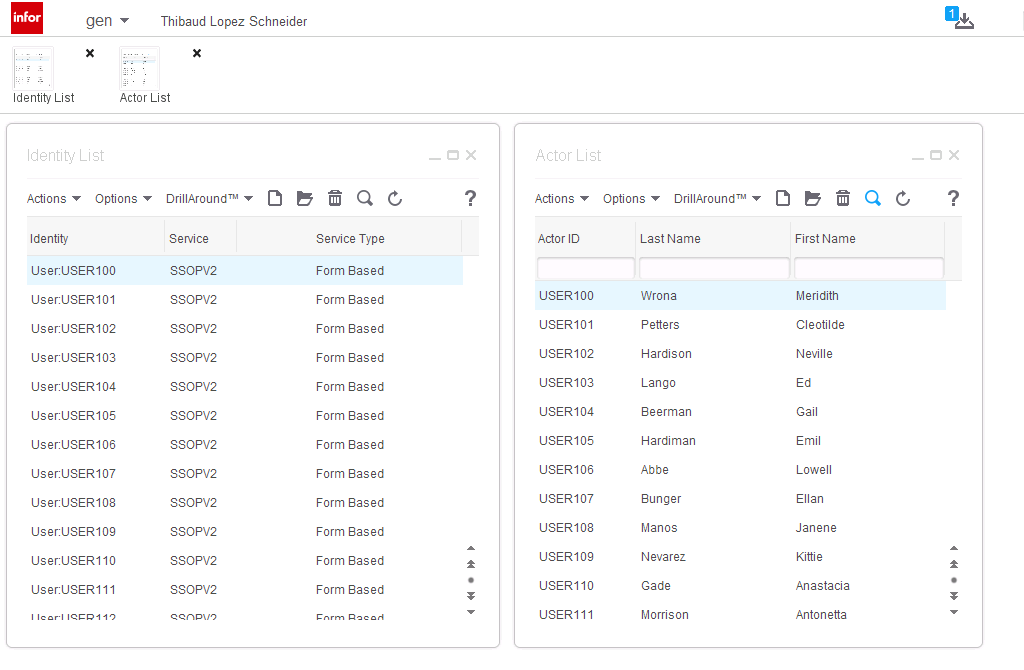
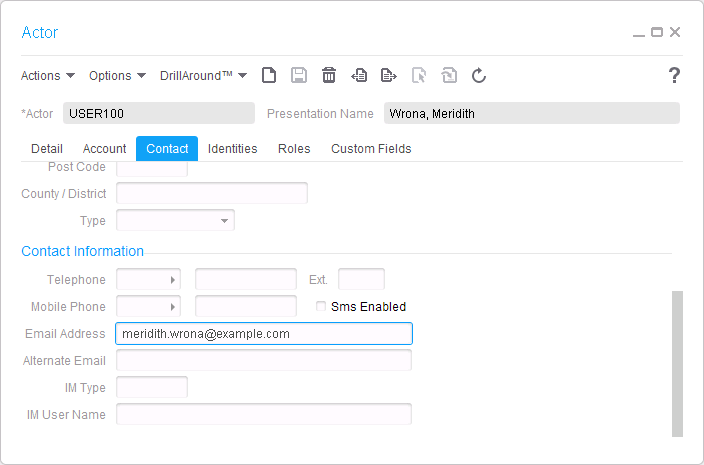
1.5. Result
Here is the resulting list of identities, actors, actor-identity, and actor-role, in the gen data area:


1.6. Repeat per environment
Repeat from step 1.2 for the next environment (e.g. DEV, TST). Due to the data model dissonance between M3 and IPA, there will be collisions; see the challenges section in part 1.
1.7. Delete
To delete the records, proceed in reverse with the remove and delete sub-commands and the –complete argument. Be careful to not delete the administrative users M3SRVADM and lawson.
@echo off
for /f "tokens=1-3 delims=;" %%a in (users.csv) do (
    echo role remove %%a InbasketUser_ST
    echo actor remove %%a SSOPV2 %%a
    echo actor delete %%a --complete
    echo identity delete SSOPV2 %%a
)
1.8. Update
I could not find a command to update the Actor; for future work; meanwhile, delete and re-add.
1.9. More
Here is some more help for the secadm command:
D:\Infor\LMTST>enter.cmd

D:\Infor\LMTST>secadm
Usage: Utility for security administration.
Syntax: secadm [secadm-options] command [command-options]
where secadm-options are global secadm options
(specify --secadm-options for a list of secadm options)
where command is a secadm command
(specify --help-commands for a list of commands
where command-options depend on the specific command
(specify -H followed by a command name for command-specific help)
Specify --help to receive this message
FAILED.

D:\Infor\LMTST>secadm --secadm-options
-c Continue on error
-d dataarea
-? Print help meesage
-i Enter interactive shell mode
-H <command> Command-specific help
-f <filename> File to use as for commands
-r Recover Secadm Password
-q Run quietly
--secadm-options For a list of secadm options
-s Run silently
--help-commands For a list of commands
-m Enter interactive menu mode
-p Password for secadm
--help Print this message
-v Print version information
[-p >password>] -u Upgrade AuthenDat
FAILED.

D:\Infor\LMTST>secadm --help-commands

Valid sub-commands are:
accountlockoutpolicy Maintain system account lockout policies.
actor Maintain system actors
httpendpoint Maintain system HTTP endpoints and HTTP endpoint assignments.
identity Maintain system identities.
load Load data from a file.
provision Provision Lawson users
loginscheme Maintain system login schemes.
migrate Migrate supplier identities from default primary SSO service to domain primary SSO service
passwordresetpolicy Maintain system password reset policies.
role Maintain system roles
secanswer Maintain system security answers.
secquestion Maintain system security questions.
service Maintain system services.
ssoconfig Maintain Single Sign On Configuration
ssodomain Maintain system domain.
security Assign security classes to roles and control Security activation
admin Lawson Security Admin Configuration
passwordpolicy Maintain system password policies.
generate Secadm script generation from data
agent Migrate system agents and actors
principalresolver Maintain custom Principal Resolver code.
report Security Data Reports
mitrustsetup Set up trusted connections for an MI socket service.
keys Key Management
SSOCertificate Manage Federated Server Certificates
wsfederation Manage WS Federation Settings
proxy Proxy
class SecurityClass
FAILED.

D:\Infor\LMTST>secadm -H identity
identity Maintain system identities.

Valid sub-commands are:
privileged Maintain privileged identities.
add Add identity to the system.
update Update identity in the system.
delete Delete identity from the system.
display Display identity in the system.
pwdResetByIdentity Password reset by identity in the system.
pwdResetByService Password reset by service in the system.
listIdentities List all identities in the system.
listBadPasswords List identities with bad passwords by service in the system
overrideBadPasswords Override password for identities with bad password by service in the system
DONE.

D:\Infor\LMTST>secadm -H actor
actor Maintain system actors

Valid sub-commands are:
add Add actor to the system.
delete Delete actor from the system. !This option is temporarily unavailable
assign Assign Identity to an actor.
remove Remove Identity from an actor.
accountenable Enable actor account in the system.
accountdisable Disable actor account in the system.
enablerunas Enable Run As for Actor in the system.
disablerunas Disable Run As for Actor in the system.
actorenable Enable actor in the system.
actordisable Disable actor in the system.
context Actor context maintenance
ctxproperty Context property maintenance
list List all actors in the system.
link Actor to Agent link maintenance
DONE.

D:\Infor\LMTST>
2. Users and tasks
Now, for each M3 environment (e.g. DEV, TST), I will generate a file of users and tasks, and I will call the importPFIdata command to import the file to the respective data area.
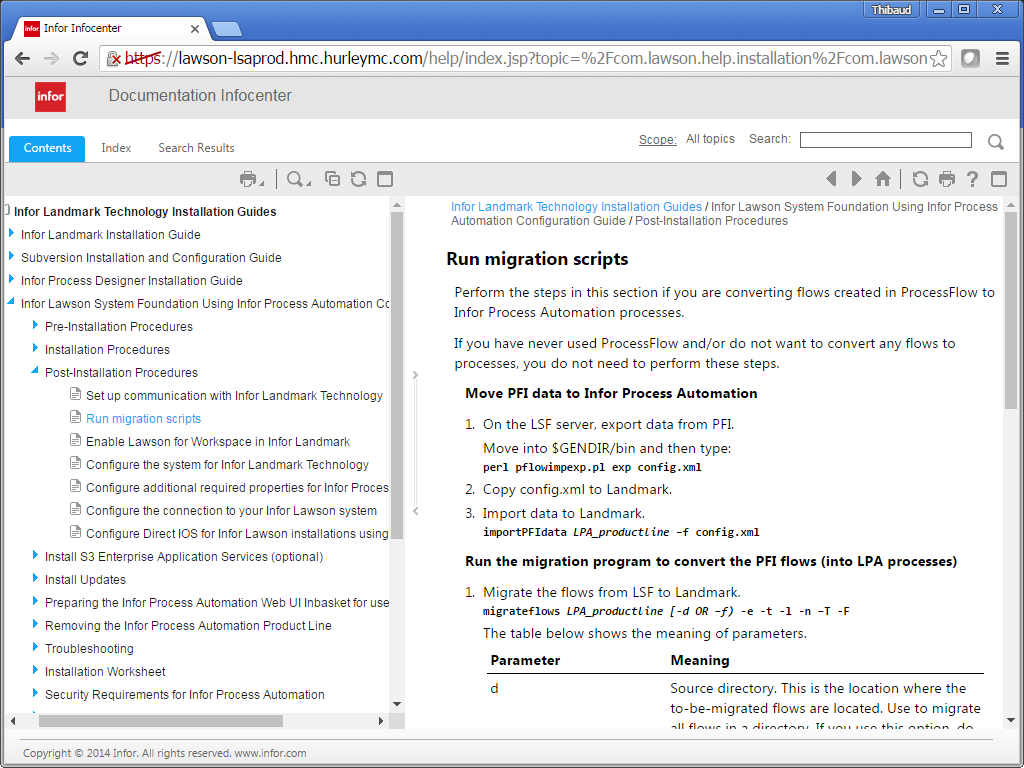
2.1. Documentation
There is some documentation for the importPFIdata command at Infor Landmark Technology Installation Guides > Infor Lawson System Foundation Using Infor Process Automation Configuration Guide > Post-Installation Procedures > Run migration scripts:
2.2. Extract the data
For each environment (e.g. DEV, TST), extract all the roles (MNS405) and user-roles (MNS410) from M3, and save them to files somewhere (e.g. roles.csv and user-roles.csv):
SELECT KRROLL, KRTX40 FROM MVXJDTA.CMNROL
SELECT KUUSID, KUROLL FROM MVXJDTA.CMNRUS
Note: If you already know the subset, you can filter the list to only the users and roles that will participate in approval flows, and discard the rest.
2.3. Transform
Transform the list of roles and user-roles to the XML syntax of importPFIdata, e.g.:
<?xml version="1.0" encoding="UTF-8"?>
<ImpExpData Version="1">
    <Tables>
        <Table Name="WFTASK">
            <Rows>
                <Row>
                    <Column Name="TASK"><Value>FLEET_MGR</Value></Column>
                    <Column Name="WF-DESCRIPTION"><Value>Fleet manager</Value></Column>
                </Row>
            </Rows>
        </Table>
    </Tables>
</ImpExpData>
Not all table names and columns are documented, but you can find them all here:


For the transformation you can use the following DOS batch file (e.g. user-roles.bat):
@echo off
echo ^<?xml version="1.0" encoding="UTF-8"?^>
echo ^<ImpExpData Version="1"^>
echo ^<Tables^>
echo ^<Table Name="WFUSRPROFL"^>
echo ^<Rows^>
for /f "tokens=1,* delims=;" %%a in (users.csv) do (
echo ^<Row^>^<Column Name="WF-RM-ID"^>^<Value^>%%a^</Value^>^</Column^>^</Row^>
)
echo ^</Rows^>
echo ^</Table^>
echo ^<Table Name="WFTASK"^>
echo ^<Rows^>
for /f "tokens=1-2 delims=;" %%a in (roles.csv) do (
echo ^<Row^>^<Column Name="TASK"^>^<Value^>%%a^</Value^>^</Column^>^<Column Name="WF-DESCRIPTION"^>^<Value^>%%b^</Value^>^</Column^>^</Row^>
)
echo ^</Rows^>
echo ^</Table^>
echo ^<Table Name="WFUSERTASK"^>
echo ^<Rows^>
for /f "tokens=1-2 delims=;" %%a in (user-roles.csv) do (
echo ^<Row^>^<Column Name="WF-RM-ID"^>^<Value^>%%a^</Value^>^</Column^>^<Column Name="TASK"^>^<Value^>%%b^</Value^>^</Column^>^<Column Name="START-DATE"^>^<Value^>00000000^</Value^>^</Column^>^<Column Name="STOP-DATE"^>^<Value^>00000000^</Value^>^</Column^>^</Row^>
)
echo ^</Rows^>
echo ^</Table^>
echo ^</Tables^>
echo ^</ImpExpData^>
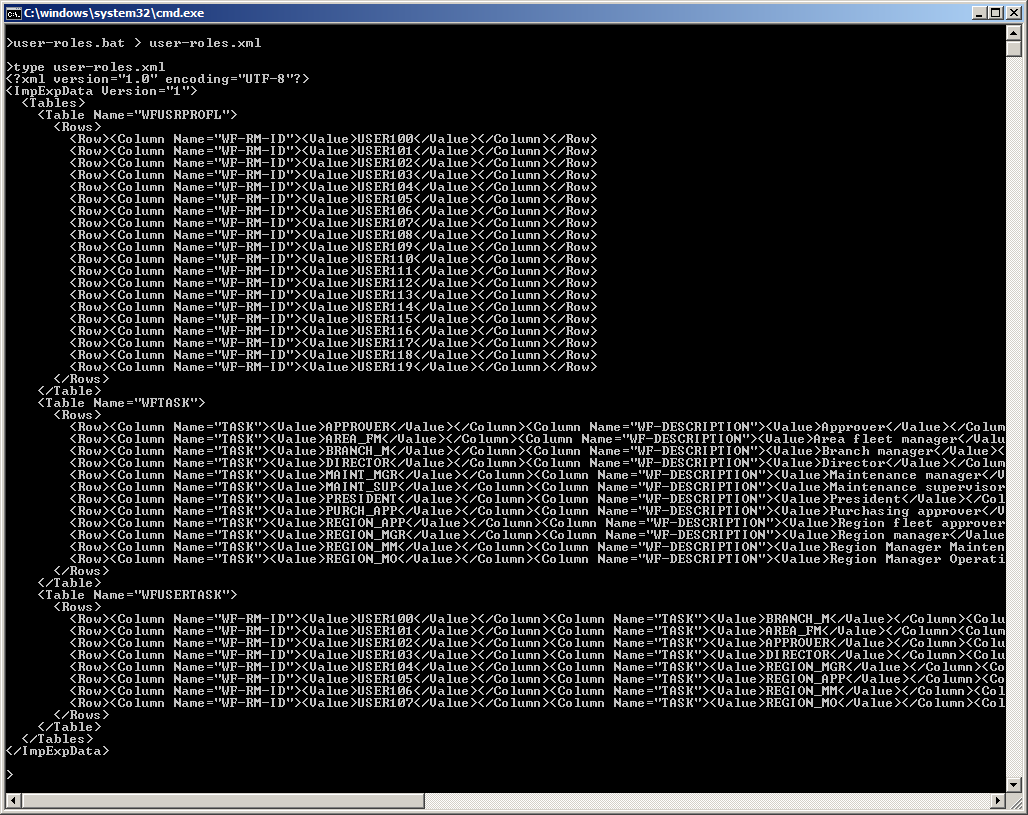
Save the result to an XML file (e.g. user-roles.xml):
user-roles.bat > user-roles.xml
We now have an XML file ready to be imported:
2.4. importPFIdata
Execute the importPFIdata command to import the file to the specified data area (e.g. lmdevipa):
cd D:\Infor\LMTST\
enter.cmd
env\bin\importPFIdata.bat lmdevipa -f user-roles.xml

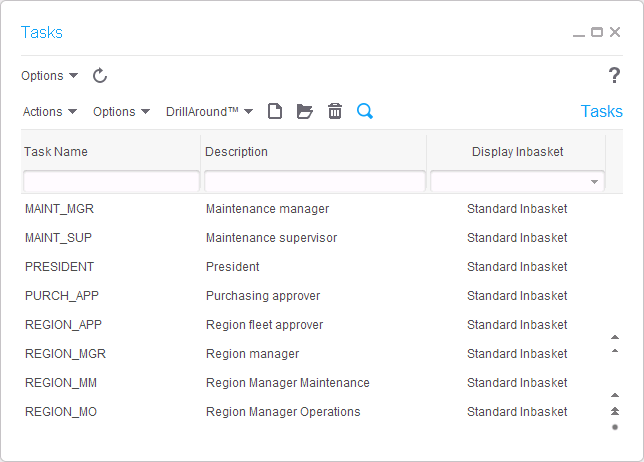
2.5. Result
Here is the resulting list of users, tasks, and user-tasks, in the specified data area:


2.6. Repeat per environment
Repeat from step 2.2 for the next environment (e.g. DEV, TST).
2.7. Delete
I do not yet know how to delete via the command line; for future work.
2.8. Update
The importPFIdata command will automatically update the record if it already exists.
Source code
I made a unified PowerShell script m3users.ps1 that I put on my GitHub.
Conclusion
That was the initial mass load of users from M3 to IPA using the command lines secadm for identities and actors in the gen data area, and importPFIdata for users and tasks in each environment data area (e.g. DEV, TST).
See also
See part 1 for the overview of user synchronization between M3 and IPA.
And read the comments by Alain Tallieu where he shares his experience and valuable tips.
Future work
Here is some future work:
- What to do about the lack of environment and CONO in IPA
- How to update actors
- How to delete users and tasks
- Prevent deleting the administrative users M3SRVADM and lawson.
- Finish the PowerShell script
To be continued…
I will continue in part 3 for the incremental backup.

NOTE: I found the class security.jar/class com.lawson.security.authen.ProvisionM3Identities which seems to create the Identities and Actors (not the email), but it is reading from MWP (I presume it’s M3 Workplace), and I could not find documentation.
LikeLike
UPDATE: I corrected the delete and update sections.
LikeLike
Hi Thibaud
heard a lot about it, read a lot it but never applied it on a boot scale; was not worth the hassle. Great to finally see it documented in action!
LikeLiked by 1 person
Yes, Java decompile is my friend. Given the ridiculous numbers of steps needed for one M3 user to be able to take action (identity, actor, email, actor-identity, actor-role, user), and the lack of documentation, maybe I am doing it wrong, maybe there is a shorter way.
LikeLike
Well could not tell I just did some unit tests with it xD. Seems to do the job, elegant solution.
LikeLike
I’m glad it worked! I’m rewriting the batch script as a unified Powershell script that does all the initial mass load: SQL extract, transform, users, emails, roles, and user-roles, secadm command, and importPFI command.
LikeLike
I bet you are, guess the new one will come in quite handy. Too high of a script level for me then I decided to stick with the mass load workflow. Remember it was taking ages, did you experience any difference between the two methods?
LikeLike
Yes, reprocessing all the records in a process flow takes ages as IPA/Landmark is painfully slow. That’s why I prefer the initial mass load via the command line directly to Landmark (skips IPA), and the incremental backup (skips all the records but one). That’s the most efficient I’ve found. I could make it even more efficient by doing the incremental backup via the command line too, but I haven’t found a convenient way to tie the command line to Event Hub.
LikeLike
UPDATE: I added section 1.6 for the repeat per environment
LikeLike
UPDATE: added “Prevent deleting the administrative users M3SRVADM and lawson.”
LikeLike
UPDATE: I added a PowerShell script, to be finished
LikeLike
NOTE 1: Regarding the PowerShell script, you need the PowerShell snapin for SQL Server or it will throw “cannot be loaded because the execution of scripts is disabled on this system […] PSSecurityException”.
To install the snapin, run this as administrator:
C:\>powershell -ExecutionPolicy unrestricted -Command “Import-Module SQLPS”
LikeLike
NOTE 2: Regarding the PowerShell script, on my new laptop, I got the error “Get-Credential : A parameter cannot be found that matches parameter name ‘UserName|Message'”
It turns out on my Windows 7 I have the old PowerShell 2.0, and I had to upgrade it by installing Windows Management Framework 4.0.
LikeLike
NOTE 3: Regarding the PowerShell script, and the snapin for SQL Server, I had to install PowerShell Extensions for SQL Server from the SQL Server 2016 Feature Pack > PowerShellTools.msi
Then I got, “The ‘invoke-sqlcmd’ command was found in the module ‘SQLPS’, but the module could not be loaded.”
Then I think I repeated note 2.
Then I got, “running scripts is disabled on this system”, so I had to run this PowerShell command as administrator: Set-ExecutionPolicy RemoteSigned
Then it worked.
LikeLike
UPDATE: I just realized it’s easier to query Active Directory for the first name, last name, and email address, to avoid dealing with splitting, character escaping and encoding, and lack of records in CRS111. I updated the script in GitHub. The command is: Get-ADUser -Filter {(sAMAccountName -eq “THIBAUD”) -and (ObjectClass -eq “user”)} -Properties EmailAddress
LikeLike