Hello World of Infor Smart Office SDK

Today I will write a post on how to start with the Infor Smart Office SDK as a continuation of Karin’s getting started post and Scott’s one to eight part series. We use the Smart Office SDK to develop applications in C#/WPF that run inside Smart Office with the benefits of look & feel, session, user information, M3 context, integration to M3 APIs and M3 Web Services, etc. I’m developing an application for a customer to integrate Cisco IP phones with Infor Customer Lifecycle Management (CLM). This is a great opportunity for me to share with you interesting bits and pieces as I progress, and it’s a way for me to anchor what I learn. I will put screenshots galore.

Here are the steps:

  1. Download and install Microsoft Visual Studio for C# and WPF development. I opted for the free Visual Studio Express 2013 for Windows Desktop:
    1.1
  2. Launch it from the Windows Start menu > All Programs > Visual Studio 2013 > VS Express 2013 for Desktop:
    1.2
  3. Download and install the Infor Smart Office SDK from Infor Xtreme > Downloads > ProductsUser Productivity PlatformSmart Office SDK – M3; choose the same version as the target Smart Office server you will develop for, version 10.1 in my case:
    2.1
  4. Unzip to a temporary folder in your computer and move the contents to the SDK root directory, for example C:\InforSmartOfficeSDK\ ; I moved to a folder with the full version number as I might have to switch back and forth between different versions for customer projects:
    2.2
  5. For more information , read the installation instructions in the Infor Smart Office Developers Guide at path Documentation\DevelopersGuide.pdf:
    0
  6. Set an environment variable LSOSDKBin in My Computer > Properties > Advanced system settings > Environment Variables, to the path of the Bin sub-folder, in my case it’s C:\InforSmartOfficeSDK_10.1.1.1_20130920\Bin :
    2.4
  7. Edit the contents of the file RegisterServer.reg in a text editor like Notepad, and change the value of Server to point to the scheme://domain:port of your Smart Office server URL. Then execute the file to merge the new MangoDev Key into your Windows Registry (C:\Windows\regedit.exe); in my case I later manually added String values for Username and Password so I don’t get authentication prompts anymore (beware of this security risk):
    2.5_
  8. Open the Sample Solution Samples\Samples.sln in Visual Studio:
    2.7
  9. Select BUILD > Build Solution F7:
    2.8
  10. Select DEBUG > Start Debugging F5:
    2.9
  11. That will start Smart Office in Developer mode. Select Help (question mark icon at the top right) > About Infor Smart OfficeView features, that will show you the Framework Examples and the Sample Feature:
    2.10_
  12. Start the Hello World application in the Sample menu of the Navigator widget:
    2.12
  13. And try the other samples and widgets:
    2.11

That’s it!

If you like this, subscribe to this blog to receive an email notification when we write posts, and become a contributor and write your M3 ideas.

Hacking Customer Lifecycle Management (CLM)

Today I will show you how I made simple modifications to Infor Customer LifeCycle Management (CLM), the CRM product for Infor M3. With CLM standard out-of-the-box we only have the ability to show/hide fields, for example choosing whether or not we want the name, address, and phone number columns in the list or the fields in the details view. CLM is a great product, and by design it is intended to be simple to use. In my case I wanted something more: I needed to add a call button next to the phone number. That is not officially possible by default so I had to do some hacking.

I’m working on a project for a customer to integrate Cisco IP phones with CLM, such that when a customer service representative on the phone receives an incoming phone call we automatically pop-up the corresponding customer data on the screen, and conversely, such that they can click a phone number in CLM and make that outgoing phone call. I had already done some work in the past integrating Skype with Smart Office, and integrating ShoreTel phones with Smart Office. This time it’s Cisco IP phones. I cannot show you the entire source code as it’s propriety of the customer and my employer, but I will show you interesting bits and pieces, and the writing helps me clean-up my code too.

I will show you:

  • How to get the list of open CLM windows
  • How to find the phone number field
  • How to add a button to CLM and use the Design System Icons
  • How to make the outgoing phone call

About CLM

To tell if you have CLM, go to Smart Office > Help > About Infor Smart Office > View features, and you will see CLM Application:
1

Then, go to the Navigator widget, you will see the menu Customer Lifecycle Management, expand it and launch My Accounts > All:
2

It will open the list of accounts:
3_

Double-click one of the rows to open the account details:
4_

How to get the list of open CLM windows

Now we have two CLM windows open: the list of accounts, and the details of an account. To programmatically get that list, I use the DashboardTaskService.FindRunningTaskByUri method, to discriminate by Uri lclm://
0


var list /*System.Collections.Generic.List<Mango.UI.Services.FindTaskResult>*/ = DashboardTaskService.Manager.FindRunningTaskByUri("lclm://", TaskMatch.StartsWith);
for (var result : FindTaskResult in list) {
    var runner : IRunner = result.Runner;
    var task : ITask = runner.Task;
    debug.WriteLine(task.Uri);
}

That will return two tasks:
lclm://filter/?ActionType=View&MainTableID=…&FilterGroupID=…&SubFilterID=…
lclm://details/?ActionType=View&MainTableID=…&PrimaryKey=…

Now we need to tell apart the Accounts windows from the other potential CLM windows such as Activities or Contacts:

var host : IInstanceHost = runner.Host;
if (host.HostTitle.StartsWith("Account")) {
    // ...
}

This code will only work for English. Ideally we would use an official CLM API that returns the correct Tasks, but I haven’t found one. Let me know if you find one.

How to find the phone number field

Now that we have the correct window, we can get its contents and find the phone number field. First, I use WPF Inspector to visually introspect the window and find the phone number field in the visual tree:
6

The fields are layed out in one of the ancestor Grids:
5

More specifically the phone number field is itself a Grid of one row and three columns:
6_

That’s where I’ll inject my button. To get there programmatically, I use the VisualTreeHelper, and I do a pre-order depth first search:

function ... {
    //...
    var content : FrameworkElement = host.HostContent;
    if (content.GetType().ToString() == "lclmControls.Custom.TabularDetailsView") {
        var o: DependencyObject = FindPhoneTextBox(content);
        if (o != null) {
            var txtbox: SingleLineTextBox = o;
        }
    }
}
function FindPhoneTextBox(o : DependencyObject): DependencyObject {
    // visit node
    if (o != null) {
        if (o.GetType().ToString().EndsWith("SingleLineTextBox")) {
            var txtbox: SingleLineTextBox = o;
            if (txtbox.Name == "Phone") {
                return o;
            }
        }
    }
    // visit children
    for (var i = 0; i < VisualTreeHelper.GetChildrenCount(o); i++) {
        var child = VisualTreeHelper.GetChild(o, i);
        var result: DependencyObject = FindPhoneTextBox(child);
        if (result != null) {
            return result;
        }
    }
    // not found
    return null;
}

How to add a button to CLM and use the Design System Icons

Now that we found the phone number field and the Grid, we can add a button. I will use the IconButtons of the Design System as illustrated by norpe:

var btn: IconButton = new IconButton();
btn.IconName = "Phone";
btn.ToolTip = "Call this phone number."
btn.HorizontalAlignment = HorizontalAlignment.Left;
btn.Margin = new Thickness(5, 0, 0, 0);
btn.Tag = txtbox; // remember the textbox
Grid.SetRow(btn, 0);
Grid.SetColumn(btn, 2);
Grid.SetColumnSpan(btn, 2);
var grid: Grid = VisualTreeHelper.GetParent(txtbox);
grid.Children.Add(btn);
btn.add_Click(OnCall);

This is the result, with the IconButton hover and ToolTip:
7_

Note: to get the Grid I used the textboxe’s parent. This assumption is true in CLM version 1.0.0.99, but could be false in a future version of CLM in which case this code would break. Ideally we would have an official CLM API for this.

How to make the outgoing phone call

Now you can do whatever with the phone number, for example use the default operating system’s URI handler for the tel scheme which is Skype in my case.

function OnCall(sender: Object, e: RoutedEventArgs) {
    try {
        var btn: Button = sender;
        var txtbox: SingleLineTextBox = btn.Tag;
        var phoneNumber: String = txtbox.Text;
        var uri: Uri = new Uri("tel:" + phoneNumber); // RFC 3966
        ScriptUtil.Launch(uri);
    } catch (ex : Exception) {
        debug.WriteLine(ex);
    }
}

And here’s the result:
8_

The method ScriptUtil.Launch will instruct the operating system to execute the specified command. That’s the equivalent of typing start command at the DOS prompt. In our case it’s:

start tel:+14156247033

9

That means any special characters of the command must be escaped, such as white spaces and ampersands. To escape white spaces in DOS that means enclosing the entire string in double-quotes. I tried enclosing the URI in double quotes, and it didn’t work. I also tried other escaping and encoding techniques like using backslash, plus sign, and %20, and they didn’t work either. So let’s simply strip it out:

phoneNumber = phoneNumber.Replace(' ', '');

Also, in my example I used a phone number that’s already correctly formatted in international E.123 notation which Skype understands. To validate the phone number, we can use a regular expression. A simple one is to strip all characters and keep only the plus sign and the digits, but that’s probably not fully compliant with the E.123 specification so we need to work more on this in the future:

var regex = /[^\+^\d]/g;
phoneNumber =  phoneNumber.replace(regex, "");

Future work

Future work includes:

  • Use an event handler to listen for new CLM windows to automatically add the Call button as the user opens the Account views. I couldn’t find an event, and Karin confirmed it’s not currently supported. I tried MForms.MainController, DashboardTaskService, DashboardTaskBar, lclmControls.EventNotifier, WindowManager, etc. I found an event handler for M3 Forms, an event handler for the Quick Start CTRL+R, and private event handlers that would have worked had they been public. Nothing I could use. I ended up using a worker that’s polling Tasks every second in a background thread (yikes).
  • Remember we added the button so we don’t add it again next time.
  • Add the Call button on all phone number fields: fax, mobile phone, home phone, etc.
  • Validate the phone number with a regular expression that complies with the specifications.
  • Make the outgoing call thru the Cisco IP phone instead of using Skype.
  • Listen for incoming phone calls.
  • Move the script to a widget using the Smart Office SDK.

That’s it! If you like this post, subscribe to this blog. And if you rock, become an author to share your ideas.

Open source release of Address Validation for M3

I’m please to announce I finally released the first free and open source version of the Address Validation for M3, and I published the code on GitHub at https://github.com/M3OpenSource/AddressValidation . It’s a combination of a Mashup and a Script for Infor Smart Office, so it’s easy for you to modify, deploy, and run. Currently, it only supports the Google Geocoding API with more address providers to be added later.

I had implemented the first proprietary version of the script for Lawson Software in 2009. Then I had implemented several variants for various customers while working at Lawson Software and Infor. I’ve always wanted it to become available to more customers, so I decided to make it free and open source. But in order to not infringe any intellectual property and copyrights over the previous source code, I had to re-write everything from scratch. The opportunity came up when I quit Infor, and before I joined Ciber, in between the two, so there was no question on the ownership of the source code, and I had made an announcement. It took me a while but here it is. And I made some improvements over to the previous proprietary code.

Self-configuration

The script is self-configurable for the following M3 Panels, i.e. just add the script to one of the supported M3 Panels and execute, without any modifications nor arguments:

  • Customer. Open – CRS610/E
  • Customer. Connect Addresses – OIS002/E
  • Supplier. Connect Address – CRS622/E
  • Customer Order. Connect Address – OIS102/E
  • Internal Address. Open – CRS235/E1
  • Company. Connect Division – MNS100/E
  • Ship-Via Address. Open – CRS300/E
  • Service Order. Connect Delivery Address – SOS005/E
  • Shop. Open – OPS500/I
  • Bank. Open – CRS690/E
  • Bank. Connect Bank Branch Office – CRS691/E
  • Equipment Address. Open – MOS272/E

Deploy locally and test

To start using the script, download the Mashup’s Manifest and XAML and the Script from the GitHub repository. Save the three files somewhere temporary on your computer. Then, install the Mashup locally using the Mashup Designer at designer://mashup (watch the video below), and run the Script with the Script Tool at mforms://jscript (watch the video below). Then, enter an address in M3, click the validate button (the little globe icon), you can also use the TAB key from Address line 1 to focus the button and press SPACE to click it, then the Mashup will pop-up with a list of possible matches, and select an address by pressing ENTER or double-clicking the address.

Screenshots

Here are some screenshots:

1 2 3 4 5

Videos

Here are some videos (watch in full-screen and high-definition for better view):

  • How to deploy the Mashup locally
  • How to test the Script
  • Sample address searches:

Then, you can deploy the Mashup globally with LifeCycle Manager, and set the script to everybody with the Smart Office Personalization Manager in the Navigator widget > Administration tools.

Future work

There’s still more work to do. For instance, it appears the Google Geocoding API doesn’t follow the same format for all addresses, they’re local to each country, so right now we have to manually change the address layout based on the country, and I would like to improve that.

Also, I want to add a WebBrowser control to show the addresses in Google Maps.

Also, this first release only supports the Google Geocoding API. I want to add support for other address providers, like Experian QAS, FedEx, Microsoft Bing Maps, UPS, United States Postal Service, and local address providers like Pages Jaunes in France, and Eniro in Sweden.

If you like it, join the project and become a contributor!

Thibaud Lopez Schneider

Mashup – SQL Wildcard / DataGrid with sorting / Copy to Clipboard

Hi,

It’s been a while since I shared something now… I primary spent my time working with mashup combined with SQL… and when I first started there was no turning back.     The same about the DataGrid, its tooo powerful!

Today i’ll share one of probably many ways, how you can perform a wildcard search from a mashup.  I’ll also drop you a few tips when using the DataGrid regarding copying and sorting.

– SQL – WildCard

This solution I provide here now, should give pretty much the exact same results as searching with standard M3.

The use provides an input to a TextBox.

You need to add the following to your mashup to be able to use the IsNotNullOrEmptyConverter

xmlns:utils=”clr-namespace:Mango.UI.Utils;assembly=Mango.UI”

We then use a DataTrigger to provide us a default value if the TextBox is blank, in this case the % to be used in the SQL LIKE(‘%’)  NB: This is a hidden TextBox

<TextBox Name="ItemWhsCheck" Visibility="Hidden">
     			  <TextBox.Style>
      			 <Style x:Key="ItemWhsCheck" TargetType="{x:Type TextBox}" BasedOn="{StaticResource {x:Type TextBox}}">
         			 <Setter Property="Text" Value="{Binding ElementName=ItemWhs, Path=SelectedValue}" />
	        			  <Style.Triggers>
	            		 	<MultiDataTrigger>
	               		 	<MultiDataTrigger.Conditions>
	                   			<Condition Binding="{Binding ElementName=ItemWhs, Path=SelectedValue, Converter={StaticResource IsNotNullOrEmptyConverter}}" Value="False" />
	                			</MultiDataTrigger.Conditions>
	                			<Setter Property="Text" Value="%" />
	            			</MultiDataTrigger>
         		 		</Style.Triggers>
      				 </Style>
    				</TextBox.Style>
  </TextBox>

We should then be able to bind the correct values to the provide it to the SQL.

	<mashup:Parameter TargetKey="ListItems1.MLWHLO" Value="{Binding ElementName=ItemWhsCheck, Path=Text}" />

In the LWS Designer the “?” will be the Input from the mashup.

SELECT MMITNO,MMFUDS from MITMAS  WHERE MMCONO=1  AND TRIM(MMFUDS) LIKE REPLACE(CAST( ? AS VARCHAR(1000)), ‘*’, ‘%’)

This will perform a search which allows exact hits, or multiple hits and the use of multiple wildcards.

Search: O-RING*  Search: O-RING, BS-204 VITON 90  Search- O-RING*204*90

All will provide the following result.  Result: O-RING, BS-204 VITON 90

You can also combine multiple of these.

AND TRIM(MMFUDS) LIKE REPLACE(CAST( ? AS VARCHAR(1000)), ‘*’, ‘%’)  AND TRIM(MMITNO) LIKE REPLACE(CAST( ? AS VARCHAR(1000)), ‘*’, ‘%’)  AND MMITTY LIKE(CAST( ? AS VARCHAR(1000)))  AND TRIM(LISERN) LIKE REPLACE(CAST( ? AS VARCHAR(1000)), ‘*’, ‘%’)  AND MLWHLO LIKE(CAST( ? AS VARCHAR(1000)))  AND TRIM(MLWHSL) LIKE REPLACE(CAST( ? AS VARCHAR(1000)), ‘*’, ‘%’)  AND MLCAMU LIKE(CAST( ? AS VARCHAR(1000)))

DataGrid – Copy to Clipboard

In this example I’m adding a ContextMenu to the DataGrid to allow to copy the line infomration to mail/excel, but you could just aswell use a button .  I added th following extra properties:

The SelectionMode is set to Exteded to allow multiple selections .  The ClipBoardCopyMode is set to IncludeHeaders

<DataGrid Name="dataGrid1" ItemsSource="{Binding ResultSetCollection}" Style="{DynamicResource styleDataGrid}" SelectionMode="Extended" ClipboardCopyMode="IncludeHeader" AutoGenerateColumns="False" SelectedIndex="0" Visibility="{Binding ElementName=SerialRadio, Path=IsChecked, Converter={StaticResource BooleanToVisibilityConverter}}">
			<DataGrid.ContextMenu>
				<ContextMenu>
					<MenuItem Header="Copy to clipboard" Command="ApplicationCommands.Copy" CommandTarget="{Binding ElementName=dataGrid1}" />
				</ContextMenu>
			</DataGrid.ContextMenu>

You should now be able to use the Copy to Clipboard, if using the standard DataGridTextColumns

However, if you would like to use the DataGridTemplateColumn you need to add ClipboardContentBinding or you will be copying blank values.

When using the DataGridTempalte, you also will be losing the standard sorting options, unless you add CanUserSort and SortMemberPath.

The function of this TemplateColumn is just to colour the text red if the overdue value = 1


<DataGridTemplateColumn Header="Next test date" CanUserSort="True" SortMemberPath="NEXTDATE" ClipboardContentBinding="{Binding NEXTDATE}">
					<DataGridTemplateColumn.CellTemplate>
						<DataTemplate>
							<StackPanel Orientation="Horizontal">
								<TextBlock MinWidth="80" MaxWidth="0" Text="{Binding NEXTDATE}">
									<TextBlock.Style>
										<Style TargetType="{x:Type TextBlock}" BasedOn="{StaticResource {x:Type TextBlock}}">
											<Style.Triggers>
												<MultiDataTrigger>
													<MultiDataTrigger.Conditions>
														<Condition Binding="{Binding Overdue}" Value="1" />
													</MultiDataTrigger.Conditions>
													<Setter Property="Background" Value="Red" />
													<Setter Property="Text" Value="{Binding NEXTDATE}" />
												</MultiDataTrigger>
											</Style.Triggers>
										</Style>
									</TextBlock.Style>
								</TextBlock>
							</StackPanel>
						</DataTemplate>
					</DataGridTemplateColumn.CellTemplate>
				</DataGridTemplateColumn>
<DataGridTextColumn Header="Service" Binding="{Binding NEXTSERVICE}" />

This is not the full .xaml ….  But it should contain alot of ideas  I hope its worth sharing.

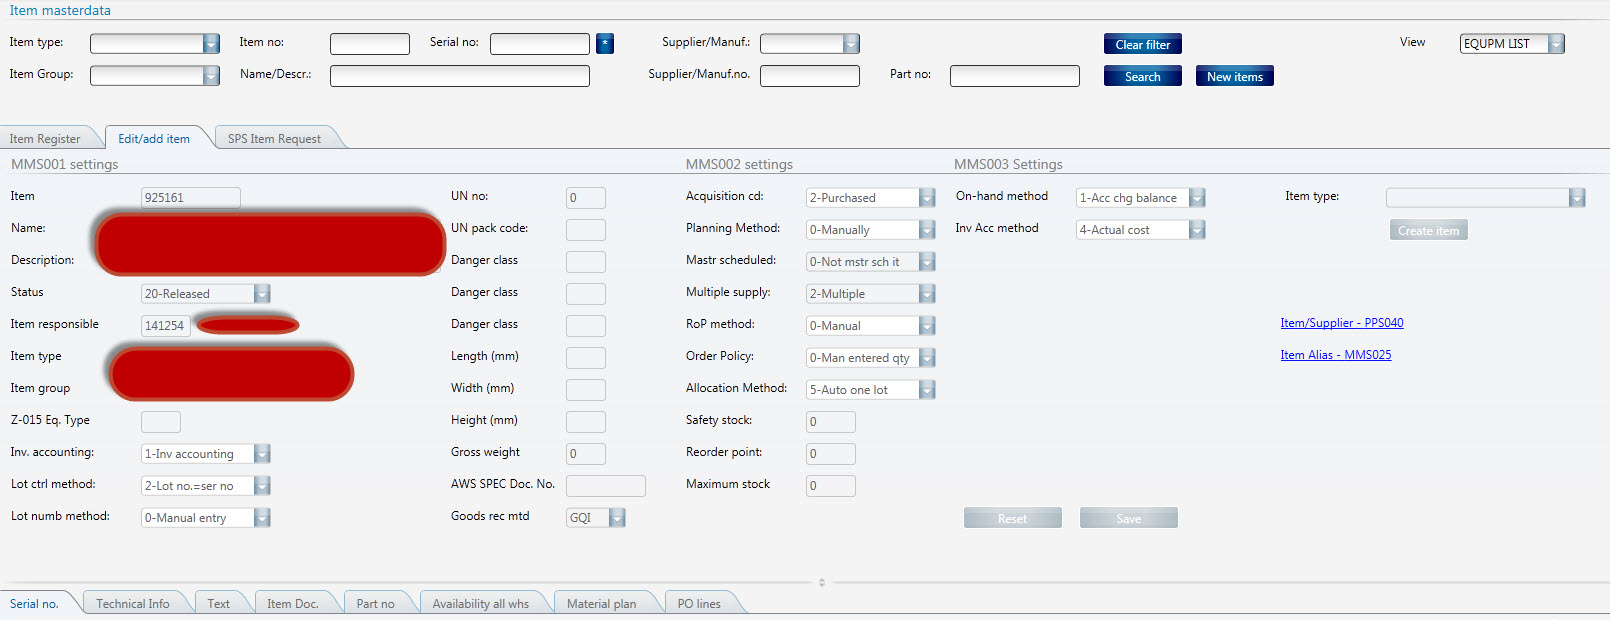
Here is an example of an end result, and the speed is amazing.

ItemSearch

Please take contact if you got any questions, or are willing to share some of your own ideas.
And I also need to thank Heiko for providing solutions when everything looks dark! 🙂

And since I haven’t seen many M3 SQL’s out there…. Here is a copy of the one behind this mashup, i’m no proffessional, so there might be minor errors.

select MMCONO,MMITNO,MMFUDS,MMITTY,LISERN,MLWHLO,MLWHSL,MLCAMU,MMITGR,LISTAT,
(Select A.MPPOPN from MITPOP A where A.MPCONO=1 and A.MPALWT=’4′ AND A.MPITNO=MMITNO fetch first 1 row only) as Partno,
(Select Case When Count(mlbano) > ‘0’ Then ‘*’ Else ” end from mitloc where mlcono=1 and mlcamu=lisern) as CONTAINED,
(Select Case When Count(asnhsn) > ‘0’ Then ‘*’ Else ” end from MROABS where ascono=1 and (asitno=mmitno and assern=lisern) OR (asnhai=mmitno and asnhsn=lisern )) as ATTACHED,

CASE
WHEN QOSTDT is null Then
CASE
WHEN HP.QHSTDT is null THEN NULL
ELSE HP.QHSTDT
END
ELSE
CASE
WHEN HP.QHSTDT is null THEN QOSTDT
ELSE
CASE
WHEN QOSTDT HP.QHSTDT Then HP.QHSTDT
END
END
END as NEXTDATE,

CASE
WHEN QOSTDT is null Then
CASE
WHEN HP.QHSTDT is null THEN NULL
ELSE HP.QHSUFI
END
ELSE
CASE
WHEN HP.QHSTDT is null THEN QOSUFI
ELSE
CASE
WHEN QOSTDT HP.QHSTDT Then HP.QHSUFI
END
END
END as NEXTSERVICE,

CASE
WHEN (days(current date ) > days (to_date(char(QOSTDT),’yyyymmdd’)))
THEN ‘1’
WHEN (days(current date ) > days (to_date(char(QHSTDT),’yyyymmdd’)))
THEN ‘1’
END AS “Overdue”,

(SELECT
CASE WHEN C.MLCAMU ” THEN C.MLWHLO
ELSE C.MLWHLO
END
FROM MITLOC C WHERE C.MLCONO=1 AND A.MLWHLO IN(‘191′,’291’) AND A.MLCAMU=C.MLBANO ) as ContWhs,

(SELECT
CASE WHEN B.MLCAMU ” THEN B.MLCAMU
ELSE B.MLWHSL
END
FROM MITLOC B WHERE B.MLCONO=1 AND A.MLWHLO IN(‘191′,’291′) AND A.MLCAMU=B.MLBANO ) as ContLoc

FROM
MITMAS
JOIN MILOIN ON LICONO=1 AND LIITNO=MMITNO
JOIN MITLOC A ON MLCONO=1 and LIITNO=MLITNO and LISERN=MLBANO
LEFT JOIN MWOPLP ON QOCONO = MLCONO AND QOFACI=’100’ AND QOPRNO = MLITNO AND QOBANO = MLBANO AND QOORTY = ‘SMA’ AND QOPSTS < 59
AND QOSTDT =(SELECT MIN(MP2.QOSTDT) FROM MWOPLP MP2 WHERE MP2.QOCONO = MLCONO AND MP2.QOFACI='100' AND MP2.QOPRNO = MLITNO AND MP2.QOBANO = MLBANO AND MP2.QOORTY = 'SMA' AND MP2.QOPSTS < 59)
LEFT JOIN MMOHED HP ON HP.QHCONO = MLCONO AND QHFACI='100' AND HP.QHPRNO = MLITNO AND HP.QHBANO = MLBANO AND HP.QHORTY = 'SMA' AND HP.QHWHST < 90
AND HP.QHSTDT =(SELECT MIN(HP2.QHSTDT) FROM MMOHED HP2 WHERE HP2.QHCONO = MMCONO AND HP2.QHFACI='100' AND HP2.QHPRNO = MLITNO AND HP2.QHBANO = MLBANO AND HP2.QHWHST < 90)

WHERE MMCONO=1
AND TRIM(MMFUDS) LIKE REPLACE(CAST( ? AS VARCHAR(1000)), '*', '%')
AND TRIM(MMITNO) LIKE REPLACE(CAST( ? AS VARCHAR(1000)), '*', '%')
AND MMITTY LIKE(CAST( ? AS VARCHAR(1000)))
AND TRIM(LISERN) LIKE REPLACE(CAST( ? AS VARCHAR(1000)), '*', '%')
AND MLWHLO LIKE(CAST( ? AS VARCHAR(1000)))
AND TRIM(MLWHSL) LIKE REPLACE(CAST( ? AS VARCHAR(1000)), '*', '%')
AND MLCAMU LIKE(CAST( ? AS VARCHAR(1000)))

Fetch first 500 rows only

Thanks.

Regards

Ken Eric

Open source project: address validation for M3

I’m announcing the start of an open source project: address validation for M3.

Address validation is the ability for the user to enter a partial or incorrect address, get a list of possible matches, chose the valid address, and save it in M3. The goals are: reduce data entry time, ensure goods will reach their destination, minimize shipment returns, accurately calculate taxes, etc.

I implemented address validation for several customers in the past years while at a previous job, and I proposed that the source code becomes a product available to every customer. I believe address validation should come standard with M3 as it is of great service. The project was ready for distribution in 2009 but it got stuck in the legal department because of a conflict with the licenses of the respective address providers. For example, it seems the company couldn’t sell software that uses the free Google Maps API. So now that I quit my last job and haven’t started a new one, I decided to re-ignite the idea as free and open source software. In that way there are no legal conflicts.

Also, I cannot re-use any of the source code nor material I wrote while at any previous job since all the data is intellectual property of that company, so I will have to re-write everything from scratch. And I need your help.

The goals are to provide address validation for M3 with choice of the following address providers:

  • Bing Maps
  • Eniro
  • Experian QAS
  • FedEx
  • Google Maps
  • Google Maps Premier
  • UPS
  • USPS

I’m looking to include more local address providers in: Belgium, Denmark, France, Germany, Norway, The Netherlands, etc. If you know of any, let me know.

The product will be self-configurable, starting with the following M3 programs :

  • Customer. Open – CRS610/E
  • Customer. Connect Addresses – OIS002/E
  • Supplier. Connect Address – CRS622/E
  • Customer Order. Connect Address – OIS102/E
  • Internal Address. Open – CRS235/E1
  • Company. Connect Division – MNS100/E
  • Ship-Via Address. Open – CRS300/E
  • Service Order. Connect Delivery Address – SOS005/E
  • Shop. Open – OPS500/I
  • Bank. Open – CRS690/E
  • Bank. Connect Bank Branch Office – CRS691/E
  • Equipment Address. Open – MOS272/E

It will be a client-side implementation for Smart Office using:

  • Script assemblies for Smart Office (C#)
  • Mashups (XAML)

With plans to support H5 Enterprise (HTML5/JavaScript) in the future.

It will be made available as free software under the GNU General Public License V3.0 license. It permits commercial use, distribution, and modification. And it requires source be made available, license and copyright notice be included, and changes be indicated. It’s copyleft instead of copyright.

Also, the resulting code will be subject to the licenses of the respective address providers: Google Maps, etc.

Also, this project is a good opportunity for me to contribute to the community, and to learn Git revision control.

I started a repository on GitHub here: https://github.com/ThibaudLopez/AddressValidation

Send me feedback. Let me know what you think. Tell your colleagues. And if you want to be a contributor, come help us.

/Thibaud

I quit Infor

I quit Infor. As of December 6, 2013 I no longer work for Infor. It has been an incredible 14 year adventure with Intentia Consulting in Paris, France, with Intentia Research & Development in Stockholm, Sweden, with Lawson Software in Chicago, and with Infor in San Francisco. I’m grateful for everything I learned, and I yet have more to learn. I’m moving on. Stay tuned. I no longer have my infor.com email address nor my mobile phone. I will update my new contact information here on the blog and on my website as soon as I have it. /Thibaud

Mashup – Dialog Window , Timer and DataListPanel

Since I just posted about the dialog box and the timer to catch the value.
It makes sense to do a small third post mixing it all together with a DataListPanel in a Dialog window.
Again, there was problem starting the DataListPanel with values in the DialogBox. But solved the same way as previous.

Link to Timer: Using the timer .

Link to Dialog: Creating a Dialog Window.

The layout here is not very sexy as it’s still under construction, but it’s an idea worth sharing.
The whole point is to be able to add extra lines to the purchase orders based on calculations done in the background with SQL from Web Service, and start the DataListPanel on startup in a new Dialog Window.

Reorder

This is not a complete working xaml file, but part of the Dialog window containing the DataListPanel

<Grid Height="700" Width="1200" xmlns="http://schemas.microsoft.com/winfx/2006/xaml/presentation" xmlns:x="http://schemas.microsoft.com/winfx/2006/xaml" xmlns:ui="clr-namespace:Mango.UI.Controls;assembly=Mango.UI" xmlns:mashup="clr-namespace:Mango.UI.Services.Mashup;assembly=Mango.UI" xmlns:m3="clr-namespace:MForms.Mashup;assembly=MForms" xmlns:clr="clr-namespace:System;assembly=mscorlib" xmlns:Services="clr-namespace:Mango.Services;assembly=Mango.Core" xmlns:ps="clr-namespace:PF.Client.Mashup;assembly=PF.Client">
	<Grid.Resources>
		<mashup:CurrentItemValue x:Key="CurrentItemValue" />
		<clr:String x:Key="BaseUri">{mashup:ProfileValue Path=M3/WebService/url}"</clr:String>
	</Grid.Resources>
	<Grid.ColumnDefinitions>
		<ColumnDefinition Width="1*" />
	</Grid.ColumnDefinitions>
	<Grid.RowDefinitions>
		<RowDefinition Height="50" />
		<RowDefinition Height="500" />
		<RowDefinition Height="50" />
	</Grid.RowDefinitions>

	<StackPanel Orientation="Vertical" Grid.Row="0">
		<mashup:Dialog Name="MyDialog" Uri="DialogAddPO.xaml" Grid.Column="0" Grid.Row="0">
		</mashup:Dialog>
		<TextBox Name="SupplierNumber" Grid.Row="0" Grid.Column="3" MinWidth="115" MinHeight="20" MaxWidth="115" MaxHeight="50" HorizontalAlignment="Left" MaxLength="18" Text="{Binding Converter={StaticResource CurrentItemValue}, ConverterParameter=Result, Mode=OneTime}" IsEnabled="False" />
		<TextBox Name="PONumber" Grid.Row="0" Grid.Column="3" MinWidth="115" MinHeight="20" MaxWidth="115" MaxHeight="50" HorizontalAlignment="Left" MaxLength="18" Text="{Binding Converter={StaticResource CurrentItemValue}, ConverterParameter=PONumber, Mode=OneWay}" IsEnabled="False" />
	</StackPanel>

	<!-- Timer to catch the SupplierNumber value andprovide it to the DataListPanel -->
	<ps:TriggerPanel Name="SQLReorderTrigger" IsDataAreaInSession="False" IsAsynchronous="True" IsAutoLayoutEnabled="True" IsConversionEnabled="True" IsResponseValidationEnabled="False">
		<ps:TriggerPanel.Events>
			<mashup:Events>
				<mashup:Event TargetName="SQLTriggerTimer" SourceEventName="Startup" TargetEventName="Start" />
			</mashup:Events>
		</ps:TriggerPanel.Events>
	</ps:TriggerPanel>

	<mashup:Timer Name="SQLTriggerTimer" Interval="0:0:01" ElapsedCount="1" Count="1" MinInterval="0:0:01" />

	<!-- Hidden TextBlock to get the CurrentSystem. Dynamic for PRD/TST/DEV/MIG -->
<TextBlock Name="ProfileName" DataContext="{x:Static Services:ApplicationServices.SystemProfile}" Text="{Binding Name}" Grid.Row="0" Visibility="Hidden" />

	<mashup:DataListPanel Name="SQLReorderPointPanel" Grid.Row="1">
		<mashup:DataListPanel.Events>
			<mashup:Events>
				<mashup:Event SourceEventName="Elapsed" TargetName="SQLReorderPointPanel" TargetEventName="Read" Debug="True" SourceName="SQLTriggerTimer">
					<mashup:Parameter TargetKey="BaseUri" Value="{mashup:ProfileValue Path=M3/WebService/url}" />
					<mashup:Parameter TargetKey="Profile" Value="{Binding ElementName=ProfileName, Path=Text}" />
					<mashup:Parameter TargetKey="WS.Wsdl" Value="{}{BaseUri}/LWSSQL{}{Profile}/SQL_Reorderpoint?wsdl" />
					<mashup:Parameter TargetKey="WS.Address" Value="{}{BaseUri}/LWSSQL{}{Profile}/SQL_Reorderpoint" />
					<mashup:Parameter TargetKey="WS.MaxReceivedMessageSize" Value="2000000" />
				</mashup:Event>
			</mashup:Events>
		</mashup:DataListPanel.Events>
		<mashup:DataListPanel.DataService>
			<mashup:DataService Type="WS">
				<mashup:DataService.Operations>
					<mashup:DataOperation Name="Read">
						<mashup:DataParameter Key="WS.CredentialSource" Value="Current" />
						<mashup:DataParameter Key="WS.Operation" Value="GetList" />
						<mashup:DataParameter Key="WS.Contract" Value="SQL_Reorderpoint" />
					</mashup:DataOperation>
				</mashup:DataService.Operations>
			</mashup:DataService>
		</mashup:DataListPanel.DataService>

		<DataGrid Name="Reorder" ItemsSource="{Binding ResultSetCollection, Mode=OneWay}" Grid.Row="1" Style="{DynamicResource styleDataGrid}" CanUserDeleteRows="True" SelectionMode="Single" SelectedIndex="0" AutoGenerateColumns="False">
			<DataGrid.Columns>
				<DataGridTextColumn Header="Item" Binding="{Binding MBITNO}" />
				<DataGridTextColumn Header="Description" Binding="{Binding MMFUDS}" />
				<DataGridTextColumn Header="Min" Binding="{Binding MBREOP, StringFormat=f0}" />
				<DataGridTextColumn Header="Max" Binding="{Binding MBMXST, StringFormat=f0}" />
				<DataGridTextColumn Header="Usage" Binding="{Binding MBUSYE, StringFormat=f0}" />
				<DataGridTextColumn Header="On-Hand" Binding="{Binding MBAVAL, StringFormat=f0}" />
				<DataGridTextColumn Header="In Order" Binding="{Binding MBORQT, StringFormat=f0}" />
				<DataGridTextColumn Header="Lead Time" Binding="{Binding MBLEA1, StringFormat=f0}" />
				<DataGridTextColumn Header="Supplier" Binding="{Binding IDSUNM}" />

				<DataGridTemplateColumn Header="Qty">
					<DataGridTemplateColumn.CellTemplate>
						<DataTemplate>
							<StackPanel Orientation="Vertical">
								<TextBox Text="0" MinWidth="50" MaxLength="5" MaxWidth="50" />
							</StackPanel>
						</DataTemplate>
					</DataGridTemplateColumn.CellTemplate>
				</DataGridTemplateColumn>

				<DataGridTemplateColumn Header="Add to PO">
					<DataGridTemplateColumn.CellTemplate>
						<DataTemplate>
							<StackPanel Orientation="Horizontal">
									<TextBlock Name="ProfileName2" DataContext="{x:Static Services:ApplicationServices.SystemProfile}" Text="{Binding Name}" Visibility="Hidden" />
									<Button Name="AddReorderLine" Content="Add" VerticalAlignment="Top">
									<Button.CommandParameter>
										<mashup:Events>
											<mashup:Event SourceEventName="Click" TargetName="WSReorderAddLine" TargetEventName="Read" Debug="True">
												<mashup:Parameter TargetKey="BaseUri" Value="{mashup:ProfileValue Path=M3/WebService/url}" />
												<mashup:Parameter TargetKey="Profile" Value="{Binding ElementName=ProfileName2, Path=Text}" />
												<mashup:Parameter TargetKey="WS.Wsdl" Value="{}{BaseUri}/lws_{}{Profile}/PPS200_AddLine?wsdl" />
												<mashup:Parameter TargetKey="WS.Address" Value="{}{BaseUri}/lws_{}{Profile}/PPS200_AddLine" />
												<mashup:Parameter TargetKey="WS.MaxReceivedMessageSize" Value="2000000" />
											</mashup:Event>
										</mashup:Events>
									</Button.CommandParameter>
								</Button>
							</StackPanel>
						</DataTemplate>
					</DataGridTemplateColumn.CellTemplate>
				</DataGridTemplateColumn>
			</DataGrid.Columns>
		</DataGrid>
	</mashup:DataListPanel>

	<mashup:DataPanel Name="WSReorderAddLine">
		<mashup:DataPanel.DataService>
			<mashup:DataService Type="WS">
				<mashup:DataService.Operations>
					<mashup:DataOperation Name="Read">
						<mashup:DataParameter Key="WS.Operation" Value="PPS200_AddLine" />
						<mashup:DataParameter Key="WS.Contract" Value="PPS200_AddLine" />
						<mashup:DataParameter Key="WS.CredentialSource" Value="Current" />
					</mashup:DataOperation>
				</mashup:DataService.Operations>
			</mashup:DataService>
		</mashup:DataPanel.DataService>
	</mashup:DataPanel>

	<StackPanel Grid.Row="3">
		<Button Content="Close">
		<Button.CommandParameter>
			<mashup:Events>
				<mashup:Event SourceEventName="Click" TargetEventName="Close">
				<mashup:Parameter TargetKey="Result" Value="{Binding ElementName=ProfileName, Path=Text}" />
				</mashup:Event>
			</mashup:Events>
		</Button.CommandParameter>
	</Button>
	</StackPanel>
</Grid>

Regards
Ken Eric

Mashup – Adding security to part of the mashup based on CurrentUser

I’ve seen a previously posts describing how to put security on a whole mashup.
But what if it is a mashup designed for all end-users, but part of it should be for limited users only, when using MI/Data Panels?

I will provide an example where I disable a GroupBox based on the CurrentUser access to MMS001 from SES401.

The first problem I ran into, was that there was missing an MI transaction to retrieve the user access, or at least I couldn’t find one.
So I create a new transaction in MDBREADMI, from CMNPUS to get the ALO field to get the values.

Input:
GetCMNPUS00

Output:
GetCMNPUS00Output

The next problem I had was that I had to run the MI transaction for user validation’ immediately’ on startup.
However, I couldn’t get the binding correct. It was like the MI startup event was triggered before I was able to bind the currentuser.
( There might be other ways to do this, it might just be me having problems with this kind of binding)
My work around for this was adding in a timer with a second delay. Which allowed me to run the MI Panel with the UserName.

I used a TriggerPanel on the startup which started the timer. The MIPanel was then triggered by Elapsed time after a second.
And then I had all the information required. Using a Hidden TextBox with a style.trigger to catch the UserAccess value ([ALO]).
Then I could bind the the text property directly to the GroupBox IsEnabled.

Here is an snapshot of the .xaml attached. 

UserAccessExample1

Here is a snapshot where I use this in the real world, where you see everything is disabled. 

 Example2UserAcccess

Attached is a full working source code. ( You have to create the MDBREADMI transaction first)

<Grid xmlns="http://schemas.microsoft.com/winfx/2006/xaml/presentation" xmlns:x="http://schemas.microsoft.com/winfx/2006/xaml" xmlns:ui="clr-namespace:Mango.UI.Controls;assembly=Mango.UI" xmlns:mashup="clr-namespace:Mango.UI.Services.Mashup;assembly=Mango.UI" xmlns:ps="clr-namespace:PF.Client.Mashup;assembly=PF.Client" xmlns:m3="clr-namespace:MForms.Mashup;assembly=MForms" xmlns:Services="clr-namespace:Mango.Services;assembly=Mango.Core">
	<Grid.Resources>
	</Grid.Resources>

	<Grid.ColumnDefinitions>
		<ColumnDefinition Width="1*" />
	</Grid.ColumnDefinitions>
	<Grid.RowDefinitions>
		<RowDefinition Height="300" />
		<RowDefinition Height="1*" />

		<RowDefinition Height="Auto" />
	</Grid.RowDefinitions>

<!-- Startup Event -->
	<ps:TriggerPanel Name="ItemMasterUserNameTrigger">
		<ps:TriggerPanel.Events>
			<mashup:Events>
				<mashup:Event TargetName="ItemMasterUserNameTimer" SourceEventName="Startup" TargetEventName="Start" />
			</mashup:Events>
		</ps:TriggerPanel.Events>
	</ps:TriggerPanel>

	<mashup:Timer Name="ItemMasterUserNameTimer" Interval="0:0:01" ElapsedCount="1" Count="1" MinInterval="0:0:01" />

<!-- Hidden TextBlock to get UserName -->
	<TextBlock Name="ItemMasterUserName" DataContext="{x:Static Services:ApplicationServices.UserContext}" Text="{Binding UserName}" Visibility="Hidden" />

	<m3:MIPanel Name="ItemMasterDataReadOnlyMI">
		<m3:MIPanel.Events>
			<mashup:Events>
				<mashup:Event TargetName="ItemMasterDataReadOnlyMI" TargetEventName="Get" SourceEventName="Elapsed" SourceName="ItemMasterUserNameTimer">
					<mashup:Parameter TargetKey="USID" Value="{Binding ElementName=ItemMasterUserName, Path=Text}" />
					<mashup:Parameter TargetKey="DIVI" Value="{mashup:UserContextValue Path=M3/Division}" />
					<mashup:Parameter TargetKey="PGNM" Value="MMS001" />
				</mashup:Event>
			</mashup:Events>
		</m3:MIPanel.Events>
		<m3:MIPanel.DataSource>
			<m3:MIDataSource Program="MDBREADMI" Transaction="GetCMNPUS00" Type="Get" InputFields="USID,DIVI,PGNM" OutputFields="ALO" MaxReturnedRecords="1" />
		</m3:MIPanel.DataSource>
	</m3:MIPanel>

<!-- Validation check, disabled by default  -->
	<TextBox Name="ItemUserValid" Visibility="Hidden">
		<TextBox.Style>
			<Style x:Key="UserCheck" TargetType="{x:Type TextBox}" BasedOn="{StaticResource {x:Type TextBox}}">
				<Setter Property="Text" Value="False" />
				<Style.Triggers>
					<MultiDataTrigger>
						<Setter Property="Text" Value="False" />
					</MultiDataTrigger>
					<MultiDataTrigger>
						<MultiDataTrigger.Conditions>
							<Condition Binding="{Binding ElementName=ItemMasterDataReadOnlyMI, Path=[ALO]}" Value="111111111" />
						</MultiDataTrigger.Conditions>
						<Setter Property="Text" Value="True" />
					</MultiDataTrigger>
				</Style.Triggers>
			</Style>
		</TextBox.Style>
	</TextBox>

<!--  Setting the GroupBox Enabled or Disabled based on the CurrentUser acccess to MMS001 -->
	<GroupBox Name="GroupBox" Header="Validation" Style="{DynamicResource styleGroupLineMashup}" IsEnabled="{Binding ElementName=ItemUserValid, Path=Text}" Grid.Row="0">
		<Grid Margin="0,0,0,8">
			<Grid.ColumnDefinitions>
				<ColumnDefinition Width="100" />
				<ColumnDefinition Width="110" />
			</Grid.ColumnDefinitions>
			<Grid.RowDefinitions>
				<RowDefinition Height="32" />
				<RowDefinition Height="32" />
			</Grid.RowDefinitions>

			<Button Name="Button" Content="Button" Grid.Column="0" Grid.Row="0" />
			<Label Content="IsEnabled" Grid.Row="1" Grid.Column="0" />
			<TextBox Text="{Binding ElementName=ItemUserValid, Path=Text}" Grid.Row="1" Grid.Column="1" MinWidth="100" MaxWidth="100" />

		</Grid>
	</GroupBox>

	<GroupBox Name="GroupBox2" Header="No Validation" Style="{DynamicResource styleGroupLineMashup}" Grid.Row="1">
		<Grid Margin="0,0,0,8">
			<Grid.ColumnDefinitions>
				<ColumnDefinition Width="100" />
				<ColumnDefinition Width="110" />
			</Grid.ColumnDefinitions>
			<Grid.RowDefinitions>
				<RowDefinition Height="32" />
				<RowDefinition Height="32" />
			</Grid.RowDefinitions>

			<Button Content="Button" Grid.Column="0" Grid.Row="0" />
			<Label Content="IsEnabled" Grid.Row="1" Grid.Column="0" />
			<TextBox Name="TextBox" Text="Test 1" Grid.Row="1" Grid.Column="1" MinWidth="100" MaxWidth="100" />

		</Grid>
	</GroupBox>
	<ui:StatusBar Name="StatusBar" Grid.Row="1" Grid.Column="0" />
</Grid>

Regards
Ken Eric

Mashup – The “new modal Dialog window”

Previously this year I wrote a post regarding popups.  And now there is something so much better…
What I didn’t know then, was that there already existed a modal dialog window for exactly this kind of behaviour I wanted within the mashup in later release.
We recently had an upgrade of our environment, and there I suddenly was… Maybe it’s just me not keeping up with all the new features, and I guess there are others of you out there who also don’ know.
So I’d like to share a small example. You can also find an example in the mashup designer under common controls, if you have it.

What I find really nice, is that the dialog windows are own .xaml files, which means it’s being added really quickly if I have to re-use it somewhere else.

This is how it can look, in this case I used it for supplier search, which often can be good to have many places. It writes back from the Dialog.xaml to the primary.xaml.

SupplierDialogBox2

Below is the code that had to be added in the primary mashup. I also added a ‘F4” gesture to open it.


<StackPanel Grid.Row="1" Grid.Column="3">
                  <mashup:Dialog Name="SupplierMyDialog" Uri="SupplierDialogBox.xaml" WindowHeight="600" WindowWidth="540" HorizontalAlignment="Left" />
                  <TextBox Name="Supplier" Text="{Binding ElementName=SupplierMyDialog, Path=CurrentItem[Supplier]}" MinWidth="80" MaxWidth="80">
                     <TextBox.InputBindings>           
                        <KeyBinding Key="F4" Command="mashup:MashupInstance.MashupCommand">          
                           <KeyBinding.CommandParameter>             
                              <mashup:Events>
                                 <mashup:Event SourceEventName="Click" TargetName="SupplierMyDialog" Debug="True">
                                    <mashup:Parameter TargetKey="SupplierNumber" Value="{Binding ElementName=Supplier, Path=Text}" />
                                 </mashup:Event>
                              </mashup:Events>          
                           </KeyBinding.CommandParameter>       
                        </KeyBinding>  
                     </TextBox.InputBindings> 
                  </TextBox>   
  </StackPanel>

And here is the complete code for the DialogBox itself.  The close button will target the supplier field with the text input.

Grid Height="600" Width="540" xmlns="http://schemas.microsoft.com/winfx/2006/xaml/presentation" xmlns:x="http://schemas.microsoft.com/winfx/2006/xaml" xmlns:ui="clr-namespace:Mango.UI.Controls;assembly=Mango.UI" xmlns:mashup="clr-namespace:Mango.UI.Services.Mashup;assembly=Mango.UI" xmlns:m3="clr-namespace:MForms.Mashup;assembly=MForms" xmlns:clr="clr-namespace:System;assembly=mscorlib" xmlns:Services="clr-namespace:Mango.Services;assembly=Mango.Core" xmlns:ps="clr-namespace:PF.Client.Mashup;assembly=PF.Client">
   <Grid.Resources>
      <mashup:CurrentItemValue x:Key="CurrentItemValue" />
   </Grid.Resources>

   <Grid.ColumnDefinitions>
      <ColumnDefinition Width="540" />
   </Grid.ColumnDefinitions>
   <Grid.RowDefinitions>
      <RowDefinition Height="80" />
      <RowDefinition Height="400" />
      <RowDefinition Height="50" />
      <RowDefinition Height="Auto" />
   </Grid.RowDefinitions>

   <GroupBox Style="{DynamicResource styleGroupLineMashup}">
      <Grid Margin="0,0,0,8">
         <Grid.ColumnDefinitions>
            <ColumnDefinition Width="60" />
            <ColumnDefinition Width="150" />
            <ColumnDefinition Width="80" />
         </Grid.ColumnDefinitions>
         <Grid.RowDefinitions>
            <RowDefinition Height="32" />
         </Grid.RowDefinitions>

         <TextBlock Text="Supplier:" Grid.Column="0" />
         <StackPanel Orientation="Vertical" Grid.Row="0" Grid.Column="1">
            <mashup:Dialog Name="SupplierMyDialog" Uri="SupplierDialogBox.xaml" Grid.Column="0" Grid.Row="0">
               </mashup:Dialog>         
            <TextBox Name="SupplierNumber" MinWidth="120" MaxWidth="120" HorizontalAlignment="Left" MaxLength="18" Text="" />

         </StackPanel>

         <Button Name="Button" Grid.Column="2" Content="Search">
            <Button.CommandParameter>
               <mashup:Events>
                  <mashup:Event TargetName="ItemMasterSupplierListBrowse" SourceEventName="Click" TargetEventName="Search" Debug="True">
                     <mashup:Parameter TargetKey="Query" Value="{Binding Path=Text, ElementName=SupplierNumber}" />
                  </mashup:Event>
               </mashup:Events>
            </Button.CommandParameter>
         </Button>
      </Grid>
   </GroupBox>

   <m3:ListPanel Name="ItemMasterSupplierListBrowse" Grid.Row="1" EnablePositionFields="False" EnableSortingOrder="False">
      <m3:ListPanel.Events>
         <mashup:Events>
            <mashup:Event SourceEventName="Startup">
               <mashup:Parameter TargetKey="IDCONO" />
               <mashup:Parameter TargetKey="IDSUNO" />
            </mashup:Event>

            <mashup:Event SourceName="ItemMasterSupplierListBrowse" SourceEventName="CurrentItemChanged" Target="{mashup:SetProperty ElementName=SupplierNumber, Path=Text}" Debug="True">
               <mashup:Parameter SourceKey="SUNO" TargetKey="Value" />
            </mashup:Event>
         </mashup:Events>
      </m3:ListPanel.Events>
      <m3:ListPanel.Bookmark>
         <m3:Bookmark Program="CRS620" Table="CIDMAS" KeyNames="IDCONO,IDSUNO" SortingOrder="1" IncludeStartPanel="True" />
      </m3:ListPanel.Bookmark>
   </m3:ListPanel>

   <Button Content="Close" Grid.Row="2">
      <Button.CommandParameter>
         <mashup:Events>
            <mashup:Event SourceEventName="Click" TargetEventName="Close">
               <mashup:Parameter TargetKey="Supplier" Value="{Binding ElementName=SupplierNumber, Path=Text}" />
            </mashup:Event>
         </mashup:Events>
      </Button.CommandParameter>
   </Button>
   
   <ui:StatusBar Name="StatusBar" Grid.Row="3" Grid.Column="0" />
</Grid>

Hope it can be to any help.

Regards
Ken Eric