H5 Client

H5 Client is a new web-based user interface in Infor Workspace that brings Infor M3 to modern web browsers.

H5 Client is built using standard HTML5/JavaScript, and uses jQuery as one of the JavaScript libraries. It can potentially run on any major browser (Microsoft Internet Explorer, Google Chrome, Apple Safari, Mozilla Firefox, etc.), on potentially any operating system (Microsoft Windows, Mac OS, Linux, etc.), on potentially any device (PC, Mac, iPhone, iPad, Android, etc.). It’s a major milestone since the old Movex Workplace.

Movex Workplace had been built solely for Internet Explorer 6 over 10 years ago with non-standard IE-only features to optimize development and maintenance after Internet Explorer had emerged winner of the first browser war. Despite having been mono-browser, Movex Workplace had been praised by IDC as “the most technologically advanced business portal on the market” extensively using XmlHttpRequest long before the term Ajax was coined.

Fast forward to 2013, the web is growing exponentially with demand for multiple devices, multiple platforms, multiple vendors. H5 Client is the response to that demand and is a new player to complement its big sister Infor Smart Office.

H5 Client was announced and made Generally Available (GA) and I want to advertise it further with this post.

First tests with Google Chrome

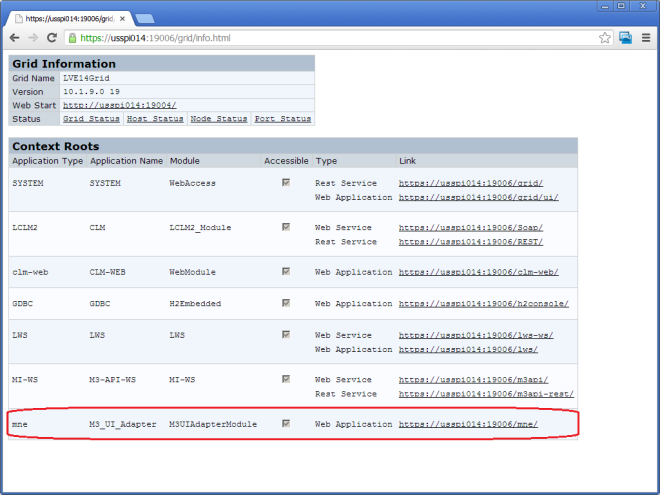
  1. To determine if you have H5 Client, open the Grid Information page and look for Application Type mne:
    6
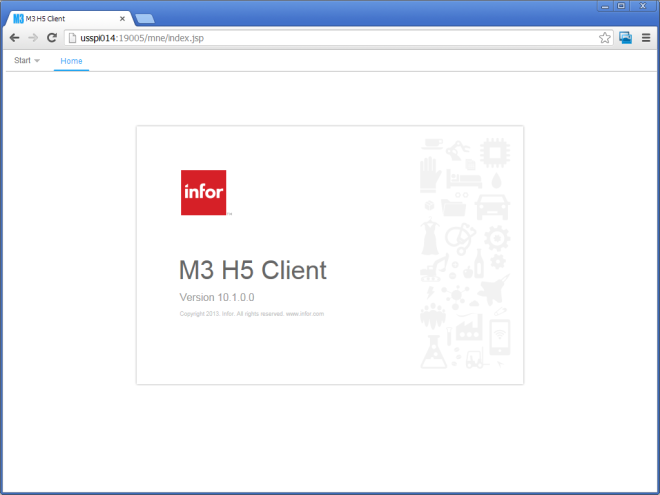
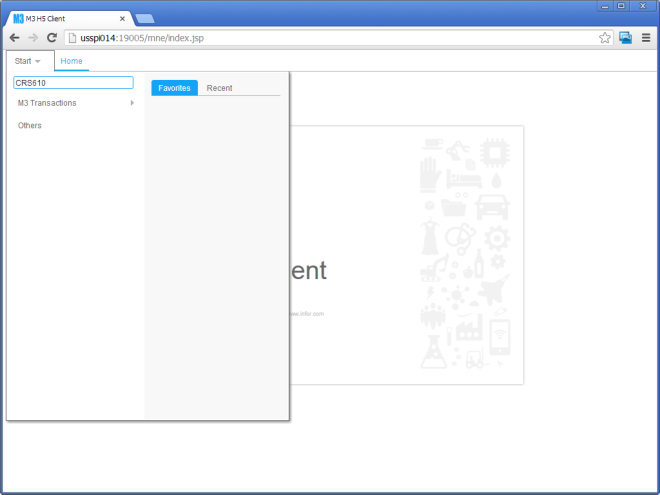
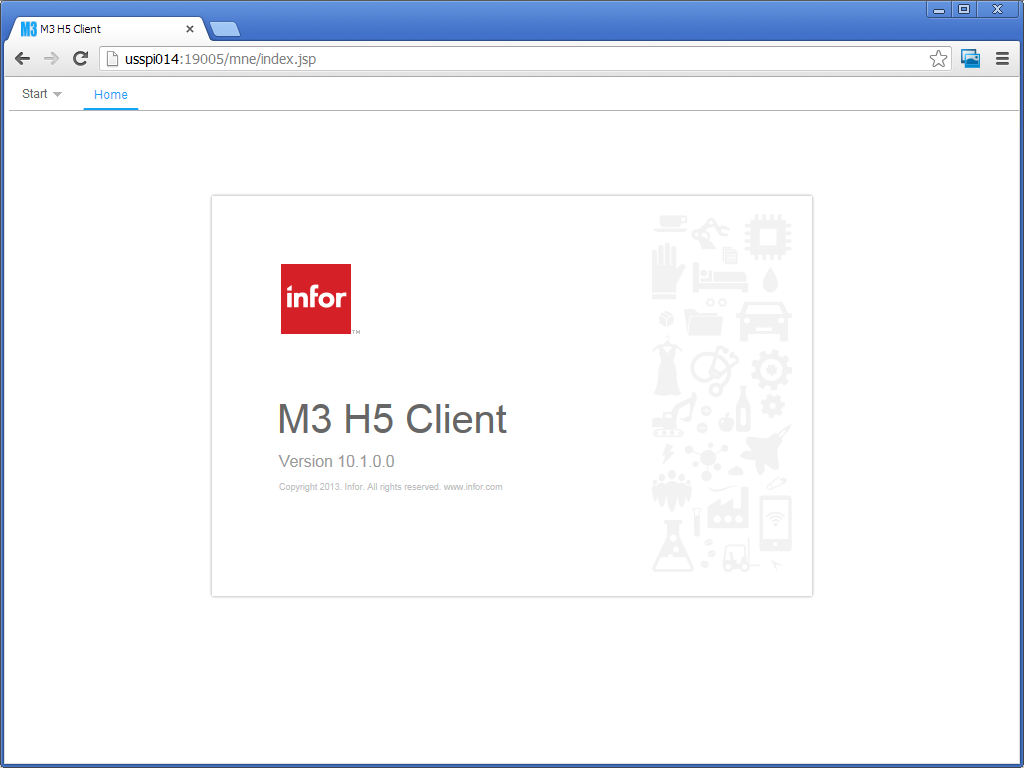
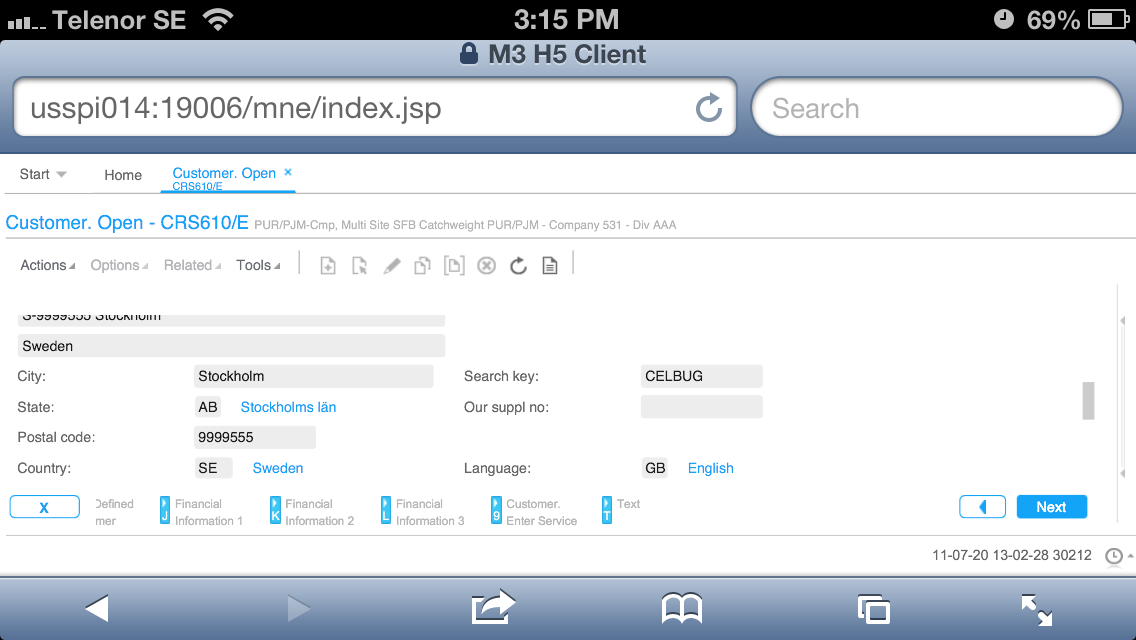
  2. Click on the /mne/ Web Application Link and authenticate with your M3 user/password. It will go to this Home page:
    1
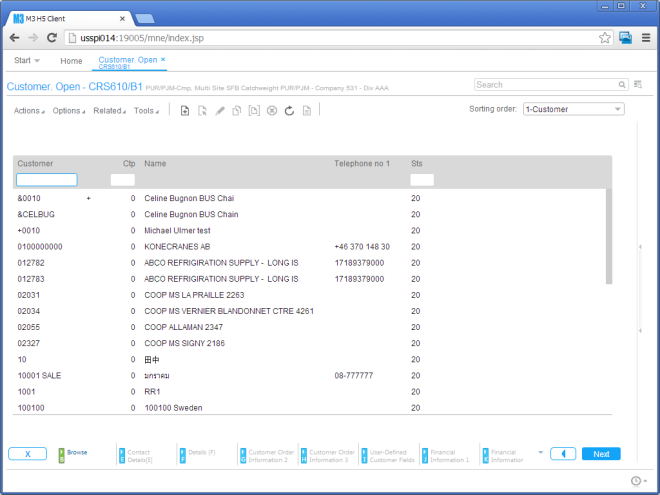
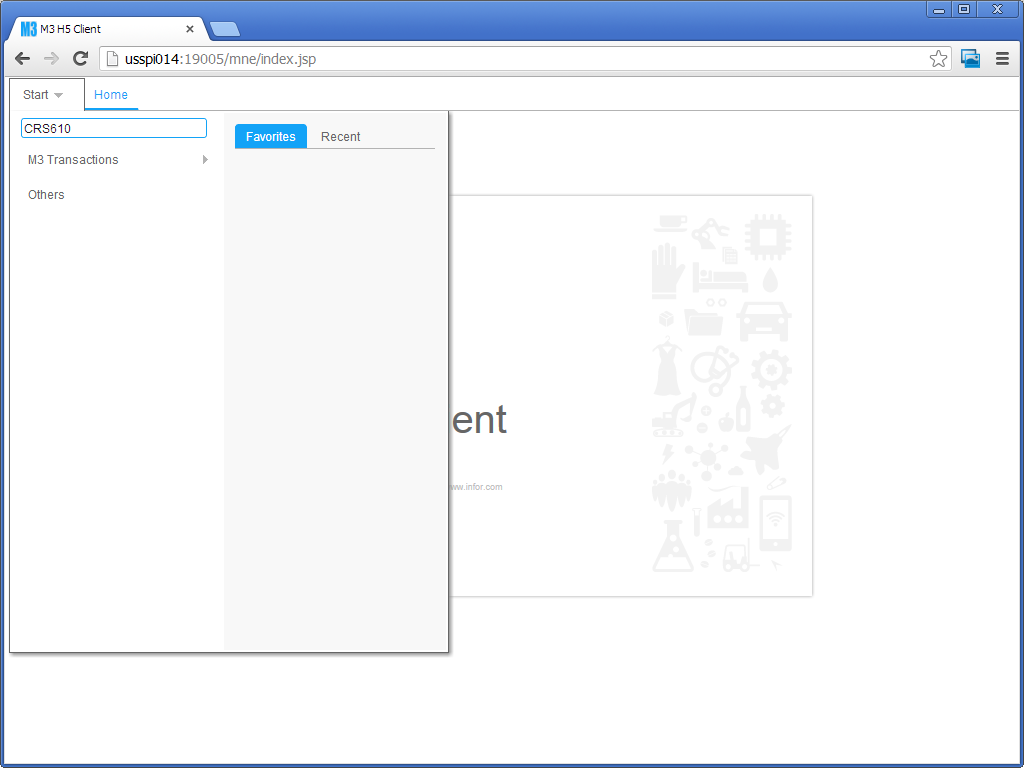
  3. Start an M3 program as usual in the QuickStart, for example CRS610:
    2
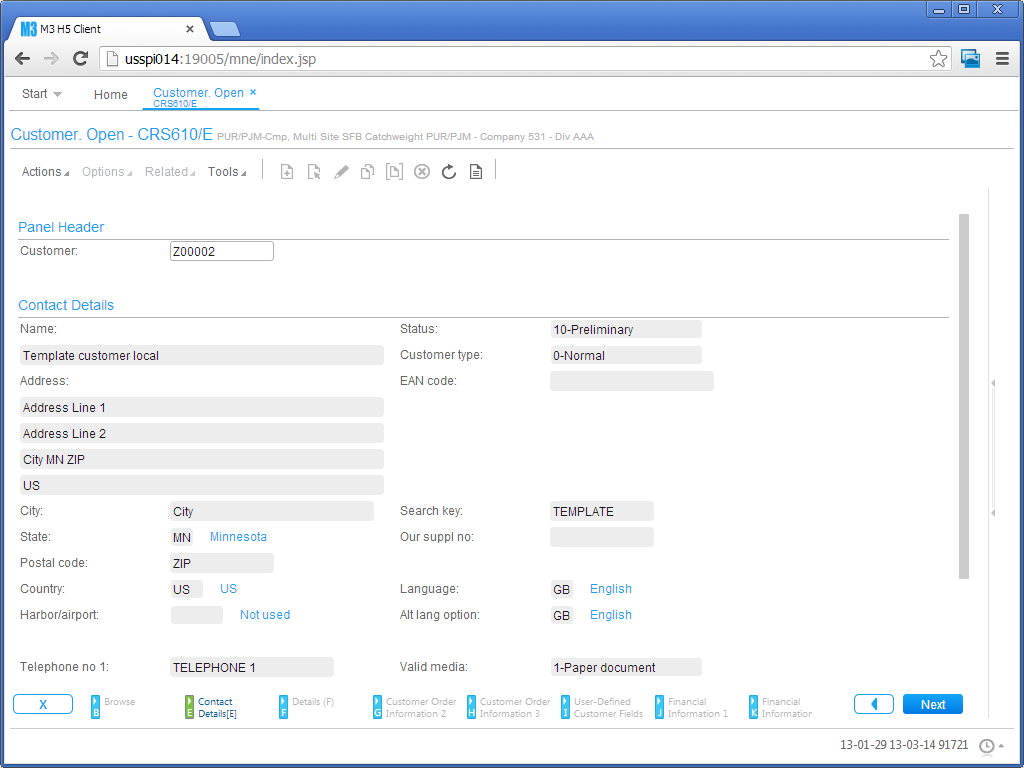
  4. The M3 program will start like it did in Movex Workplace, but this time in a modern browser, Google Chrome for instance:
    3
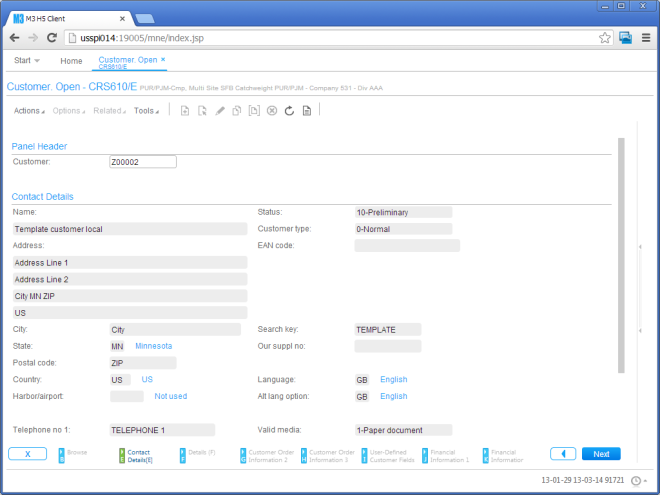
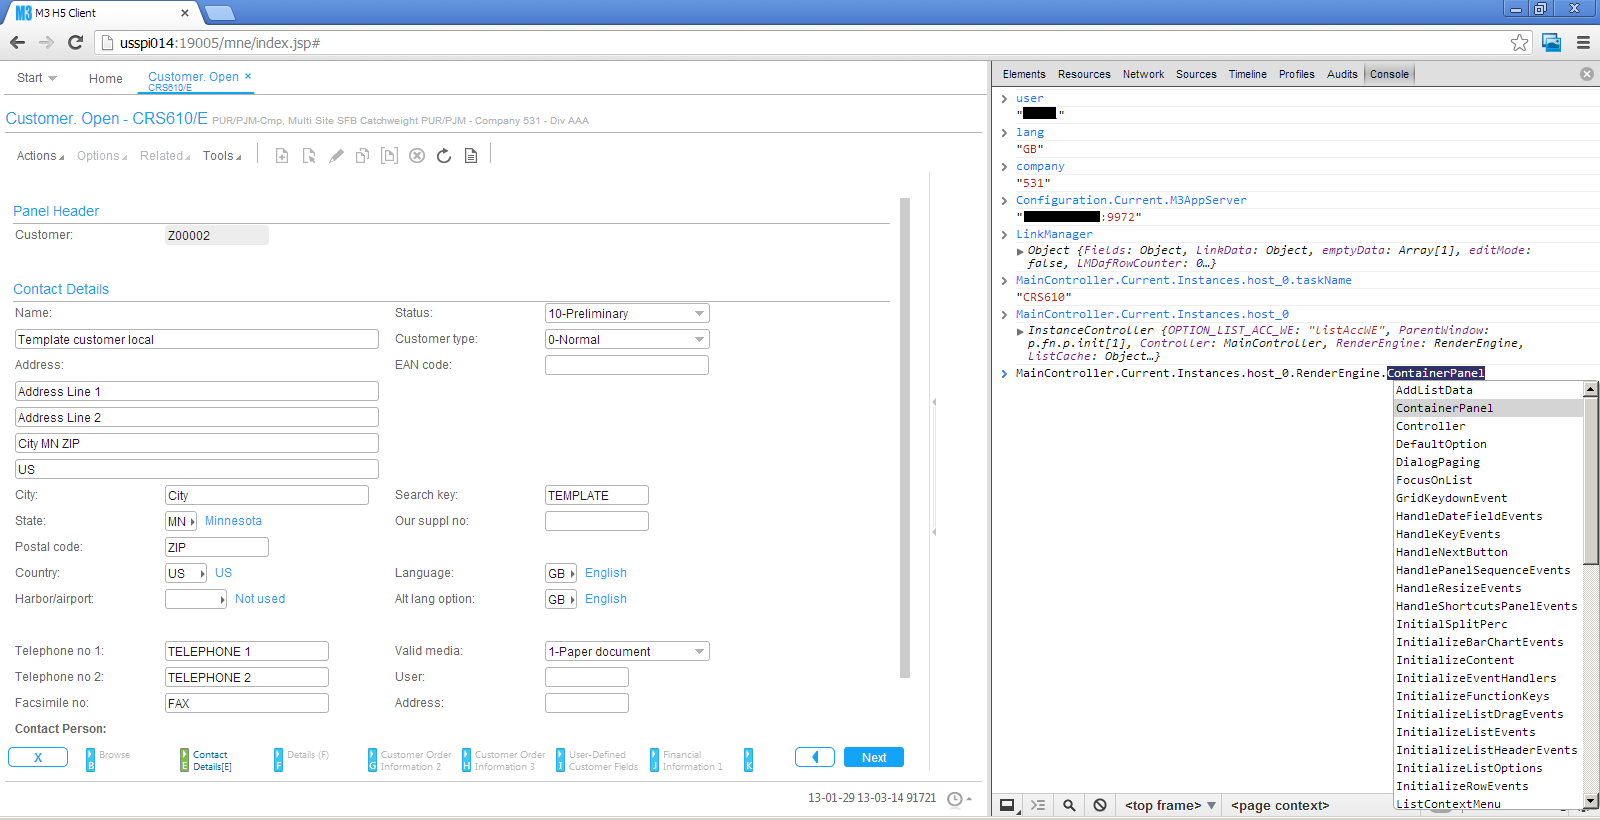
  5. From here, use the program as usual, for example Options > Display CTRL+5:
    4
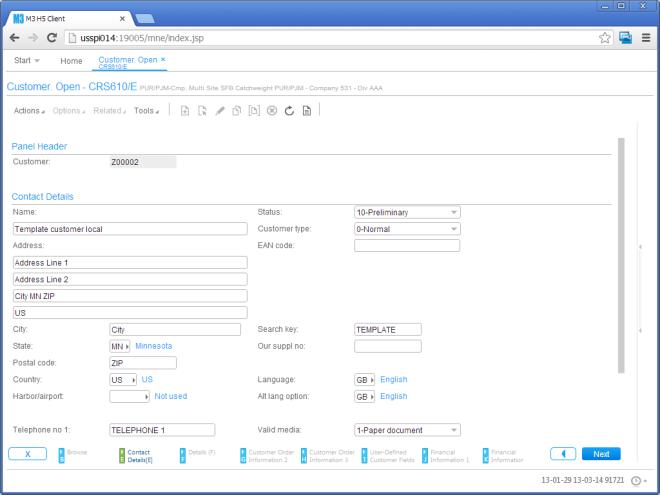
  6. And Options > Change CTRL+2:
    5

On Safari

Here is a screenshot of H5 Client in Safari on my PC:
3_

On the iPhone

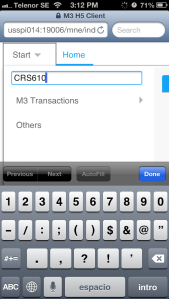
I tested H5 Client on Safari on my iPhone, and here is the result:

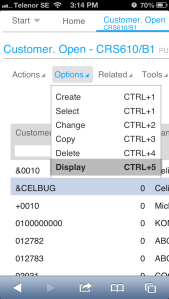
Start > CRS610 > Options > Display CTRL+5:
IMG_9107 IMG_9110 IMG_9117

In Landscape View:
IMG_9112

Batch Customer Order – OIS275/B1:
IMG_9113

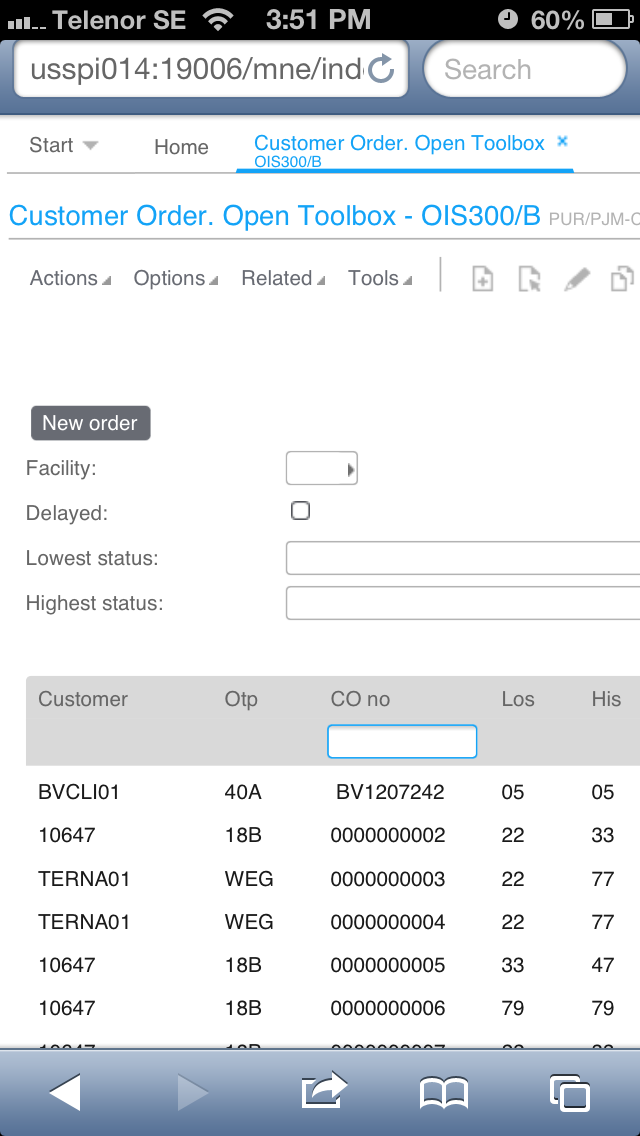
Customer Orders – OIS300/B:
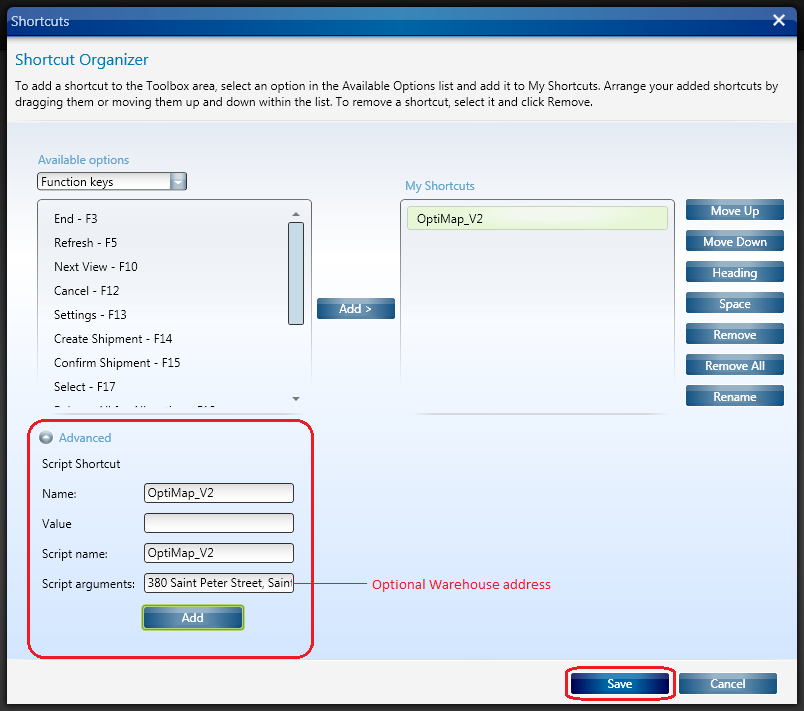
IMG_9115

Shortcuts

Also, it’s possible to use Shortcuts like in Smart Office:
6

JavaScript

Also, I can use the browser’s Developer Tools and the JavaScript Console to integrate with the H5 Client with Classes similar to Smart Office Scripts (UserContext, Configuration, Controller, Content); that reminds me of MNEAI for Movex Workplace and will probably lead to more posts in the future:
7

Disclaimer

H5 Client is supposed to run as part of Infor Workspace. Thus, H5 Client alone won’t provide all the features necessary for the user.

Also, not all devices and browsers are officially supported. I successfully tested it in Internet Explorer, Google Chrome, and Safari on my PC, and Safari on my iPhone. It failed to run on Firefox on my PC (the entries in the Options menu were disabled), and on Chrome on my iPhone (it froze at /mne/index.jsp). And I yet have to test it on iPad, Linux, Mac OS, and Android.

For more information

To learn more about H5 Client, visit the Summit Week or Inforum 2013.

That’s it! I hope this quick overview will spark an interest in Infor Workspace and H5 Client.


UPDATE 2013-03-15: Added link to HTML5.

OptiMap_V2

Here is the second version of the OptiMap script for Smart Office that integrates the Delivery Toolbox – MWS410/B with OptiMap – Fastest Roundtrip Solver to calculate and show on Google Maps the fastest roundtrip for the selected Routes. This extends the first version of the script.

In this second version I added the possibility to set the starting address (for example the Warehouse) as the Script argument. See lines 52-54.

import System;
import System.Web;
import System.Windows;
import Mango.UI.Services.Lists;
import MForms;

/*

	OptiMap_V2 for M3
	Thibaud Lopez Schneider, Infor, October 19, 2012 (rev.2)

	This script illustrates how to integrate the Smart Office Delivery Toolbox - MWS410/B with OptiMap - Fastest Roundtrip Solver, http://www.optimap.net/
	to calculate and show on Google Maps the fastest roundtrip for the selected Routes; it's an application of the Traveling Salesman Problem (TSP) to M3.
	This is interesting for a company to reduce overall driving time and cost, and for a driver to optimize its truck load according to the order of delivery.

	To install this script:
	1) Deploy this script in the mne\jscript\ folder of your Smart Office server
	2) Create a Shortcut in MWS410/B to run this script; for that go to MWS410/B > Tools > Personalize > Shortcuts > Advanced > Script Shortcut, set the Name to OptiMap, and set the Script name to OptiMap
	3) Optionally, set the starting address (for example the Warehouse) as the Script argument; the address must be recognized by Google Maps
	4) Create a View (PAVR) in MWS410/B that shows the address columns ADR1, ADR2, ADR3

	To use this script:
	1) Start MWS410/B
	2) Switch to the View (PAVR) that shows the address columns ADR1, ADR2, ADR3
	3) Select multiple Routes in the list (press CTRL to select multiple rows)
	4) Click the OptiMap Shortcut
	5) The Shortcut will run the script, the script will launch OptiMap in a browser and pass the selected addresses as locN parameters in the URL, and OptiMap will optimize the roundtrip

	For more information and screenshots refer to:
	https://thibaudatwork.wordpress.com/2012/10/04/route-optimization-for-mws410-with-optimap/
	https://thibaudatwork.wordpress.com/2013/03/08/optimap_v2/

*/
package MForms.JScript {
	class OptiMap_V2 {
		public function Init(element: Object, args: Object, controller : Object, debug : Object) {
			try {
				// get a reference to the list
				var listControl: MForms.ListControl = controller.RenderEngine.ListControl;
				var listView: System.Windows.Controls.ListView = controller.RenderEngine.ListViewControl;
				if (listControl == null || listView == null) { MessageBox.Show('Error: Couldn\'t find the list.'); return; }
				// get the selected rows
				var rows = listView.SelectedItems; // System.Windows.Controls.SelectedItemCollection
				if (rows == null || rows.Count == 0) { MessageBox.Show('Error: Select multiple routes in the list (press CTRL to select multiple rows).'); return; }
				// get the address columns ADR1, ADR2, ADR3
				var column1: int = listControl.GetColumnIndexByName('ADR1');
				var column2: int = listControl.GetColumnIndexByName('ADR2');
				var column3: int = listControl.GetColumnIndexByName('ADR3');
				if (column1 == -1 || column2 == -1 || column3 == -1) { MessageBox.Show('Error: Couldn\'t find the address columns ADR1, ADR2, ADR3.'); return; }
				// construct the URL
				var query: String = 'http://www.optimap.net/?';
				// set the optional starting address
				var offset: int = 0;
				if (!String.IsNullOrEmpty(args)) { offset=1; query += 'loc0=' + HttpUtility.UrlEncode(args) + '&'; }
				// add the selected addresses
				for (var i: int = 0; i < rows.Count; i++) {
					var row: ListRow = rows[i];
					var ADR1: String = row[column1];
					var ADR2: String = row[column2];
					var ADR3: String = row[column3];
					var address: String = ADR1 + ',' + ADR2 + ',' + ADR3;
					query += 'loc' + (i+offset) + '=' + HttpUtility.UrlEncode(address) + '&';
				}
				// launch OptiMap in a browser
				ScriptUtil.Launch(new Uri(query));
			} catch (ex: Exception) {
				MessageBox.Show(ex);
			}
		}
	}
}

Here is a screenshot of how to set the address as an Argument of the script:

8_

That’s it!

(Oh, and I finally learned how to post source code to WordPress. Duh!)

Related Articles

How to call an M3 Web Service using jQuery

Here’s a simple example of calling an M3 web service using jQuery. In this example, my web service has two input fields and 3 output fields. You’ll obvously need to change the URL to the web service and the format of your soap request to match your WSDL.

<html>
<head>
    <title>example m3 soap web service with jquery</title>
    http://ajax.googleapis.com/ajax/libs/jquery/1.9.1/jquery.min.js
    
        $(document).ready(function () {
            jQuery.support.cors = true;

            $("#submitBtn").click(function (event) {
                var wsUrl = "http://ussplu124.lu123train.lawson.com:20005/lws-ws/learning/JK-CustomerService";

                var soapRequest = '';
                soapRequest += '' + $("#cusno").val() + '' + $("#addressId").val();
                soapRequest += '';
                $.ajax({
                    type : "POST",
                    url : wsUrl,
                    contentType : "text/xml",
                    dataType : "xml",
                    data : soapRequest,
                    success : processSuccess,
                    error : processError
                });
            });
        });

        function processSuccess(data, status, req) {
            if (status == "success") {
                var ois002 = $(req.responseText).find('OIS002');
                var response = ois002.find('Name').text() +
                                "
" + ois002.find('AddressLine1').text() + "
" + ois002.find('AddressLine2').text(); $("#response").html(response); } } function processError(data, status, req) { alert(req.responseText + " " + status); } </head> <body> <h3>Calling Web Services with jQuery/AJAX</h3> <h4>Input</h4> Customer Number / Address ID <input id="cusno" type="text" /> <input id="addressId" type="text" /> <input id="submitBtn" value="Submit" type="button" /> <h4>Output</h4> <div id="response"/> </body> </html>

Here’s the example HTML page, with my input fields and the response I get when I submit the form:

jquery example

/Jessica

Related articles

Google Glass

I just applied to get a pair of Google Glass.

Google Glass is an anticipated product from Google X for bringing Augmented Reality to the masses in a sports fashion pair of glasses containing a video camera, a Heads-Up Display, a processing unit running Android, Wifi connectivity, and a battery (c.f. the patent).

I was at Google I/O 2012 were they accepted pre-orders for Glass Explorer Edition but I made the regretful decision to not apply. Google is now offering a second chance: What would you do if you had Glass? Answer with #ifihadglass.

If I had Glass I would improve the workers job in a warehouse: I would show walking directions to the picking location, I would display information about the item, and I would keep track of the picking list. I’m an enthusiast I/On working on AR in the enterprise.

This would be a continuation of my previous implementation of Augmented Reality for M3.

Here are my three concepts pictures for Google Glass:

1

2

3

Here’s my application:

4

Wish me luck, and see you at Google I/O 2013.


M3 + Augmented Reality

In this article I introduce the first implementation that I know of Augmented Reality for Infor M3. Augmented Reality is the ability to superpose digital information on top of real world objects. This is achieved by locating the user’s head in space, by determining the user’s point of view, by registering real world objects, and by projecting virtual 3D objects accordingly. Implementing it has been a deer dream of mine. In this example I use fiducial markers and data coming from Item Master – MMS001.

Applications

Augmented Reality for M3 could be used for many applications. For example, it could help a worker find an Item in the warehouse by showing optimized walking directions and distance to possible picking locations. Also, it could help a worker show contextual information at a glance.

I believe Augmented Reality to be a disruptive technology and one of the next big revolutions in the software industry, with positive impacts similar to those of the Internet and mobile devices, that will reshape entire industries in the next 10 years.

Timeline & motivation

In 1998 I got a summer job in a warehouse for a company that sold car brakes. Every few minutes a printer spit out a picking list of items that I had to collect. As a temporary worker unfamiliar with the place, I spent most of my time wandering through the warehouse, searching for the items, and asking the more seasoned workers for help; I found that inefficient and I wished the computer gave me a map with directions of where to go. Also, the picking lists were un-ordered and I often had to go back to a previous location I had just visited; I found that inefficient and I wished the computer optimized the picking lists. Also, once I found the location, I often discovered the boxes were empty and I had to ask a forklift driver to replenish the stock location from a box of a higher shelf; I found that inefficient and I wished the computer planned replenishment ahead of time. That was in 1998 and nowadays ERP and Warehouse management systems are more common. Yet, I kept my wish to make better systems.

Then, In 2001 I read about Professor Steven Feiner’s Augmented Reality KARMA project from 1992 at Columbia University. The system fit in a backpack and had portable computer, batteries, GPS, compass, and head-mounted display. It would give detailed instructions to a user on how to repair a printer. That was my first exposure to Augmented Reality and ever since I have been wanting to implement it.

In 2007 Apple introduced the iPhone, with a stunning user interface, graphics, and processing power, blowing everybody’s mind about mobility and redefining an industry. And in 2009 Apple added a camera to the iPhone 3GS. The hardware technology for Augmented Reality started becoming accessible to the masses.

In 2009 I met with Brad Neuberg of Google at the Google I/O conference and I started working on a client-side search engine for M3 source code. That was my first exposure to HTML5.

In 2010 I implemented my first Warehouse 3D demo using Google Earth, with real data fed from the ERP, and I projected the result on a large touch screen for an immersive experience. That was my first step towards implemented Augmented Reality for M3.

In 2011 I proposed an idea for an internal project for M3 + Augmented Reality on mobile devices.

In parallel, WHATWG and W3C have been working hard to standardize HTML5 with the ability to use the webcam in JavaScript with WebRTC, to access pixel data, to paint on the canvas, and to use WebGL for 3D rendering. The software technology for Augmented Reality is becoming accessible to the masses.

More recently I started working on geo-locating Stock Locations in M3. This opens the door to new applications for geo-coded data in M3.

Then, at the Google I/O conference this year, I met with Ilmari Heikkinen whom pointed me to his article in HTML5 Rocks on Writing Augmented Reality Applications using JSARToolKit. That was the last push I needed to implement actual Augmented Reality for M3. So I did.

Implementation

I used Ilmari’s source code and I added a few lines of code to call an M3 API using REST in JavaScript when a marker is detected. In this example, the marker is mapped to an Item number (ITNO), but it could also be mapped to a Stock Location (WHSL) for example. Then, for that Item number I call the M3 API MMS200MI.GetItmBasic and I display the Name (ITDS), Description (FUDS), Basic unit of measure (UNMS), Volume (VOL3), Net weight (NEWE), Gross weight (GRWE).

Result

Here is a video of the result. Note the section below the canvas that shows M3 data coming from MMS200MI.GetItmBasic for the detected marker. We can see an activity indicator flickering as the markers are detected. For best viewing, watch the video in YouTube, in HD, and in full screen.

Source code

I provide the result for download at http://ibrix.info/ar/demo.zip with HTML and JavaScript source code, sample fiducial markers, and sample images.

Future work

With the simple example I introduced in this article I illustrate that hardware and software technology for Augmented Reality have have already become accessible for the masses. The technology is still maturing. There are on-going projects to provide registration without the use of markers. Also, sensors are becoming better for indoor location.

That’s it for now.

Please click ‘Follow’ to subscribe to my blog.

Route optimization for MWS410 with OptiMap

Here is a script for Lawson Smart Office that integrates the Delivery Toolbox – MWS410/B with OptiMap – Fastest Roundtrip Solver to calculate and show on Google Maps the fastest roundtrip for the selected Routes. It’s a solution to the Travelling salesman problem (TSP) for M3 Routes.

This is interesting for a company to reduce overall driving time and cost, and it’s interesting for a driver to optimize its truck load according to the order of delivery.

To solve the TSP on Google Maps, the authors of OptiMap implemented several algorithms, including brute force, nearest-neighbor, and the Ant Colony Optimization, and released the code for the TSP Solver for Google Maps API as open source with an MIT License. Because the TSP is an NP-complete problem the solution only works well for up to 10 cities on current desktop computers. But OptiMap can apparently solve more than 15 cities. You can read more about OptiMap at Behind the Scenes of OptiMap and OptiMap version 4 is here.

To integrate OptiMap with Smart Office I wrote a simple Personalized Script that gets the addresses of the selected Routes in MWS410/B, and that opens OptiMap in a web browser with the delivery addresses in the URL. The GET parameters are explained in OptiMap’s Optimize Your Trips.

Setup

To install and use the script:

  1. Deploy this script in the mne\jscript\ folder in your Smart Office server:
  2. Create a Shortcut in MWS410/B to run this script; for that go to MWS410/B > Tools > Personalize > Shortcuts > Advanced, expand Script Shortcut, set the Name to OptiMap, set the Script name to OptiMap, click Add, and click Save:
  3. Create a View (PAVR) in MWS410/B that shows the address columns ADR1, ADR2, ADR3:
  4. Select multiple Routes in the list (press CTRL to select multiple rows), and click the OptiMap Shortcut to run the script:

Result

The script will launch OptiMap for the selected Routes, and OptiMap will optimize the order of delivery:

Source code
Here is the complete source code for the script:

import System;
import System.Web;
import System.Windows;
import Mango.UI.Services.Lists;
import MForms;

/*
Integrates the Smart Office Delivery Toolbox - MWS410/B with OptiMap - Fastest Roundtrip Solver, http://www.optimap.net/
to calculate and show on Google Maps the fastest roundtrip for the selected Routes.
This is interesting to reduce driving time and cost, and for a driver to optimize its truck load according to the order of delivery.
1) Deploy this script in the mne\jscript\ folder in your Smart Office server
2) Create a Shortcut in MWS410/B to run this script; for that go to MWS410/B > Tools > Personalize > Shortcuts > Advanced > Script Shortcut, set the Name to OptiMap, and set the Script name to OptiMap
3) Create a View (PAVR) in MWS410/B that shows the address columns ADR1, ADR2, ADR3
4) Select multiple Routes in the list (press CTRL to select multiple rows)
5) Click the OptiMap Shortcut to run this script and launch OptiMap for the selected Routes
For more information and screenshots refer to https://thibaudatwork.wordpress.com/2012/10/04/route-optimizer/
Thibaud Lopez Schneider, Infor, October 4, 2012 (rev.2)
*/
package MForms.JScript {
    class OptiMap {
        public function Init(element: Object, args: Object, controller : Object, debug : Object) {
            try {
                // get the list
                var listControl: MForms.ListControl = controller.RenderEngine.ListControl;
                var listView: System.Windows.Controls.ListView = controller.RenderEngine.ListViewControl;
                if (listControl == null || listView == null) { MessageBox.Show('Error: Couldn\'t find the list.'); return; }
                // get the selected rows
                var rows = listView.SelectedItems; // System.Windows.Controls.SelectedItemCollection
                if (rows == null || rows.Count == 0) { MessageBox.Show('Error: No rows selected.'); return; }
                // get the address columns ADR1, ADR2, ADR3
                var column1: int = listControl.GetColumnIndexByName('ADR1');
                var column2: int = listControl.GetColumnIndexByName('ADR2');
                var column3: int = listControl.GetColumnIndexByName('ADR3');
                if (column1 == -1 || column2 == -1 || column3 == -1) { MessageBox.Show('Error: Couldn\'t find the address columns ADR1, ADR2, ADR3.'); return; }
                // construct the URL
                var query: String = '';
                for (var i: int = 0; i < rows.Count; i++) {
                    var row: ListRow = rows[i];
                    var ADR1: String = row[column1];
                    var ADR2: String = row[column2];
                    var ADR3: String = row[column3];
                    var address: String = ADR1 + ',' + ADR2 + ',' + ADR3;
                    query += 'loc' + i + '=' + HttpUtility.UrlEncode(address) + '&';
                }
                var uri: Uri = new Uri('http://www.optimap.net/?' + query);
                // launch OptiMap
                ScriptUtil.Launch(uri);
            } catch (ex: Exception) {
                MessageBox.Show(ex);
            }
        }
    }
}

That’s it!

Related posts

See also version OptiMap_V2.

Geocoding of Stock Locations in MMS010

Here is a video that illustrates the process to set the Geo Codes XYZ of Stock Locations in MMS010 in Smart Office, i.e. to set the latitude, longitude, and altitude of Stock Locations, a.k.a. geocoding. In my example I determined the coordinates based on an 3D model built in Google SketchUp and geo-located in Google Earth; a GPS receiver with good indoor accuracy would work as well. With geocoded information, we can present data from the Warehouse Management System in a graphical way. This is important for applications such as showing Stock Locations on a map, or finding the shortest path for a picking list.

Demo video

How to proceed

These are the steps I followed in the video to geolocate the Stock Locations in MMS010:

  1. I used this SketchUp model of a 3D warehouse that I had previously geo-located:
  2. I also used this other SketchUp model of the Stock Locations that I had previously uniquely identified:
  3. Then, I used this Ruby script to get the geocoding of the floor plan:
  4. Then, I used this other Ruby script to get the geocoding of each Stock Location:
  5. The result is this CSV file of the floor plan’s geocodes and each Stock Location’s geocodes:
  6. Then, I used this Lawson Web Service of type Display Program to set the values for the fields Geo Code X (GEOX), Geo Code Y (GEOY), and Geo Code Z (GEOZ) in MMS010/F for a specified Warehouse (WHLO) and Stock Location (WHSL):
  7. Then, I used a Visual Basic macro for Microsoft Excel to call the Web Service for all Stock Locations:
  8. Finally, I used this script to display the Geo Codes XYZ in MMS010/B1:

Result

The result is the list of Stock Locations in MMS010/B1 displaying all the Geo Codes XYZ:

Resources

  • Download the SketchUp model of the geo-located 3D warehouse.
  • Download the SketchUp model of the uniquely identified Stock Locations.
  • Download the Ruby script to get the geocoding of the floor plan.
  • Download the Ruby script to get the geocoding of each Stock Location.
  • Download the resulting CSV file of all Stock Locations and their Geo Codes.
  • Download the Lawson Web Service to set the Geo Codes XYZ of a Stock Location.
  • Download the script to display the Geo Codes XYZ in MMS010/B1.
  • Watch the video of the entire process.

Related articles

UPDATE

2012-09-28: I had a bug in the Ruby script that miscalculated the Y and Z geocodes for the Stock Locations. I corrected the script and the resulting CSV file and I updated the links above.

M3 API with jQuery DataTables

Here is a sample JavaScript code to render a list of results of an M3 API call using DataTables for jQuery. This is useful for web developers who need to easily display M3 data in a web page. This article builds on my previous post about How to call M3 API from JavaScript.

jQuery is a great JavaScript library for cross-browser compatibility, ease of programming, and added functionality. DataTables is great for rendering, pagination, sorting, and filtering of table data, all client-side; this will not be suitable for large amounts of data in which case a server-side positioning will be necessary by setting the necessary API input fields.

Here’s the source code:

<!DOCTYPE HTML PUBLIC "-//W3C//DTD HTML 4.01//EN" "http://www.w3.org/TR/html4/strict.dtd">
<html>
    <head>
        <title>M3 API with jQuery DataTables</title>
        <meta http-equiv="Content-type" content="text/html; charset=utf-8"/>
        <style type="text/css" media="screen">
            @import "http://datatables.net/media/css/site_jui.ccss";
            @import "http://datatables.net/release-datatables/media/css/demo_table_jui.css";
            @import "http://datatables.net/media/css/jui_themes/smoothness/jquery-ui-1.7.2.custom.css";
            body { padding: 10px }
            #container { width: 980px; }
        </style>
    </head>
    <body onload="run()">
        <h1>Customers</h1>
        
http://live.datatables.net/media/js/jquery.jshttp://datatables.net/download/build/jquery.dataTables.nightly.js // settings var userid = 'userid'; var password = 'password'; var program = 'CRS610MI'; var transaction = 'LstByNumber'; var maxrecs = 100; var returncols = 'CUNO,CUNM,CUA1,TFNO,STAT'; var inputFields = ''; // ex: CONO=1&CUNO=10001 // call the API and show the result function run() { try { // construct the URL var url = '/m3api-rest/execute/'+program+'/'+transaction+';maxrecs='+maxrecs+';returncols='+returncols+'?'+inputFields; // execute the request var xhr = new XMLHttpRequest(); xhr.open('GET', url, true, userid, password); xhr.setRequestHeader('Accept', 'application/json'); xhr.onreadystatechange = function () { // handle the response if (this.readyState == 4) { if (this.status == 200) { // get the JSON var jsonTxt = xhr.responseText; var response = eval('(' + jsonTxt + ')'); // show the metadata var table = document.getElementById('results'); var thead = table.tHead; if (thead === null) { thead = document.createElement('thead'); var tr = document.createElement('tr'); var metadata = response.Metadata.Field; for (var m in metadata) { var th = document.createElement('th'); th.appendChild(document.createTextNode(metadata[m]['@description'] + ' ' + metadata[m]['@name'])); tr.appendChild(th); } thead.appendChild(tr); table.appendChild(thead); // paint the table with jQuery DataTables $('#results').dataTable({ "bJQueryUI": true, "sPaginationType": "full_numbers" }); } // show the data var rows = response.MIRecord; for (var i in rows) { var fields = rows[i].NameValue; var values = []; for (var j in fields) { values.push(fields[j].Value); } $('#results').dataTable().fnAddData(values); } } else { alert(xhr.responseText); } } }; xhr.send(); } catch (ex) { alert(ex); } } </body> </html>

Here’s a screenshot of the result:

Related articles

How to call M3 API from JavaScript

Here is a solution to call M3 API from JavaScript, for example to call MMS200MI.GetItmBasic from an HTML page, using the solution described in a previous post on how to call M3 API with REST & JSON. This solution is interesting for easily integrating M3 into third-party web applications.

In this example, I will call the API program MMS200MI and the transaction GetItmBasic to get the details of a specified Item. This API accepts three input fields: Company (CONO), Item number (ITNO), and Language (LNCD).

First, let’s set the variables (replace the values with those that suit your environment):

var userid = 'm3userid';
var password = 'm3password';
var CONO = 100;
var ITNO = 'AN21R8';
var LNCD = 'GB';

Then, let’s construct the URL to make the REST call, and make sure to URI-encode the parameter values:

var url = '/m3api-rest/execute/MMS200MI/GetItmBasic?';
url += '&CONO=' + encodeURIComponent(CONO);
url += '&ITNO=' + encodeURIComponent(ITNO);
url += '&LNCD=' + encodeURIComponent(LNCD);

There are many solutions in JavaScript to make REST calls. I will use the built-in XMLHttpRequest object of modern browsers, but you can choose to use another library of your choice such as jQuery Ajax, Dojo.xhr, etc.

However, all modern browsers implement a same origin policy that restricts cross-domain requests to prevent malicious attacks on a page. Thus, our HTTP Request must be made on the same domain as the REST Service endpoint. For example, if our REST Service endpoint is located at http://hostname:33005/m3api-rest/ then your HTML page must be served with the same origin, i.e. same host and same port number. For example, I placed my HTML page in the mne/script/ folder of my Smart Office server to ensure the same origin policy. There are several workarounds to make cross-domain requests, for example JSONP makes the HTTP Request using a dynamic <script> tag; I haven’t tested such workarounds.

Then, let’s make the HTTP Request assuming your HTML page respects the same origin policy:

var xhr = new XMLHttpRequest();
xhr.open('GET', url, false, userid, password);
xhr.setRequestHeader('Accept', 'application/json');
xhr.send();

Remember, if your HTML page is not in the same domain as the REST service endpoint the browser will throw a JavaScript exception about cross-domain requests.

Then, let’s check if we received a response or not:

if (xhr.status == 200) {
   // success
} else {
   // error
}

The status codes returned could be 200 OK, 401 Unauthorized (incorrect userid/password), 500 Internal Error (invalid data rejected by M3), or something else.

If it’s 200 OK let’s parse the resulting JSON and show the result, otherwise let’s show the error message:

if (xhr.status == 200) {
   // success
   var jsonTxt = xhr.responseText;
   var response = eval('(' + jsonTxt + ')');
   var metadata = response.Metadata.Field;
   var fields = response.MIRecord.NameValue;
   for (var i in fields) {
      console.log(metadata[i]['@description'] + ' (' + fields[i].Name + ', ' + metadata[i]['@type'] + metadata[i]['@length'] + ') = ' + fields[i].Value);
   }
} else {
   // error
   console.log(xhr.responseText);
}

I use eval to parse the JSON but you can use another parser like Doug’s JSON, jQuery.parseJSON, dojo/json, or another parser of your choice.

Also, I use console.log to output the results to the JavaScript console of Google Chrome. Feel free to use any other technique of your choice.

Here is the full source code:

MITest-JS// <![CDATA[
   // set the input fields
   var userid = 'm3userid';
   var password = 'm3password';
   var CONO = 100;
   var ITNO = 'AN21R8';
   var LNCD = 'GB';
   // construct the URL
   var url = '/m3api-rest/execute/MMS200MI/GetItmBasic?';
   url += '&CONO=' + encodeURIComponent(CONO);
   url += '&ITNO=' + encodeURIComponent(ITNO);
   url += '&LNCD=' + encodeURIComponent(LNCD);
   // execute the request
   var xhr = new XMLHttpRequest();
   xhr.open('GET', url, false, userid, password);
   xhr.setRequestHeader('Accept', 'application/json');
   xhr.send();
   // handle the response
   if (xhr.status == 200) {
      // success
      var jsonTxt = xhr.responseText;
      var response = eval('(' + jsonTxt + ')');
      var metadata = response.Metadata.Field;
      var fields = response.MIRecord.NameValue;
      for (var i in fields) {
         console.log(metadata[i]['@description'] + ' (' + fields[i].Name + ', ' + metadata[i]['@type'] + metadata[i]['@length'] + ') = ' + fields[i].Value);
      }
   } else {
      // error
      console.log(xhr.responseText);
   }
// ]]>

Here is a screenshot of the result in Internet Explorer, Google Chrome, Firefox, and Safari of an HTML page with a form that I made:

That’s it!

UPDATE 2012-09-12:

You can access a field value directly by its field name with the following code:

var record = {};
response.MIRecord[i].NameValue.map(function(o){ record[o.Name] = o.Value; }); // transform each record to an associative array accessible by a key
record['ITNO']
record['ITDS']
record['STAT']
record['RESP']

Related articles

Compiled Scripts for Smart Office

Here is a solution in Lawson Smart Office to write “compiled scripts” in C# (as opposed to writing dynamic scripts in JScript.NET).

Background

Traditionally, Personalized Scripts for Lawson Smart Office are written with the built-in Script Editor in the JScript.NET programming language and are deployed as plain text *.js files on the server.

There is also a less known technique. It is also possible to write scripts in C#, to compile them as DLL, and to deploy the *.dll file in lieu of the *.js file.

Pros and cons

There are several advantages of using C# versus JScript.NET. Mostly, the biggest advantage is the full richness of C#. Indeed, C# supports features that are not supported in JScript.NET, for example delegates. Also, C# is more extensively supported by Microsoft and by the community. Whereas JScript.NET is not fully supported by Microsoft, for example there’s no IntelliSense for JScript.NET in Visual Studio whereas there is IntelliSense for C#, and there are almost no examples for JScript.NET in MSDN whereas there are plenty for C#.

There are several disadvantages of using C# versus JScript.NET. Developing compiled scripts requires compiling the C# source code and deploying the DLL to run the script, which makes each iteration longer than developing with JScript.NET. Also, from the deployed DLL it’s not possible to directly see the source code, which is a problem if the source code is not available. Also, the script might need to be re-compiled for different versions of Smart Office, which could be a problem with upgrades.

Microsoft Visual C# Express

I will use Microsoft Visual C# Express to develop and compile my source code.

1) Find the Smart Office libraries

First, we need to find the Smart Office DLL as we’ll need to reference them in Microsoft Visual C# Express.

A user’s computer can run multiple instances of Smart Office at the same time, with different LSO version numbers, and different DLL version numbers. We want to find the correct DLL for our desired instance of Smart Office. There are two sets of DLL to find:

  1. Go to Smart Office
  2. Open the Help menu, it’s the question mark icon at the top right
  3. Select About Lawson Smart Office:
  4. Select View log file:
  5. That will open the Log Viewer
  6. Filter by message C:\ . That will show you the path to the Smart Office ClickOnce deployment folder in your computer, for example:
  7. C:\Users\12229\AppData\Local\Apps\2.0\Data\79O176HR.9F1\N42AOMBD.0HB\http..tion_2b27e2947dd74766_000a.0000_20a2b87dbe5264e8\
  8. Open that folder in Windows Explorer
  9. Search for the DLL files in all sub-folders. That will give us the first set of DLL, for example:
  10. The second set of DLL files is located in the other branch of the folder structure at C:\Users\12229\AppData\Local\Apps\2.0\. For example:
    C:\Users\12229\AppData\Local\Apps\2.0\3YDTAV5W.D22\Q01ZYJYU.RV0\http..tion_2b27e2947dd74766_000a.0000_20a2b87dbe5264e8\

2) Create a Project

Now that we found the two sets of DLL files we can create a C# project in Visual C# Express and reference the DLL.

  1. Go to Visual C# Express
  2. Select File > New Project
  3. Select Class Library and give it a Name:
  4. Select Project > Properties, and make sure to use the same Target framework as your target Smart Office; for example, I use .NET Framework 4.0:
  5. Select Project > Add Reference:
  6. Browse to the first set of DLL found above:
  7. Then add the second set of DLL:
  8. Add the .NET components PresentationCore and PresentationFramework:
  9. Add System.Xaml:
  10. Add WindowBase:
  11. Select File > Save All, and choose a location to save your project.

3) Type the source code

Now we can start creating our script:
using System;
using System.Windows;
using System.Windows.Controls;
using MForms;
using Mango.UI;

namespace MForms.JScript
{
    public class Thibaud
    {
        public void Init(object element, object args, object controller, object debug)
        {
        }
    }
}

The result will look like this:

4)  Compile

Select Debug > Build Solution:

Visual C# Express will compile the code and produce a DLL file in the \obj\Release\ sub-folder of your project:

5) Deploy

Locate the jscript folder.

For Grid versions of Smart Office, the jscript folder is located in one of the LifeCycle Manager sub-folders, for example:

\\hostname\d$\Lawson\LifeCycleManager\Service\<service>\grid\<profile>\applications\LSO_M3_Adapter\webapps\mne\jscript\

For non-Grid versions of Smart Office, the jscript folder is located in one of the WebSphere sub-folders, for example:

\\hostname\d$\IBM\WebSphere7\AppServer\profiles\MWPProfile\installedApps\MWPProfileCell\MWP_EAR.ear\MNE.war\jscript\

And copy/paste your DLL file there:

6) Execute

Now that the script is deployed on the server, we can execute it:

  1. Attach the script to the desired panel in Smart Office via Tools > Personalize > Scripts
     
  2. Set the Script value to the filename and .dll extension, for example Thibaud.dll:
  3. Click Add
  4. Click Save
  5. Press F5 to load and execute the script

7) Additional source code

If you need the controller, you will need to cast it from object to MForms.InstanceController.

InstanceController controller_ = controller as InstanceController;

If you need the content, you will need to cast it from object to System.Windows.Controls.Grid.

Grid content = controller_.RenderEngine.Content;

Now you can start developing your scripts, for example:

TextBox WRCUNM = ScriptUtil.FindChild(content, "WRCUNM") as TextBox;
controller_.RenderEngine.ShowMessage("The value is " + WRCUNM.Text);

Here is a screenshot of my sample script:

UPDATE 2012-04-25: Wayne L. found that we can also use a strongly typed signature for the Init method, so we don’t have to cast the objects anymore:

public void Init(object element, String args, MForms.InstanceController controller, MForms.ScriptDebugConsole debug) {
}

Voilà!

Thanks to Peter A.J. for the help.