Continuing my previous and previous posts on Infor Smart Office SDK, I will now post on how to add a profile fragment in Smart Office Developer mode. For that, I will follow the instructions from the Developer’s Guide and from Karin’s comments.
We use the <Profile> section of the feature Manifest to merge our settings into the system profile. It gets merged only when the feature is deployed to the server with LifeCycle Manager (LCM). It doesn’t get merged when Smart Office is running in Developer mode. The workaround is to use a local profile.xml and reference it in our Windows Registry. First we need to get the server’s profile.xml.
Find the server’s profile.xml
In old versions of Smart Office, the file profile.xml used to be an actual file on the server. Now with the Infor Grid the file has been moved into a distributed database. Supposing you have such version of Smart Office:
- Go to your H2 Web Console following Scott’s instructions, login to the MangoServer application, click on the CATEGORYFILES table, it will display the contents of the table, and copy the CONTENT of profile.xml:

- HEX-decode the contents, for example with Notepad++ or Ostermiller’s decoder:

- Save the decoded contents to a file profile.xml somewhere on your computer, and ensure it’s valid XML:

- That’s the server’s profile.xml.


Add your fragment
Now you can add your settings:
- Open the file profile.xml with a text editor like Notepad, add your application group (or extend an existing one), and add your settings, for example:
<applicationgroup name="Thibaud"> <A> <A1>Hello World!</A1> <A2>123</A2> </A> <B> <B1>true</B1> <B2>["abc", "def"]</B2> <B3>{ "msg": "I'm a value!" }</B3> </B> </applicationgroup> - Ensure the file is still valid XML:

- Optionally, you can add Description attributes at each element, and enabled=”true” on the applicationgroup.

Reference the file in Windows Registry
Now tell Smart Office Developer mode to use that profile.xml:
- Start your Windows Registry Editor (C:\Windows\regedit.exe).
- Go to the Smart Office SDK Window Registry Key HKEY_CURRENT_USER\Software\Infor\MangoDev
- Add a String value ProfilePath, and set the value to the path of your profile.xml:


Test in Smart Office
Now test it in Smart Office Developer mode:
- Now re-start Smart Office in Developer mode (from your Visual Studio solution).
- Start the Profile Editor from the Navigator widget > Administration tools.
- Select your application group, Thibaud in my example.
- Select Advanced and your settings are there:

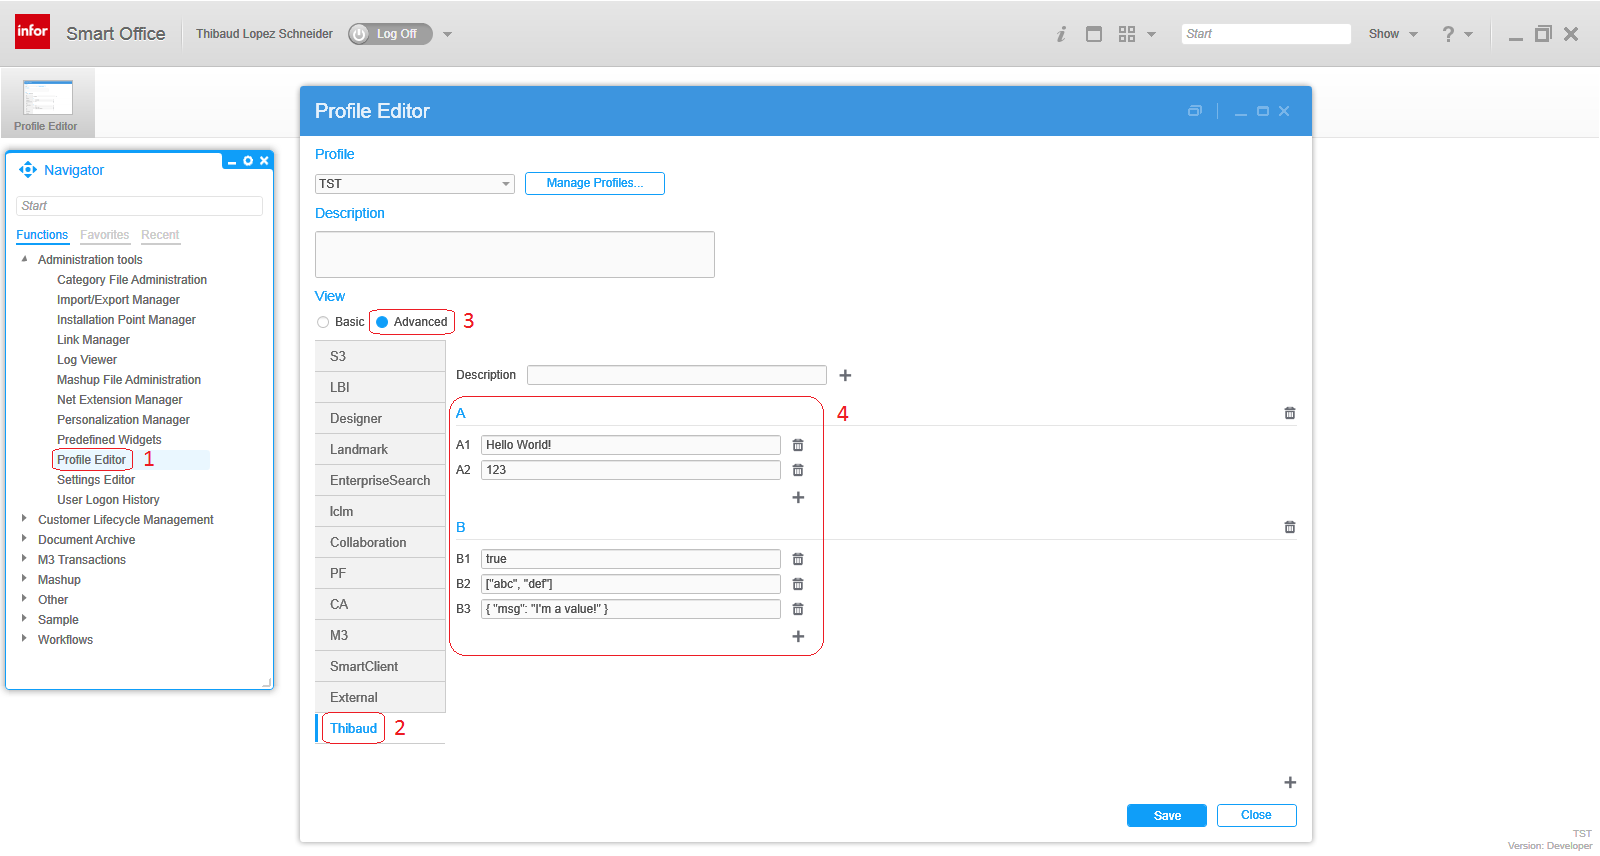
That’s it!
If you liked this, click the Follow link below to subscribe to this blog. And join the authors and share your own M3 ideas with us.
Related articles
- Add a feature to Smart Office SDK
- Hello World of Infor Smart Office SDK
- Getting started with the Smart Office SDK
- Adding settings to your feature
- Smart Office SDK – First Project Part 1 – Testing the Installation
- Smart Office SDK – First Project Part 2 – In the beginning there was nothing
- Smart Office SDK – First Project Part 3 – Rediscovering our Modification
- Smart Office SDK – First Project Part 4 – Searching for and Validating Update Methods
- Smart Office SDK – First Project Part 5 – styleTextBoxBrowse
- Smart Office SDK – First Project Part 6 – the Browse Control
- Smart Office SDK – First Project Part 7 – the Toolbar
- Smart Office SDK – First Project Part 8 – the Next, Previous, Close, the Toolbar and CommandBar – Gah!

UPDATE: You can also get the file profile.xml by calling the SOAP Web Service at http://theserver:theport/mangows/MangoProfileManager?wsdl . In SOAP UI, use the HTTP scheme (non-secure) and respective port number on the WSDL URL to create a new SOAP Project, and use the HTTPS scheme (secure) and respective port number on the endpoint to execute the web service. For input values, set the <get:GetProfilesRequest> to the string dummy. In the Auth tab at the bottom of SoapUI, set your Smart Office username/password. Click Submit to execute. The SOAP Response Body will contain a CDATA section with the profile.xml. Unfortunately you cannot use the Web service test tool of Smart Office (tool://wstest) because the returned value is XML in CDATA and it won’t show in the Output tab of the test tool.
LikeLike
I just wanted to thank you for all your ideas and information on M3. We are in the process of installing a new system and it has been a major help in getting things done. You and your efforts are very much appreciated here
LikeLike
Hi Steve. Thank you for the feedback. I appreciate when I hear back from the community, and when I meet new people. Can you share more about your process of installing a new system?
LikeLike