Get MEC properties

I need to programmatically get the properties of Infor M3 Enterprise Collaborator (MEC). How?

1

At some point I found com.intentia.ec.server.DocServer.getEcProperties(), but I do not remember if that worked or not.

I could not quickly find a solution, and eventually I found the Module MecUIServer’s Local Management Pages (ServerPropertiesPage):
22_

I decompiled it, and I learned it uses com.lawson.ec.gridui.PropertiesSourceFactory.getInstance().getProperties():
3

So that’s the answer to get the MEC properties:

import java.util.Properties;
import com.lawson.ec.gridui.PropertiesSourceFactory;

Properties props = PropertiesSourceFactory.getInstance().getProperties();
props.getProperty("mec.central.file.path"); // D:/Infor/MECDEV

Remember to check for null.

I am now using the properties I need in my mappings and custom processes.

That’s it. Thanks for reading. Please subscribe, like, share.

2015 in review

Happy New Year! Thank you for an amazing year 2015 writing and reading about Infor M3.

The goal of this blog is to create a community of software developers, technical consultants, and power users, to share ideas around Infor M3, and to motivate others to write and share and create their own blogs.

Here are some stats for 2015:

  • The blog was viewed 68,798 times in 2015, that is 40% more than 2014:
    0
  • The blog was viewed a total of 178,981 views since it started in 2011, with 517 views in its best day in June:
    1
  • We welcomed four new authors in 2015:
  • We wrote 28 posts, that is about one every two weeks
  • It is taking me longer than last year to craft each new blog post, about eight hours nowadays; I should write more, and quicker
  • We wrote mostly about Infor M3 Enterprise Collaborator (MEC), Infor ION Grid, Event Hub and Event Analytics, Infor Process Automation (IPA), M3 API, M3 Web Services (MWS), and some ideas and hacking
  • I changed the domain to m3ideas.org (from thibaudatwork) to make the blog more about the M3 community and less about me.
  • There are visitors from all countries, even countries I did not know had M3 users; Hello, Bonjour, Hej, Hola, Hallo, नमस्ते, Kumusta, Halo, ආයුබෝවන්, வணக்கம்:
    2
  • I discovered two new blogs (I put all the known blogs in the Links page):

Thank you. It would not be possible without you. Please subscribe. A like and a share would also go a long way. And if you have something to share, join us and become an author (contact me).

Infor MEC – 15 years on

In this article I am going to talk about Infor M3 Enterprise Collaborator (MEC), an integration platform that has survived for over 15 years and is still as relevant as ever.
It all started at a Swedish software company called Intentia R&D around the turn of the century. As you might remember, this was just about the time when business’ were starting to see the benefits of Internet for more than just static web pages.
At the time I was part of the e-Business team, and it was an exciting period with many new products in the pipeline, such as webshops, e-procurement, web portals and of course M3 Enterprise Collaborator, or Movex e-Collaborator as it was called then.

Our mission was, taken from the original marketing presentation, “to create a solution that enables business-to-business (B2B) e-collaboration in terms of both intra-enterprise and inter-enterprise through Application-to-Application (A2A) integration.

We needed something that were flexible enough to both support traditional EDI based B2B transactions, but would also be able to handle XML (eXtensible Markup Language), which was the new document format that everyone was talking about. A separate project was launched to develop business documents for different business processes and these where initially called MBD (Movex Business Documents), but later renamed MBM (Movex Business Message). The rumour was that MBD abbreviation had the unfortunate association with “Minor Brain Damage”, but I’m not sure if that was true or not.

The MBM documents where initially meant to be generic business documents, based on an open standard such as OAG or RosettaNet, since these were thought to gradually replace traditional text based EDI files. However, later they became based on traditional EDI in an XML format, since it appeared EDI was going to stick around for a while. Interestingly the recently launched BOD’s (Business Object Documents) are back on track with Business Process oriented documents, so perhaps we were just ahead of our time?

Although the original MEC was limited in functionality, most of the components were still the same as they are today. There was a Partner Admin tool, a Mapper and of course the runtime server. The server was running in a command window and not as a service, so someone had to always be logged in and he or she better not close that window.
The Flatfile conversion tool was the only part missing, but the functionality was still there. However, you had to manually define the XML files for each XML to flat translation.

I often hear criticism of MEC, but the fact that it is still around 15 years on, must mean that we did something right.
I think it is important to understand what MEC is and what it isn’t. The most common argument is that it is overly complicated and time consuming and that if you are a programmer you could easily write code to connect to any of the available Interfaces directly. However, I think that then you are missing the point. MEC is more than just an IDE for developing an interface.
It is the sum of its parts that makes it so powerful, and if you wanted to add the same functionality in your custom interface, you would essentially need to build another MEC.

I’m going to list some of the benefits of MEC to a custom interface and I am expecting to get some comments in line with  “you can do that with a custom interface too”, but be aware that MEC is meant to be maintained by business people, not programmers, so if it is not intuitive it is not an option.

  • Graphical mapper IDE in Eclipse, with a palette of drag-and-drop functions, such as all the available APIs (Application Programming Interface).
  • Full version control and simple process to switch between different versions of an interface (also referred to as a maps). Unlimited flexibility, since user-defined java-functions can be created within your maps.
  • Re-usable maps, which are independent of M3 ERP version and can be imported/Exported to multiple environments.
  • Complete Administration, Maintenance and Monitoring platform, where the status and content of each transaction can be easily viewed and appropriate action taken if necessary.
  • A Partner Agreement tool that allows you to define specific workflows and communication requirements for individual partners. It also helps you organize and group all your different integrations in a logical manner.
  • A full set of predefined process steps at your fingertips, including but not limited to ION integration, a Document Asset Management integration, XSL transformations as well as multiple communication protocols for receiving and sending.
  • Already used successfully by a large customer base and developed over 15 years for stable and secure High-Availability, High-Performance and High-Throughput.

The list could go on, but I think the benefits above is enough to expected MEC to be here for some time to come.

Hope you enjoyed reading this article and please feel free to comment or contact me if you have any questions.

Rich HTML output from MEC

Here is a technique to give custom, rich, interactive, and user-friendly HTML responses to the users of Infor M3 Enterprise Collaborator (MEC), instead of giving them classic HTML, XML, or email responses.

Scope

MEC is an EAI tool that takes input messages, processes them, and produces output messages. I will only focus on interactive scenarios where the user needs an immediate response from MEC. I will only focus on the HTTP channels of MEC. I will assume we already have a request, and I will only focus on the HTML response. So this is a pretty specific scope of use. Note I have not been to a MEC training so my results by trial and error may not be optimal.

Classic responses

Canned response

By default, the HTTPIn channel of MEC produces this minimalist HTML response, with no piece of identifiable data about what it is referring to, no explanation of what “successfully processed” means – there could actually be a failure behind – it is just a basic acknowledgment of receipt, misspelled:

e-Collaborator HTTP Reply
The request was succesfully processed
e-Collaborate!

Custom XML response

With the HTTPSyncIn + HTTPSyncOut channels we can produce a custom response, typically in XML because MEC is XML-centric. In there, we can put identifiable data, and a detailed explanation. I illustrated this scenario in my previous post HTTP channels in MEC (part 3). But XML is not user-friendly thus not suitable for users.

Email response

Many developers setup their MEC agreements to send responses as emails to their users. However, 1) if a user takes an action that merits an immediate response from MEC, receiving an email disrupts the user context, 2) sending emails worsens mailbox pollution, 3) and most email clients block HTML and JavaScript features, thus thwarting interactivity. I prefer to show an HTML page as the primary confirmation, and optionally the email as the secondary confirmation.

Desired HTML response

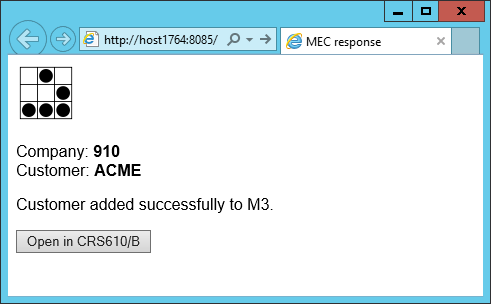
My desired response is dynamic HTML from MEC. To it, I will add images and CSS for beautification, and JavaScript to manipulate the page dynamically. I will reflect the input identifiers onto the output as a feedback loop for the user. I will craft a format that is easy for the user to understand. I will put a detailed message of the processing’s result. And I will add buttons for the user to interact with the result in M3. Here is my example:

Here is my desired dynamic HTML output from MEC. I recommend using HTML5 instead of HTML4 to avoid the quirks:

<!DOCTYPE html>
<html>
   <head>
     <title>MEC response</title>
     <link rel="stylesheet" type="text/css" href="http://host1623:22107/mne/Test.css" />
   </head>
   <body>
     <img src="http://host1623:22107/mne/Test.png" alt="Test" />
     Company: <span id="CONO">910</span>
     Customer: <span id="CUNO">ACME</span>
     Customer added successfully to M3.
     <input id="btn" type="button" value="Open in CRS610/B" />
     <script type="text/javascript" src="http://host1623:22107/mne/Test.js"></script>
   </body>
</html>

Note: for an explanation of that /mne/ path, see the chapter further below about static files.

Here is my static CSS file, Test.css:

body { font-family: sans-serif }
span { font-weight: bold }

Here is my static JavaScript code, Test.js. It opens the customer record in CRS610/B. For that, it uses the Infor Smart Office Installation Point URL, the task parameter [1] and an MForms Bookmark URI [2]:

btn.addEventListener("click", function () {
   var CONO = document.getElementById("CONO").innerText;
   var CUNO = document.getElementById("CUNO").innerText;
   var isoUrl = "http://host1762:22107/mango/MangoClient.application?server=https://host1762:22108";
   var bookmarkUri = "mforms://bookmark/?program=CRS610&tablename=OCUSMA&keys=" + encodeURIComponent(["OKCONO", CONO, "OKCUNO", CUNO]);
   var url = isoUrl + "&task=" + encodeURIComponent(bookmarkUri);
   window.open(url, "_blank");
});

Note 1: You can use anchors <a> instead of buttons if you prefer.

Note 2: You can replace Smart Office by H5 Client if you prefer.

Unsuccessful attempts

I originally tried to produce the HTML output directly from MEC Mapper.

For that, I imported the XHTML 1.0 Strict XML Schema, but MEC Mapper tripped on <xs:import schemaLocation=”…xml.xsd”/>:

I removed it from the XSD and tried again, but then MEC Mapper tripped on <xs:attributeGroup ref>:
3_

I removed them all from the XSD and tried again, but then MEC Mapper added the document elements as a recursive list of all the possible elements and attributes of HTML, even the ones I did not need and the optional ones, with no flexibility to change:

Instead, I created a minimalist XSD for my sample HTML, but MEC Mapper deleted the values of my attributes, even if I enforced them in the XSD <xs:attribute>:

Then I tried to restore my attribute values with a Java function, but that quickly became un-maintainable for a large HTML document with frequent changes:
6_

And each time I change the XSD, I have to do the cycle of delete/un-publish/save/generate/publish/add/reload/activate [3], and it is too overwhelming for short development cycles.

Too complicated.

FAIL

ABORT

Back to XML

I will revert my mapping back to XML output:

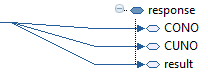
Here is the desired XML output:

<?xml version="1.0"?>
<response>
   <CONO>910</CONO>
   <CUNO>ACME</CUNO>
   <result>OK</result>
</response>

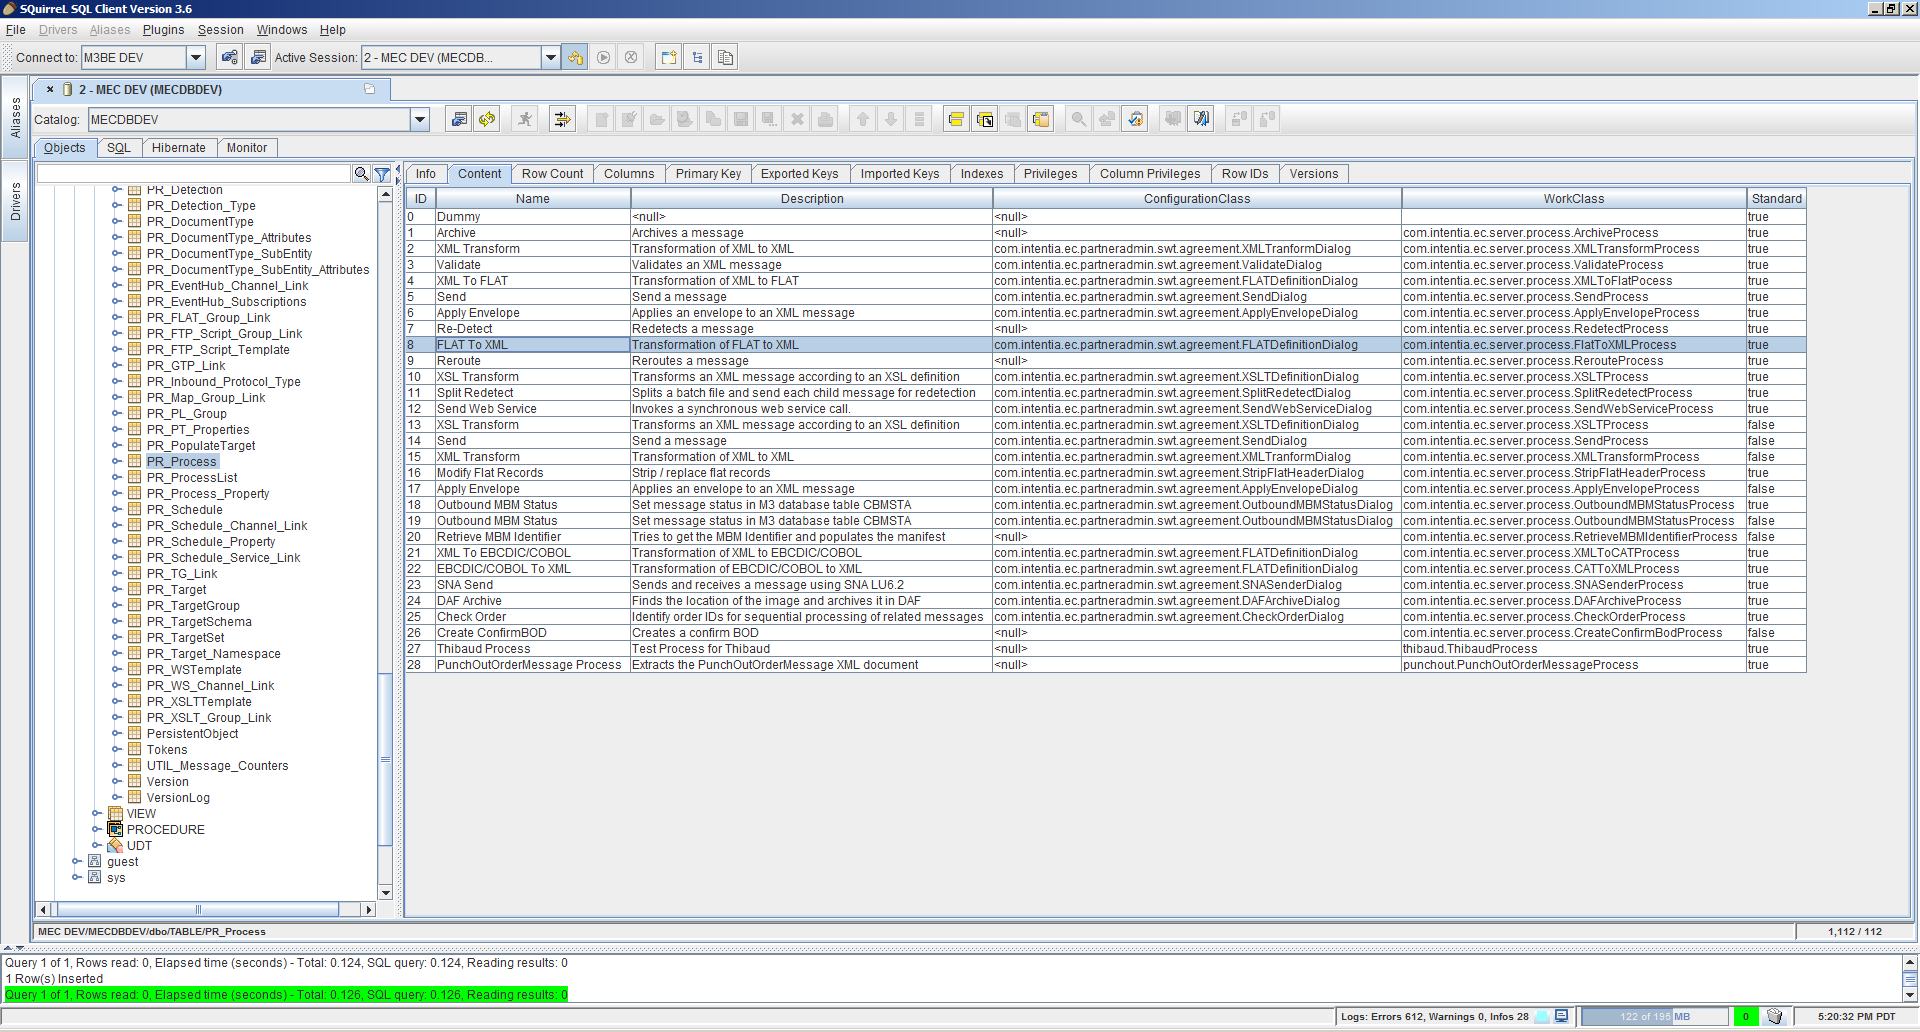
As usual, to create the XSD, I use Microsoft SDK’s xsd.exe, I remove the Byte Order Mark (BOM), I remove the NewDataSet, and I import the resulting XSD in MEC Mapper.

Here is the output in MEC Mapper:

The result will be XML.

XSL Transform

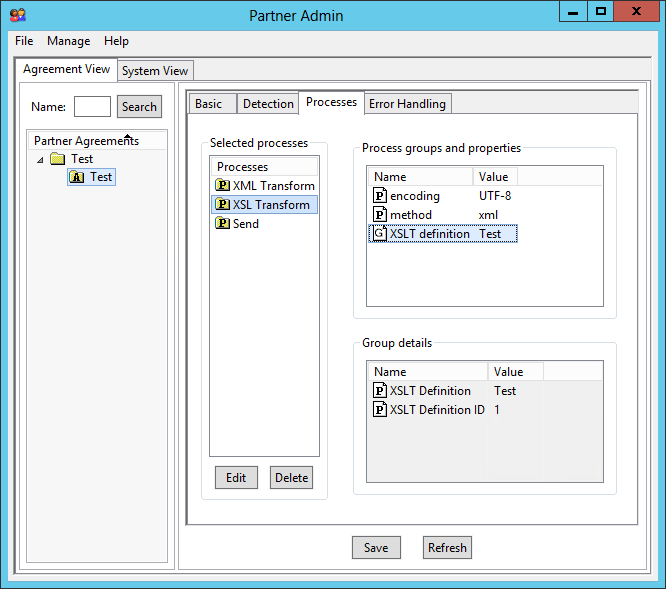
I will use XSL Transformations (XSLT) to transform the XML into HTML. For that, create the XSLT file with your favorite editor, go to Partner Admin > Manage, and add an XSLT Definition:
14_

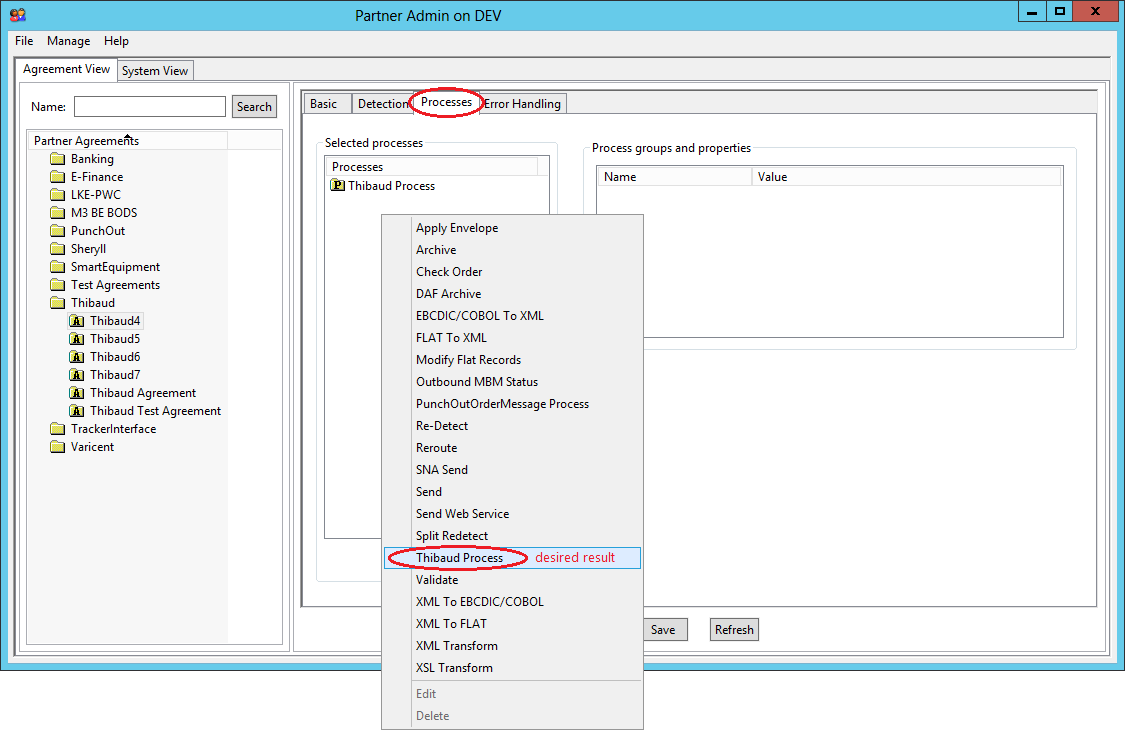
Then go to your agreement > Processes, add an XSL Transform process between XML Transform and Send, and set it to the XSLT Definition:
8

Here is a subset of my XSLT (the complete version includes the rest of the HTML):

<?xml version="1.0"?>
<xsl:stylesheet version="1.0" xmlns:xsl="http://www.w3.org/1999/XSL/Transform">
<xsl:output method="html" doctype-system="about:legacy-compat" encoding="UTF-8" indent="yes" omit-xml-declaration="yes" />
   <xsl:template match="/response">
     <html>
       <body>
         Company: <xsl:value-of select="CONO" />
         Customer: <xsl:value-of select="CUNO" />
         <xsl:choose>
            <xsl:when test="result='OK'">Customer added successfully to M3.</xsl:when>
            <xsl:otherwise>Error: <xsl:value-of select="result" /></xsl:otherwise>
         </xsl:choose>
       </body>
     </html>
   </xsl:template>
</xsl:stylesheet>

The result will be HTML.

Note 1: I use a choose-when-otherwise to display the success and error message differently.

Note 2: I set the xsl:output properties like doctype and omit-xml-declaration in the XSLT file itself, because if I set them in the XSL Transform process properties in Partner Admin then there is no or an incorrect effect (MEC bug?).

Send

Set the Send process in the agreement to Content-type text/html:

Static files

As per the basic rules of web pages, I will make the CSS and JavaScript external, with the CSS at the top and scripts at the bottom.

We can put the static files (images, CSS, JavaScript) on any web server of our choice. I did not find a generic web server in MEC, so for now I put the files in the M3 UI Adapter (MUA) folder at \\host1623\D:\Infor\LifeCycle\?\grid\?\grids\?\applications\M3_UI_Adapter\webapps\mne\, and the files are now accessible at http꞉//host1623:22107/mne/ (I will move them to a sub-folder later):

Note: I had originally put the files in the Smart Office MangoServer webapp that serves the ISO Installation Point (IP) at \\host1762\D:\Infor\LifeCycle\?\grid\?\grids\?\applications\MangoServer\Client\IP\ but the server returned the JavaScript as an attachment, and the browser downloaded the JavaScript file instead of executing it. So I moved them to the mne folder which returns the correct content type.
Incorrect:
Content-Disposition: attachment; filename=Test.js
Content-Type: application/x-download

Correct:
Content-Type: application/x-javascript

Then, set the URLs accordingly in the HTML:

<link  href="http://host1623:22107/mne/Test.css".../>
<img    src="http://host1623:22107/mne/Test.png".../>
<script src="http://host1623:22107/mne/Test.js".../>

Result

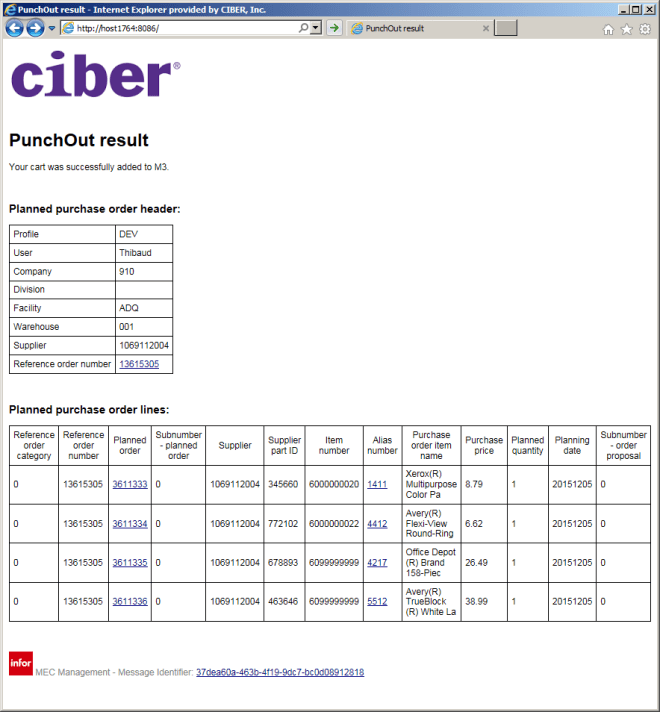
You can now test the result. MEC will produce XML and will use XSLT to transform the XML into HTML, the browser will get the HTML and will follow the links to get the static files and render the result, and the user will see a nice HTML page that it can interact with.

Here is the result for one of my customers, and it is coming straight from MEC; users love it, they can click on the links to open the records in Smart Office, they can print it, save it as PDF, etc.:

What about you

If you have an existing MEC mapping/agreement that produces XML, and you want to get this HTML solution:

  1. Create the static files (images, CSS, JavaScript) and place them somewhere in a web server
  2. Create the XSLT file that transforms the XML into HTML, set the URL of the static files accordingly, and add the XSLT to the Partner Admin > XSLT Definitions
  3. Add an XSL Transform process to your agreement (between XML Transform and Send), and set the Send content type to text/html

There is nothing to change in the MEC mapping. There is no server to reload.

Maintenance

With this design we have separation of concerns between data, presentation, and control, and it is easier to maintain than my original idea to do HTML output from the mapping:

  • XML: maintain the XML as usual in MEC Mapper
  • Static files (images, CSS, JavaScript): update the files with your favorite editors, and save them directly to the file system
  • XSLT/HTML: update the file with your favorite editor, save directly to the file system, and update the XSLT Definition
  • XSLT Definition: in the Partner Admin, delete the XSL Transform from the agreement and save it, select the new XSLT file in the XSLT Definition, re-add the XSL Transform to the agreement and save

Each step can be maintained individually by the same developer or by separate developers.

Note: MEC is not collaborative for developers, so if two developers are working on the same agreement in MEC Partner Admin (e.g. one maintaining the XML Transform, the other maintaining the XSL Transform) then the agreement will be corrupted.

Future work

There is more work to be done:

  • Move the static files to another web server (who knows what will happen to the mne folder with upgrades of M3)
  • Select the environment dynamically for the Smart Office Installation Point (DEV, TST, PRD)
  • Set the text to the local language (English, Swedish, French, etc.)
  • Get the column headings (CONO, CUNO, etc.) from the M3 language constants using the M3 translate API [4] instead of hard-coding the values
  • Implement the Post/Redirect/Get pattern to avoid duplicate form submission when users click the back button, and to not sanction users that save the page in the browser bookmarks
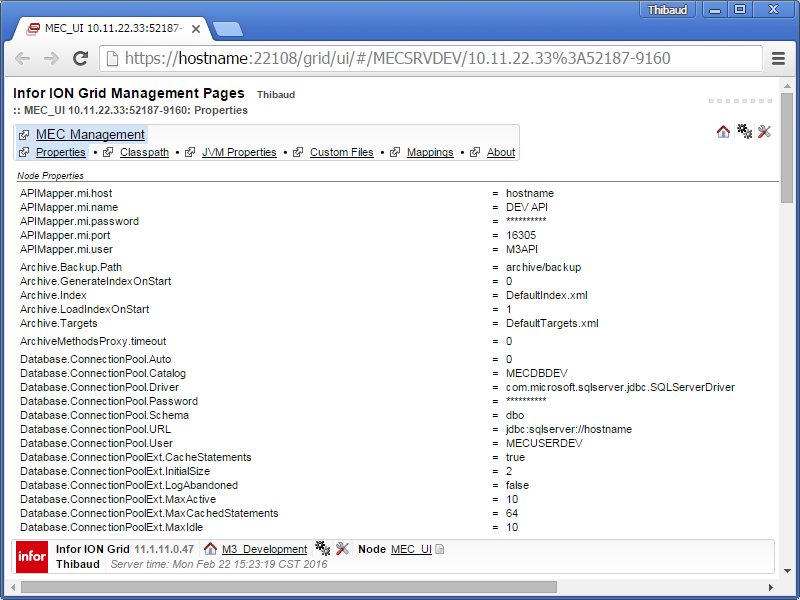
  • For easy cross-reference to the MEC Management log files, output the manifest UUID to the XML output using the Java method com.intentia.ec.mapper.Mapping.getManifestInfo(“UUID”), and add a link to it in the HTML with the href to https://host1764:22108/grid/ui/#com.lawson.ec.gridui.page.MessageDetailPage/MECSRVDEV?uuid/xxxxxxxx-xxxx-xxxx-xxxx-xxxxxxxxxxxx
  • One time I received the error “Internet Explorer has modified this page to help prevent cross-site scripting” (it is related to the same origin policy of browsers), but I have not been able to reproduce it. Otherwise it is working fine with my URLs spread across three hosts. To be troubleshot.

Conclusion

That was my solution for MEC to give custom, rich, interactive, and user-friendly HTML responses to the users. This is useful where the user needs an immediate response. All you have to do is add the XSL Transform and the static files without touching the existing mapping. In most of the cases, the classic responses – canned response, XML, or email – are sufficient.

That’s it! Special thanks to my colleague Sheryll Limmex for the help with the MEC mapping.

What solution did you design? Let me know in the comments below.

How to call M3 API from Pentaho Spoon (PDI)

HI, I am Walter. This is my first post in this blog which was usefull just more than once for me in past … now I want to contribute something also from my side…

In past I have done a lot of data exports and imports via M3API over VBA in Excel. This works fine too, but this has 2 problems:

  1. you have to pay attention if you share the files (security)
  2. there are no good practicable solution for automation of the scripts

In past I have done a lot of work also with data integration tools, one of the most used is Pentaho Spoon (PDI). So I startet some investigation of how to integrate M3 API with PDI. This is a short how to call M3 API using the data integration tool Pentaho Spoon (ex. Kettle), also known as Pentaho PDI.

Data integration tools are usefull for extracting, manipulating and writing data from and to different in and outputs.

pdi-screen2

In this example I use Kettle to extract Customerdata, transform it and save it in a csv file.

Pentaho Spoon is a very powerful tool, is based on a opensource licence and the community edition can be downloaded here. The package is platform independent and the transformation files can be build in Windows, and used on a Linux environemnt or viceversa. Probably only some path variables must be changed.

Preparation

This example is based on windows environment, but the same can be done without any problems also on Linux environment.

  1. Download the Pentaho PDI package from the link above. Unzip the package and copy/paste the folder where every you want. For example directly under C:\
  2. You need a newer version of API Toolkit where also java library is available. All you need for this example is the library MvxAPI.jar which normally is located in the MvxAPI Folder.
  3. Copy the MvxAPI.jar lib to the lib Folder of Pentaho PDI, normally located in the data-integration folder.
  4. Start Pentaho PDI

Lets start

The target is to read data from M3 via the M3 API. For this purpose we use the Java library. Pentaho PDI uses graphical transformation steps which help you to create a data transformation. For some of this steps it needs also little bit of programming knowledge. But don’t worry, there are many examples in the MvxAPI package about calling M3 API via Java. And also for Pentaho PDI there are many examples for each transformation step.

For calling M3 API via PDI we use the transformation step “User Defined Java Class” (UDJC)

pdi_java2

In total for this example I have used 6 different transformation steps:

  1. Get Variables – call variables from kettle.properties file located under your home/.kettle directory
    sysvar
  2. User defined Java Class – Call API and forward all retrieved records to next step.
  3. Strings cut – split the API stream in individual fields.
  4. Select values – filtering of columns which should be forwarded to next step.
  5. Trim – trim the blanks before and after the column values.
  6. Text file output – write the selected and cleaned values in a csv file.

It looks like this now:

trans

As just explained you need to make some java development in the UDJC (User defined java class) step. Here is my piece of cake:

import java.util.regex.Pattern;
import java.util.*;
import MvxAPI.*;

private Pattern p = null;
private FieldHelper fieldToTest = null;
private FieldHelper outputField = null;

private ArrayList keys = null;
private int idx = 0;

MvxSockJ obj2;
int i, j, x;
String str,str2;
String sendstr;
double ver;
String test, MvxERR;

public boolean processRow(StepMetaInterface smi, StepDataInterface sdi) throws KettleException
{
//Initialize rows
Object[] r = getRow();
if (r == null) {
setOutputDone();
return false;
}

//assign system variables from previous step (kettle.properties)
String M3_System = get(Fields.In, “M3_System”).getString(r);
int M3_Port = get(Fields.In, “M3_Port”).getInteger(r).intValue();
String M3_User = get(Fields.In, “M3_User”).getString(r);
String M3_Pass = get(Fields.In, “M3_Pass”).getString(r);

//Create new row output
r = createOutputRow(r, data.outputRowMeta.size());

/**
* Setup communication parameters for M3
*/
//open the connection with system variables forwarded from previous step
obj2=new MvxSockJ(M3_System, M3_Port, “”, 0, “”);

obj2.DEBUG = true; // Have MvxSockJ print out debug info

//Call the MI with user and pass forwarded from previous step
i = obj2.mvxInit(“”, M3_User, M3_Pass, “CRS610MI”);

if(i>0) {
get(Fields.Out, “error”).setValue(r, “Error: ” +obj2.mvxGetLastError());
putRow(data.outputRowMeta, r);
return true;
}

ver=obj2.mvxVersion();
get(Fields.Out, “version”).setValue(r, ver);

/**
* Build the transaction
*/
sendstr = “LstByNumber    1            “;

//Set max records
str=obj2.mvxTrans(“SetLstMaxRec   50          “);

//Run the transaction
str=obj2.mvxTrans(sendstr);

if(str.startsWith(“NOK”)) {
get(Fields.Out, “error”).setValue(r, “Error:” +str);
}

x=0;

if(str != null) {
while (str.startsWith(“REP”)) {
x=x+1;
/**
* This prints out the whole returned string without trying to
* extract particular fields from the layout.
*/

// Set key and value in a new output row
get(Fields.Out, “crs610_stream”).setValue(r, str);
get(Fields.Out, “idx”).setValue(r, x);

// Send the row to the next step.
putRow(data.outputRowMeta, r);
str=obj2.mvxRecv();
}
}
else
get(Fields.Out, “error”).setValue(r, “Error: ” +obj2.mvxGetLastError());
putRow(data.outputRowMeta, r);
i=obj2.mvxClose(); // close connection
return true;
}

The class is calling the CRS610MI and reads the first 50 records. This records are forwarded then to the next step.

At the end the of the transformation the output is saved in the file C:\TEMP\crs610.csv

The whole transformation with all contained steps will be saved in a file with .ktr extension. Here you can download the example file! You have to accept the self signed certificate. Don’t worry, there is no risk 😉

Conclusion

After a short time of investigation I was able to build a really performant transformation. For reading, transforming and writing up to 10.000 records the transformation it needs less the 30 seconds. In my eyes a good performance.

Clearly you can do all what do you want with the data, save in another database, combine the data with additional datasources, save in Excel or send to another server via REST, SOAP, JSON webservice, or whatever is your requirement.

If you are not familiar with Pentaho PDI (Spoon) there are many How to’s in the web, in the Examples folder are many examples which gives you an idea how to work with PDI.

And for me the most important function that the transformation can be scheduled in combination with “Kittchen”, which is also part of Pentaho PDI.

Next steps

My next target is to write data via API in M3 using PDI. I will keep you updated about it. Hope this is may usefull for somebody of you! Let me know.. if you have any questions let me know.

Thank you,
Walter

M3 API protocol dissector for Wireshark

Have you ever needed to troubleshoot M3 API calls in Wireshark? Unfortunately, the M3 API protocol is a proprietary protocol. Consequently, Wireshark does not understand it, and it just gives us raw TCP data as a stream of bytes.

Abstract

I implemented a simple protocol dissector for Wireshark that understands the M3 API protocol, i.e. it parses the TCP stream to show the M3 API bytes in a human-readable format, with company (CONO), division (DIVI), user id (USID), and MI program (e.g. CRS610MI). The dissector is currently not complete and only parses the MvxInit request phase of the protocol.

Reverse engineering

I reverse engineered the M3 API protocol thanks to MvxLib, a free and open source client implementation of the protocol in C# by Mattias Bengtsson (now deprecated), and thanks to MvxSockJ, the official and closed-source client implementation of the protocol in Java (up-to-date).

3 2

MvxInit

The MvxInit phase of the protocol is the first phase of the protocol for connection and authentication, and it has the following structure:

struct MvxInit
{
   struct request {
      int size;
      char Command[5]; // PWLOG
      char CONO_DIVI[32];
      char USID[16];
      char PasswordCiphertext[16]; // password ^ key
      char MIProgram[32]; // e.g. CRS610MI
      char ApplicationName[32]; // e.g. MI-TEST
      char LocalIPAddress[16];
   };
   struct response {
      int size_;
      char message[15];
   };
};

Wireshark Generic Dissector

I used the Wireshark Generic Dissector (wsgd) to create a simple dissector. It requires two files: a data format description, and a file description.

The data format description m3api.fdesc is very similar to the C struct above, where the header is required by wsgd:

struct header
{
   byte_order big_endian;
   uint16 id;
   uint16 size;
}
struct body
{
   struct
   {
      uint32 size;
      string(5) Command;
      string(32) CONO_DIVI;
      string(16) USID;
      string(16) PasswordCiphertext;
      string(32) MIProgram;
      string(32) ApplicationName;
      string(16) LocalIPAddress;
   } MvxInit;
}

Given the limitations of wsgd and its message identifier, I could not solve how to parse more than one type of message, so I chose the MvxInit request, and the rest will throw errors.

I made a test M3 API call to M3BE, I captured it in Wireshark, and I saved the TCP stream as a binary file (I anonymized it so I can publish it here):

Then, I used wsgd’s byte_interpret.exe (available on the wsgd downloads), using that test binary file, to fine tune my data format description until it was correct:
byte_interpret.exe m3api.fdesc -frame_bin Test.bin

Then, here is the wsgd file description m3api.wsgd; note how I listed the TCP port numbers of my M3 API servers (DEV, TST, PRD):

PROTONAME M3 API protocol
PROTOSHORTNAME M3API
PROTOABBREV m3api

PARENT_SUBFIELD tcp.port
PARENT_SUBFIELD_VALUES 16305 16405 16605 # DEV TST PRD

MSG_HEADER_TYPE header
MSG_ID_FIELD_NAME id
MSG_SUMMARY_SUBSIDIARY_FIELD_NAMES size
MSG_TOTAL_LENGTH size + 4
MSG_MAIN_TYPE body

PROTO_TYPE_DEFINITIONS
include m3api.fdesc;

To activate the new dissector in Wireshark, simply drop the wsgd generic.dll file into Wireshark’s plugins folder, and drop the two above files into Wireshark’s profiles folder:

Then, restart Wireshark, and start capturing M3 API calls. Wireshark will automatically parse the TCP stream as M3 API protocol for the port numbers you specified in the data format description.

Result

Here is a resulting capture between MI-Test and M3BE. Note how you can filter the displayed packets by m3api. Note how the protocol dissector understands the phase of the M3 API protocol (MvxInit), the company (CONO), division (DIVI), user id (USID), and MIProgram (CRS610MI). Also, I wrote C code to decrypt the password ciphertext, but I could not solve where to put that code in wsgd, so the dissector does not decrypt the password.

Limitations and future work

  • I am using M3BE 15.1.2. The M3 API protocol may be different for previous or future versions of M3.
  • I am doing user/password authentication. The M3 API protocol supports other methods of authentication.
  • Given the limitations of wsgd and its message identifier, I will most likely discontinue using wsgd.
  • Instead, I would write a protocol dissector in LUA.
  • Ideally, I should write a protocol dissector in C, but that is over-kill for my needs.

Conclusion

That was a simple M3 API protocol dissector for Wireshark that parses and displays M3 API bytes into a human readable format to help troubleshoot M3 API calls between client applications and M3 Business Engine.

About the M3 API protocol

The M3 API protocol is a proprietary client/server protocol based on TCP/IP for third-party applications to make API calls to Infor M3 Business Engine (M3BE). It was created a long time ago when Movex was on AS/400. It is a very simple protocol, lean, efficient, with good performance, it is available in major platforms (IBM System i, Microsoft Windows Intel/AMD, SUN Solaris, Linux, 32-bit, 64-bit, etc.), it is available in major programming languages (C/C++, Win32, Java, .NET, etc.), it supports Unicode, it supports multiple authentication methods, and it has withstood the test of time (since the nineties). It has been maintained primarily by Björn P.

The data transits in clear text. The protocol had an optional encryption available with the Blowfish cipher, but that feature was removed. Now, only the password is encoded with a XOR cipher during MvxInit. If you need to make secure calls, use the M3 API SOAP or REST secure endpoints of the Infor Grid.

For more information about M3 API, refer to the documentation in the M3 API Toolkit:
4

More interfaces

If you need to integrate Infor M3 with any of the following interfaces, here are most of the interfaces with which I have worked in the past two years for which I have not posted anything on this blog yet, and for which I may be able to help you if you have questions (contact me here). For that, I used a variety of Enterprise Collaborator, Smart Office scripts, and other code.

Also, check-out the other interfaces I have worked with.

Authorization hierarchies for approval flows in M3

Today I will illustrate authorization hierarchies for approval flows in Infor M3.

Approval flows

A common requirement in M3 projects is to implement approval flows, for example for purchase orders; where a buyer creates a purchase order of a certain amount; where one or more approvers must review the order, and either approve it, one approver after the other, either reject it for some reason; and where the approvers are selected from a hierarchy of managers and their maximum order amount.

There are many variations of these approval flows, each being specific to the requirements of the M3 project. Here is a simple approval flow with a single approver:
Approval flows get complex quickly, with many decisions to take, many levels of approval to have, many design trade-offs to consider, and all sorts of scenarios to support.

Infor Process Automation

To implement the approval flows we use Infor Process Automation (IPA). We can also use the former Lawson ProcessFlow Integrator (PFI). As for Infor ION, it is the new standard for implementing M3 approval flows, but its usage for M3 is still young, and it does not yet have as many features as IPA does.

M3 Purchase Authority – PPS235

To store the hierarchy of approvers and their maximum order amounts, we use the program M3 Purchase Authority – PPS235. It stores the user (AURE), the maximum order amount this user is authorized to approve (MPOA), and their manager who is the next level for authorization (MNGR). For orders that exceed this amount, authorization is required by a user with authorization rights for a higher amount.

1

Huh?

I am not an expert on PPS235, but it looks like it does not enforce integrity, and it is not in normal form, and that can result in logical inconsistencies.

Indeed, the hierarchy of managers and maximum order amount may contradict each other. For instance, PPS235 allowed me to set a user whose maximum order amount was higher than that of its manager, in which case routing the approval to that manager will result in a logical anomaly.

Also, there is a field to set the user’s authorization level (AUTL) which results in an alternate hierarchy of approvers, and PPS235 allowed me to enter illogical values there too.

That results in several possible hierarchies: either based on the managers, either based on the maximum order amounts, either based on the authorization levels, all possibly contradicting each other.

Also, PPS235 erroneously allows cycles in the hierarchy. For instance, it allowed me to set a user to be the manager of its manager. This will cause an infinite loop in the graph traversal.

Also, users can be unreachable if there does not exist a connection to that user in the hierarchy.

There is probably a logical explanation for these design decisions. Meanwhile, you must ensure the integrity of your data before proceeding.

MPAUTD

The data of PPS235 is stored in table MPAUTD – Authorization distribution as an adjacency list of users and their managers, for example:

AURE MNGR
Marie Eric
Keith Daniel
Eric Daniel
Charles Daniel
John Daniel
Daniel Joe
Joe Jeff

The resulting tree looks something like this (I use Graphviz to visualize the hierarchy and ensure it is correct):
input

To retrieve the hierarchy of managers for a certain user we traverse the adjacency list recursively using SQL’s common table expressions (CTE), for example for user Marie and for a purchase order in company 100:

WITH CTE AS (
SELECT ATCONO, ATAURE, ATMPOA, ATMNGR FROM MPAUTD WHERE ATCONO=100 AND ATAURE='Marie'
UNION
SELECT M.ATCONO, M.ATAURE, M.ATMPOA, M.ATMNGR FROM MPAUTD M JOIN CTE C ON M.ATCONO=C.ATCONO AND M.ATAURE=C.ATMNGR
)
SELECT ATAURE FROM CTE
ORDER BY ATMPOA

That results in the hierarchy of approvers and their maximum order amount starting at the specified buyer:
output

You can now create a loop of UserAction activity nodes in IPA to iterate thru that hierarchy. Here is an excerpt (you will need to add the SQL activity node and everything else that may be needed; you can also use the new ForEach activity node instead of my loop with an if-then-else Branch):
x

Conclusion

That was a quick illustration of authorization hierarchies for approval flows for purchase orders in M3, more specifically how to store the hierarchy of approvers in PPS235, how to recursively query it from MPAUTD, and how to do a loop of UserAction activity nodes.

(I meant to write about this many years ago. I finally got around to doing it after I learned how to do the recursive SQL portion for a customer last week. I hope it helps you.)

Forums

New M3 forums on PotatoIT 👍🏻

potatoit's avatarPotato IT

Some of you will have noticed a few changes recently…a new font for the site 🙂

And a new domain…and the purpose of this post – a page which will take you to some development forums (http://forum.potatoit.kiwi).

For quite some time I’ve wanted to create some M3 development specific forums or a mailing list as a nice and convenient way for people to ask quick questions or to share experiences around developing for M3.

I entertained the idea of dropping it on to my server at home, but as you can see from the photo below – home based servers have a tendency to get overwhelmed by dust puppies though mine hasn’t quite gone that far, it’s just a matter of time.  Not to mention that during summer my office gets pretty warm – not exactly lending confidence in the life expectancy of the drives.

Server

I also considered setting…

View original post 119 more words

Custom message process in MEC

Here is an unofficial guide on how to create a custom message process in Infor M3 Enterprise Collaborator (MEC).

What is a message process?

A message process in MEC is one of the steps in a process flow. Technically speaking, it is a Java class that reads a stream of bytes as an input, does some processing on it, and writes a stream of bytes as an output, for example transform a flat file to XML, apply XSLT to an XML, remove an envelope, archive the message, or make a SOAP request. Message processes are chained together in a partner agreement in the Partner Admin Tool.

2_

Documentation

The Partner Admin Tool User Guide has some information about message processes:
1__

Java classes

The message processes are Java classes located in MEC’s core library:

D:\Infor\LifeCycle\host\grid\M3\grids\M3\applications\MECSRVDEV\MecServer\lib\ec-core-x.y.z.jar

Each message process is a Java class in package com.intentia.ec.server.process:4

Each message process may have a configuration dialog box in package com.intentia.ec.partneradmin.swt.agreement: 3

Database

The message processes are declared in the MEC database in table PR_Process:
5

Java code

To create your own message process follow these steps:

  1. Use the following skeleton Java code, fill with your code, set the file extension for the output message (in my example it is .something), use the in input and out output streams to process the message as you need, and eventually use the cat logger to write debug info in the log file:
    package somewhere;
    
    import java.io.InputStream;
    import java.io.OutputStream;
    import org.apache.log4j.Category;
    import com.intentia.ec.server.process.AbstractProcess;
    import com.intentia.ec.server.process.ProcessException;
    
    public class SomeProcess extends AbstractProcess {
    
      private static Category cat = Category.getInstance(SomeProcess.class.getName());
    
      public String getState() {
        return "SomeProcess";
      }
    
      public boolean hasOutput() {
        return true;
      }
    
      public String getFileExtension() {
        return ".something";
      }
    
      public void process(InputStream in, OutputStream out) throws ProcessException {
        // your code here
        cat.info("processing...");
      }
    
    }

    Note: I do not have a sample code for the dialog box, but you can get inspiration from one of the existing classes in package com.intentia.ec.partneradmin.swt.agreement.

  2. Compile the Java code with:
    javac -extdirs D:\Infor\LifeCycle\host\grid\M3\grids\M3\applications\MECSRV\MecServer\lib\ SomeProcess.java
  3. Copy the resulting Java class to the classpath of the MEC server and Partner Admin Tool, in the folder corresponding to the package (in my case it was package somewhere):
    D:\Infor\LifeCycle\host\grid\M3\grids\M3\applications\MECSRV\MecServer\custom\somewhere\SomeProcess.class
    D:\Infor\MECTOOLS\Partner Admin\classes\somewhere\SomeProcess.class

    Note: You can probably also put the Java class in a JAR file; to be tested.

  4. In the MEC database, add the process to the PR_Process table, where ?? is a new ID, for example 27:
    INSERT INTO MECDBDEV.dbo.PR_Process (ID, Name, Description, ConfigurationClass, WorkClass, Standard) VALUES (??, 'Thibaud Process', 'My custom message process', null, 'somewhere.SomeProcess', 1)
  5. In the Infor Grid, restart the MECSRV application to pick up the new Java class:
    6
  6. In the Partner Admin Tool, create a partner agreement and add the message process:
    2
  7. Reload the MEC server to pick up the new agreement:
    7
  8. Run the partner agreement, for example I have a channel detection with a HTTPIn receive channel listening on port 8084, and I make an HTTP request to that port number to trigger the partner agreement.
  9. Check the message received (.rcv) and the message produced (in my case it was extension .something); for that, you will need one Archive process in your partner agreement, before and after your custom process:
    128
  10. You can also open the files directly in the folder specified:
    11
  11. And if you used the logger, you can check your logs in the Event tab:
    10

Real-world example

In my case, I needed a custom message process for the following real-world scenario. My current customer does Procurement PunchOut with its partners using cXML, an old protocol from 1999. In that protocol, there is a step (PunchOutOrderMessage) that sends an XML document in a hidden field cxml-urlencoded of an HTML form. That results in a POST HTTP request (to MEC) with Content-Type: application/x-www-form-urlencoded, with the XML document that is URL-encoded as a value of parameter cxml-urlencoded in the request body. Unfortunately, MEC does not have a message process to extract a specific parameter value of a message, and URL-decode it. So I developed my custom message process as explained above, to take the request body, extract the desired parameter value, URL-decode it, and output the resulting XML. I may write a detailed post about it some day, maybe not.

Conclusion

That was a guide on how to create a custom message process in MEC, doing Java development, to take an input message in a partner agreement, do some custom processing on it, and produce an output message. This is an unofficial solution that I figured out by de-compiling and hacking MEC. There may be a simpler solution, I do not know.

That’s it! Thank you for supporting this blog, please like, subscribe, share around you, and come author the next blog post with us.